
From the blue dress/white dress controversy to the ongoing saga of the pizza rat(s) — hundreds of moments have purported to “break the internet.”
However, there’s just one platform upon which a huge percentage of the entire internet is built.
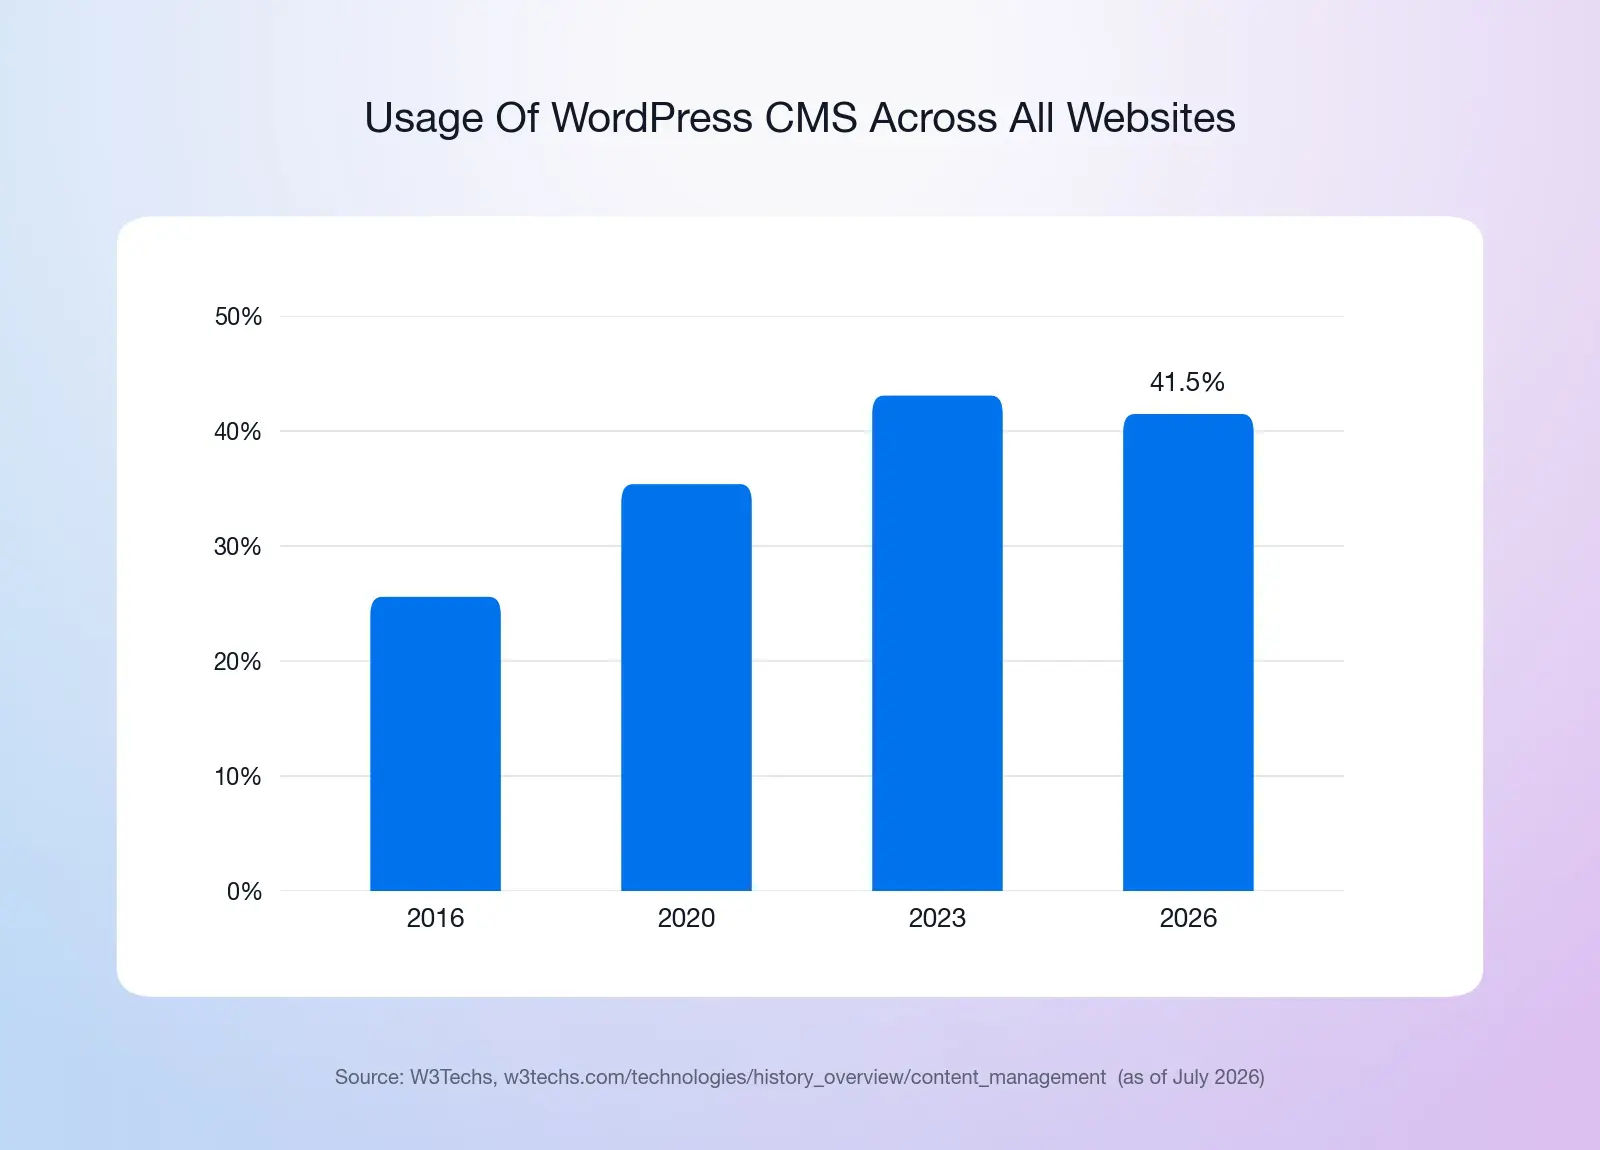
As of July 2026, WordPress powers about 41.5% of all websites around the world, per W3Techs.
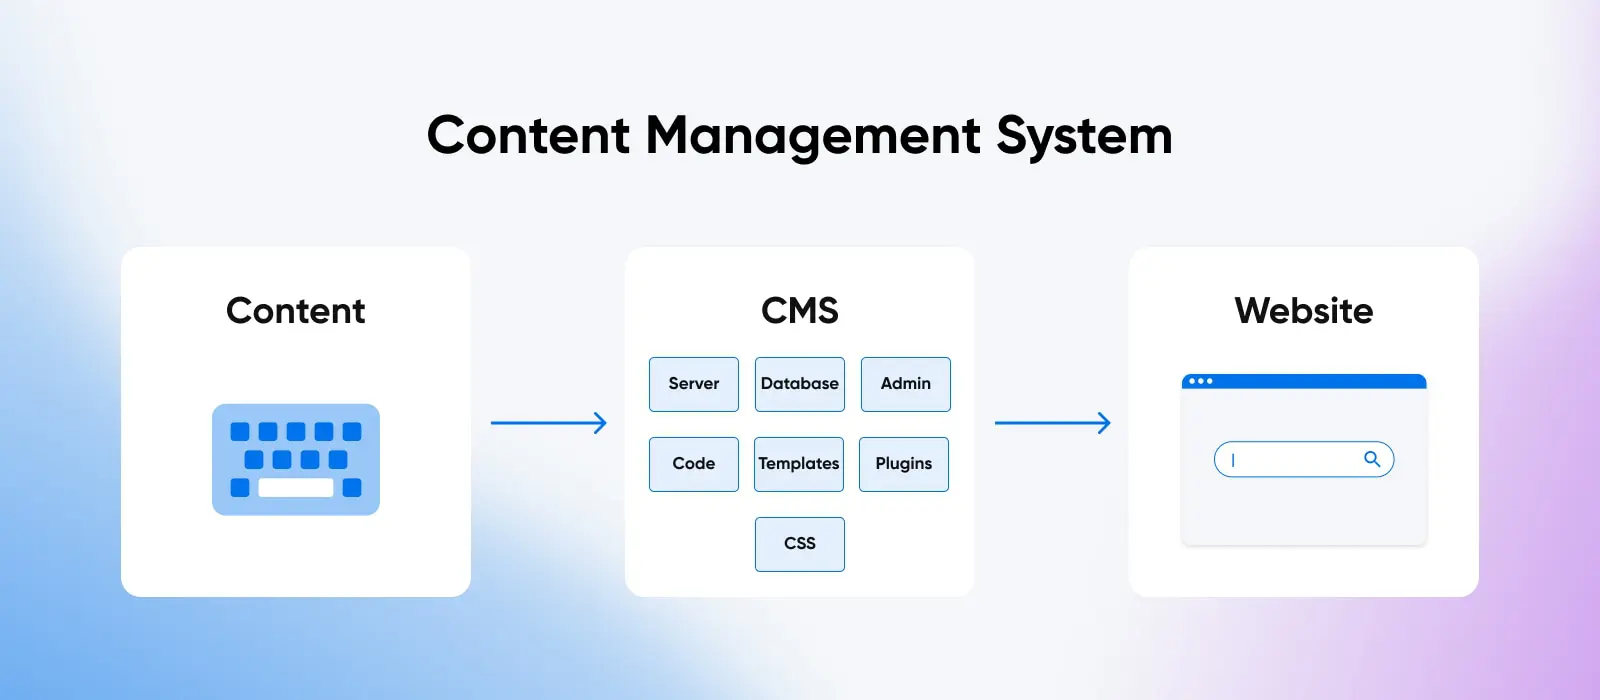
What is WordPress, exactly? WordPress is free, open-source software for building and managing a website. It’s a content management system (CMS), which means you can publish pages, posts, and other content without writing code. You install it through a web host, pick a theme for the design, and add plugins for extra features.
So, if you want to create or have been tasked with managing a successful website and need to find the best solution on the market, WordPress is your best bet.
While there’s no one perfect platform, WordPress comes pretty close. It’s easily adaptable to all types of sites, from simple blogs to booming online stores. The benefits of using WordPress are numerous, and it’s incredibly easy to get started with.
In this article, we’re going to introduce you to WordPress and explain what it’s all about. We’ll discuss some of its history, the tech that makes it tick, the core elements you should know about, and even the basics of how to get a WordPress site up and running for the first time.
Without further ado, let’s get to know the world’s most popular CMS (And yeah, we’ll cover what that means, too!).
An Introduction To WordPress
WordPress
WordPress is an open-source Content Management System (CMS). Since it is free and accessible, WordPress is used to power almost any type of website, from blogs to e-commerce businesses.
Read MoreWordPress is a content management system (CMS) that you can use to build and manage a website. The first version was created in 2003 by Matt Mullenweg and Mike Little as an alternate version of another program called b2/cafelog.
From the very beginning, WordPress was designed as open-source software. We’ll talk about this concept in more depth later, but in a nutshell, it means that WordPress is maintained by a large community of primarily volunteer programmers and designers. As a result, WordPress has remained affordable while growing more powerful over time, even as new features and functionality are added with every new version.
W3Techs (World Wide Web Technology Surveys) tracks millions of websites, and as of July 2026, it finds that WordPress is the CMS behind 59.2% of the websites where a CMS can be identified. It’s safe to say that no matter what you want to build, you can likely do it on WordPress.
But before we dive into all the cool features and how to get a WordPress website off the ground, let’s talk about one interesting caveat newcomers ought to know.
There is a difference between WordPress.com and WordPress.org. The former (.com) is a hosting solution and site builder from Automattic that enables you to create a limited site online for free, with upgrades at higher pricing tiers. The latter (.org) is open-source software that you can download (totally free) and use to create a custom site, which requires a web hosting service (not free).
Note: This is why you’ll sometimes see WordPress.org referred to as “self-hosted WordPress.”
Since WordPress.org tends to be a more flexible and powerful platform, we’ll be mostly focusing on it throughout the rest of this article. However, note that both platforms possess several of the same core features and can make many similar end products. Even if you find yourself more interested in the simplicity of a WordPress.com site at the end of the day, we promise that reading this guide won’t be for naught.
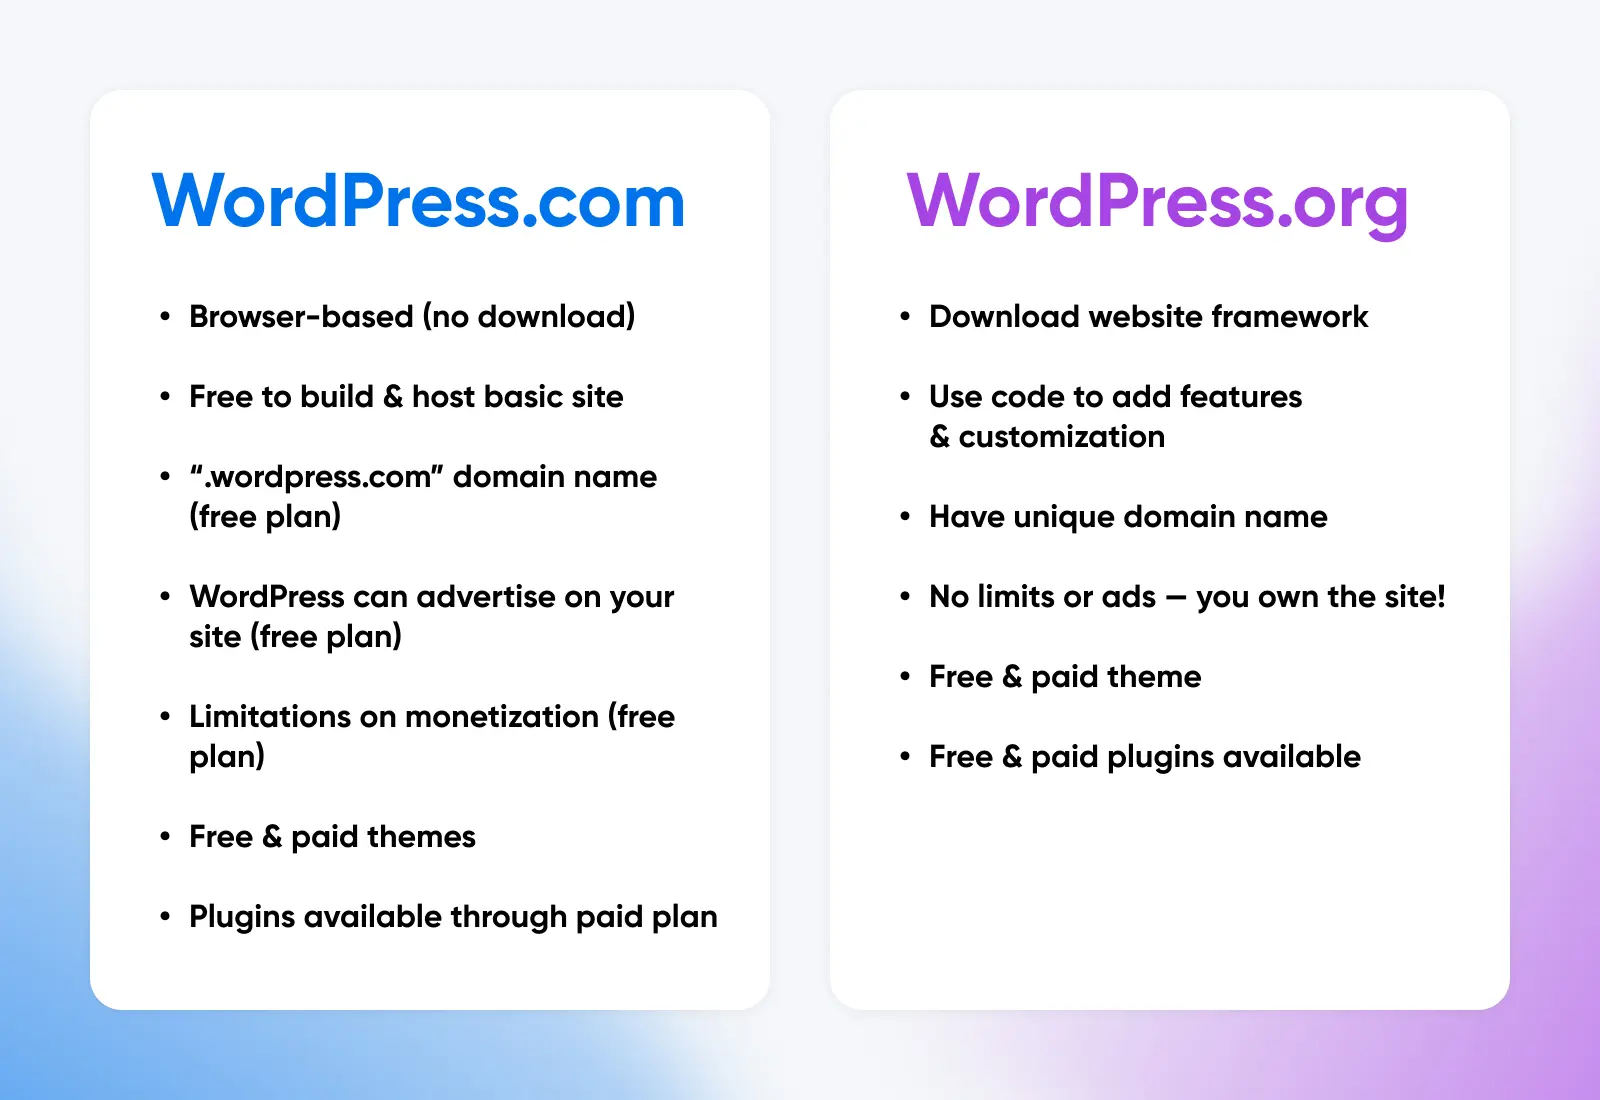
Psst: If you’re really interested in all the nitty, gritty details, don’t miss our robust guide The Difference Between WordPress.com & WordPress.org.
Deepen Your Knowledge: Getting To Know CMS
Algorithm Update
An algorithm update refers to any changes or upgrades to a pre-existing search engine algorithm. These updates are made to improve the accuracy and relevance of search results and can often result in large ranking fluctuations.
Read MoreContent management systems, as a concept, were developed to enable users without a lot of technical savvy to produce, publish, and manage, web content.
For businesses, CMS software grants non-technical people the freedom to execute their content marketing strategies (on the front end) and web developers the freedom from getting mired in content work that takes them away from their technical tasks (on the back end). They also pretty much broke the world of dynamic website building wide open for the masses.
Today, most CMS software makes much of this possible by way of a WYSIWYG (pronounced “wiz-ee-wig”) editor — meaning “what you see is what you get.”
WYSIWYG Editor
WYSIWYG is an acronym that stands for ‘what you see is what you get.’ In web design, this typically refers to a web building interface that allows users to edit their website using an interface that instantly shows the end result.
Read MoreIt’s called this because it displays content much like it will look on the live website, even while it’s still being built. This makes it easy for folks to create blog posts, web pages, and other content-rich elements without knowing coding languages.
WordPress is one kind of CMS software, and there are a great many more out there. There are also different classes of CMS software, from the headless CMS to the much simpler web CMS — which is where our friends over at WordPress.com fall.
While we don’t have the space to go deep into all the nuances of CMS right now if you want to learn more, visit The Comprehensive Guide To Content Management Systems.
When To Use WordPress
While WordPress was originally designed for bloggers, because of its robust capabilities, today it can be used to build a whole host of digital entities.
Not sure a WordPress site will work for you? It probably will if you’re building anything like these various web properties:
- Marketing website
- Government website
- News publishing website
- Ecommerce store
- Professional portfolio
- Forum
- Online community
- Blog
- Job board
- Educational website
- Membership website
- Online marketplace
- Event website
Elements That Make WordPress Powerful, Yet Beginner-Friendly
Okay, so what exactly is it about WordPress that makes it such a great choice for spinning up and managing a new website?
I’m so very glad you asked.
Ease Of Use
At first, a CMS like WordPress might seem more intimidating than what you had in mind when the words “website builder” first passed through your head.
Content Management System (CMS)
A Content Management System (CMS) is a software or application that provides a user-friendly interface for you to design, create, manage, and publish content.
Read MoreIt’s true that WordPress may have a slightly steeper learning curve due to the plethora of settings and customizable features — so you’ll likely need to put in a little time learning the ropes. However, on the whole, the WordPress user interface is built to be as user-friendly as possible. You don’t need to know any coding to get started, and many of the advanced settings and features are totally optional for building a functional site.
More than two decades on, WordPress continues to update its editing tools to offer an easy, visual experience similar to most other drag-and-drop website builders on the market. Full-site editing and block themes have kept maturing with each release — right up through WordPress 7.0 “Armstrong,” released May 20, 2026 — to make editing WordPress perhaps the best it’s ever been for non-developers.
AI has changed how people build websites, too. AI website builders like DreamHost’s Remixer can draft a working site from a text prompt, and AI-assisted plugins bring similar help into WordPress itself for drafting content and designs. You can see how the two approaches compare in our guide to website builders. Builders are faster for a simple first site; WordPress gives you full ownership and more room to grow.
As long as you’re willing to invest a very modest amount of time upfront, you’ll find that WordPress is a solid platform for beginners (and one that can keep up as you gain more knowledge and experience).
If you do run into trouble or have any questions though, you’ll also discover that there’s plenty of help available. You can find WordPress tutorials, lots of useful documentation, WordPress community forums, and, of course, WordPress-focused blogs like ours.
Themes And Plugins
Themes and plugins are additional pieces of software that you can download separately and install on your WordPress site. We’ll cover them in tandem, as the best way to use these tools is alongside each other to create the most robust experience.
WordPress themes — of which there are more than 8,000 free options in the official directory alone — enable you to customize the appearance and layout of your site. They sometimes also include useful features. WordPress plugins, on the other hand, add new levels of functionality to your site.
Plugin
WordPress plugins are add-ons that enable you to extend the Content Management System’s (CMS) functionality. You can use plugins for almost everything, from adding e-commerce features to WordPress to implementing page builders or using Search Engine Optimization (SEO) tools.
Read MoreBoth things let you take the basic WordPress platform and customize it to suit your needs, tastes, and goals. Themes help you make your site look unique, and plugins enable you to add almost any feature you can think of. With over 60,000 free plugins available in the WordPress Plugin Directory, there are plugins that can help you create everything from custom forms, an online storefront, help you share your content with social media, automate tasks, bolster your site’s security, and much more.
You can find WordPress themes and plugins in plenty of places online. However, if you’re feeling overwhelmed, your best bet is to start with the official WordPress theme and plugin directories. Everything in these directories is available for free and has been run through a strict vetting process. Plus, that’s where you’ll find most of the essential plugins that you’ll need to get the most out of your site.
Theme
A WordPress theme is a layout tool that enables you to change the design of your site. A theme is composed of a group of files within a zipped folder that includes page templates, CSS stylesheets, images, and more.
Read MoreOpen-Source Ideology (Affordable And Powerful!)
As we mentioned earlier, WordPress(.org) is an open-source content management system. This means anyone is free to download and make changes and improvements to the software. But don’t worry, that doesn’t make it the Wild West full of bugs and viruses.
Today, open source is all about collaboration, fast improvements, merit, transparency, and pushing the envelope. In addition, it’s maintained by a thriving, dedicated community of WordPress developers. In other words, open-source WordPress software is probably more powerful than some of the cutting-edge but closed source development software being put out today by huge corporations!
There are a lot of advantages to using open-source software like WordPress.org. For example:
- There are constant improvements, and new functionality is frequently added.
- The same people who improve the platform are also WordPress users, so there’s a focus on adding flawless, convenient features.
- You have a huge community to turn to for help and support. Plus, everyone is welcome to contribute to WordPress if you have a great idea.
- People make lots of add-on software, such as the themes and plugins discussed earlier, so you can extend performance practically endlessly.
- The platform is completely free to use without sacrificing power.
Come with us as we expand a little on that last point.
Since WordPress.org is open-source, it won’t cost you anything to download the software and build your site. You will have to choose a domain name and a hosting plan, but these elements can be found for a low cost.
If you want, you can also spend money on premium themes and plugins to add new customization options to your site. However, this is optional because of course there are a lot of great, free plugins and themes available.
Open Source
In software development, open source projects are free for anyone to download, use, modify, and distribute. WordPress is one great example of open-source software, although it’s far from the only one.
Security Focus
Because WordPress.org is open source and relies heavily on the practice of plugging in tools from third parties, it’s understandable that nefarious forces often target websites built on the platform.
In fact, WPScan’s vulnerability statistics (2026) indicate that less than 1% of known WordPress vulnerabilities come from the actual core software. The rest of the risk lies in exploits discovered in plugins and themes.
That said, security is crucial for any website — and it’s something you want to start thinking about now. This is particularly important if you intend to make money from your site or handle sensitive data and personal information.
Fortunately, WordPress is equipped with not only a security team but also the aforementioned community of skilled developers who are always looking out for, reporting, and fixing bugs. Regular community-led security releases address risks, which is why keeping your site on the latest version of WordPress — and keeping any add-ons up to date — is one of the best things you can do to keep your website secure.
You can secure your WordPress website even further by doing things like opting for managed WordPress hosting, enabling a web application firewall, hardening your file permissions, keeping the number of admin users limited to a small trusted group, and more.
Money-Making Opportunities
WordPress’ roots as a blogging tool make it ideal for small, personal sites. However, today, it’s also perfect for many larger projects — including money-making websites.
The vast number of features and functionality available through both the base platform as well as add-ons make WordPress the smart choice if you want to create a profitable site.
Here are just a few of the ways to make money with your WordPress site:
- Build a small business website to share your offerings and convert visitors.
- Leverage affiliate marketing to promote vendor products on your site.
- Create an ecommerce site with a plugin like WooCommerce and sell products directly.
- Add Google AdSense to include advertisements on your site and generate passive income.
Whether you’re looking to move your entire business online or just build a lucrative side hustle, WordPress will enable you to do it effectively with some hard work and patience.
WordPress FAQs
Is WordPress free?
Yes. The WordPress.org software is free and open source. You only pay for a domain name and web hosting, plus any premium themes or plugins you choose to add. For a realistic budget, see our breakdown of what a WordPress site costs.
What is WordPress used for?
Almost any kind of website. WordPress started as a blogging tool in 2003, but today it runs business sites, online stores, news publications, portfolios, forums, and membership communities — roughly two out of every five websites on the internet.
What’s the difference between WordPress.org and WordPress.com?
WordPress.org is the free software you install with your own web host, giving you full control. WordPress.com is a hosted service from Automattic with free and paid tiers. Our WordPress.com vs. WordPress.org guide compares them in detail.
Is WordPress good for beginners?
Yes. The block editor is visual and code-free, and most hosts offer one-click installs. Expect a modest learning curve — more than a drag-and-drop builder, less than coding a site — with plenty of free tutorials when you get stuck.
Next Step: Get Started With WordPress
Does WordPress sound like the best platform for your needs?
Then let’s not waste any time. Start developing your website on WordPress today!
The steps to setting up your first WordPress.org website are as follows:
- Set up a domain that aligns with the purpose of your website. Use a domain checker to find a name that’s available, and then get it registered to make it exclusively yours. The domain registrar you pick is important for several reasons. Check out our guide on choosing the best WordPress domain name to learn all about that.
- Select a web hosting provider and package. Hosting makes the content of your website available on the internet, and the right hosting company can even help you set up, run, and secure your website. As a beginner, you may find one that specializes in WordPress the most helpful. Learn more about this important step in The Ultimate Guide To Web Hosting.
- Now, install WordPress! You can install WordPress manually, but be warned this will require interacting with code. Many web hosts have processes that make it quite simple to set up, including a one-click install method. If that’s important to you, keep it in mind when shopping around.
- It’s finally customization time. Visit [yourdomain].com/wp-login.php and log in. Unless you want to build from scratch — totally fine, but it will take a bit of poking around! — pick a WordPress theme to get some design and structure in place. From here you can start filling in content and customizing with blocks and plugins.
WordPress has been around for a long time, but it’s only getting better and better. What used to be a humble blogging platform has expanded into a powerful CMS that’s ready to take on any type of website.
Need help using it to set up your dream site? Find out where DreamHost’s website management, design, development, and marketing pros can assist you.

Do More with DreamPress
DreamPress’ automatic updates, caching, and strong security defenses take WordPress management off your hands so you can focus on your website.
Check Out Plans