
The deadline’s almost here. Are you ready to make the switch from Universal Analytics to Google Analytics 4 (GA4)?
In 2019, Google introduced Google Analytics 4 as an alternative to Universal Analytics. Users were free to choose between using standard analytics properties or jumping to the new version. Now, Google plans to sunset Universal Analytics in just a few weeks — requiring all users to transition to Google Analytics 4.
If you use Google Analytics and haven’t made the move yet, you’ll need to understand what Analytics 4 offers and how it’s different from Universal Analytics. Time is running out to acquaint yourself with the service and make the change before Universal Analytics ceases to function — so start today, with this guide.
In this article, we’re going to talk about what Google Analytics 4 does differently from its predecessors. We’ll also show you how to transition your account to Google Analytics 4 and discuss some tutorials and tips to help you get the most out of the platform. Let’s get to it!
What Is GA4?
Google Analytics 4 (GA4) is the latest version of Google Analytics. It is designed to help businesses and website owners understand their online audience, track user behavior, and measure the effectiveness of their marketing efforts. GA4 introduces several new features and improvements over the previous version, Universal Analytics (UA).
Getting To Know GA4
There are a few key areas where GA4 is very different from its predecessor.
For a long time, analytics has focused on helping you measure desktop web metrics, with mobile analytics data being almost an afterthought. Google Analytics 4 changes that approach by helping you unify multiple types of properties into singular user journeys:
With Google Analytics 4, you can see measurements for your websites and web and mobile apps. You can also gain insights from machine learning algorithms into how to optimize those properties.
Another key aspect of Google Analytics 4 is that it doesn’t rely solely on cookies. It offers an increased emphasis on user privacy.
“Universal Analytics was built for a generation of online measurement that was anchored in the desktop web, independent sessions and more easily observable data from cookies. This measurement methodology is quickly becoming obsolete.”
– Russell Ketchum, Director of Product Management for Google Analytics
Arguably, one of the main drivers behind the shift in how Google Analytics collects data comes from the General Data Protection Regulation (GDPR). The GDPR has had a massive impact on how websites and platforms can legally collect and store user data.
Cookies have come under fire in recent years due to increased privacy concerns, meaning many companies are looking into alternative data collection streams.
With Google Analytics 4, measurements no longer rely on sessions. The platform is capable of recognizing and measuring multiple types of human interaction “events”, including:
- Pageviews
- Scrolls
- Outbound clicks
- In-site searches
- Video engagement metrics
- File downloads
With previous versions of Google Analytics, measuring several metrics involved manually setting up complex events. Now, the platform can automatically tag the events for you, which gives you access to more data from the get-go.
Finally, Google Analytics 4 brings better funnel reports to the table, including cross-platform analysis. You can use the platform to identify key steps in the customer journey and see where users enter and drop out. The service also enables you to understand what users are doing in-between steps in the funnel:
But why are all these changes happening? Why can’t users just keep their Universal Analytics properties that they already know?
Universal Analytics Will Sunset On July 1
For almost a decade, Universal Analytics has been the standard for measuring performance and engagement for websites. It has also been a vital tool for determining the success of keyword strategies.
However, the platform was designed for an era where we mostly interacted with sites through desktop computers. Although Universal Analytics can also measure mobile and app data, it doesn’t offer a unified experience for properties across multiple channels.
“People expect to interact with businesses when and how they like, such as browsing a brand’s website to research a product and then purchasing it later using the brand’s app. Getting insight into these cross-platform journeys is critical for businesses to predict customer needs and provide great experiences—but it can be very challenging.”
– Russell Ketchum, Director of Product Management for Google Analytics
Google Analytics 4 was designed to help remedy that problem and improve privacy standards in collecting measurements. Since its introduction in 2019, it has existed alongside Universal Analytics so that users could choose between both experiences:
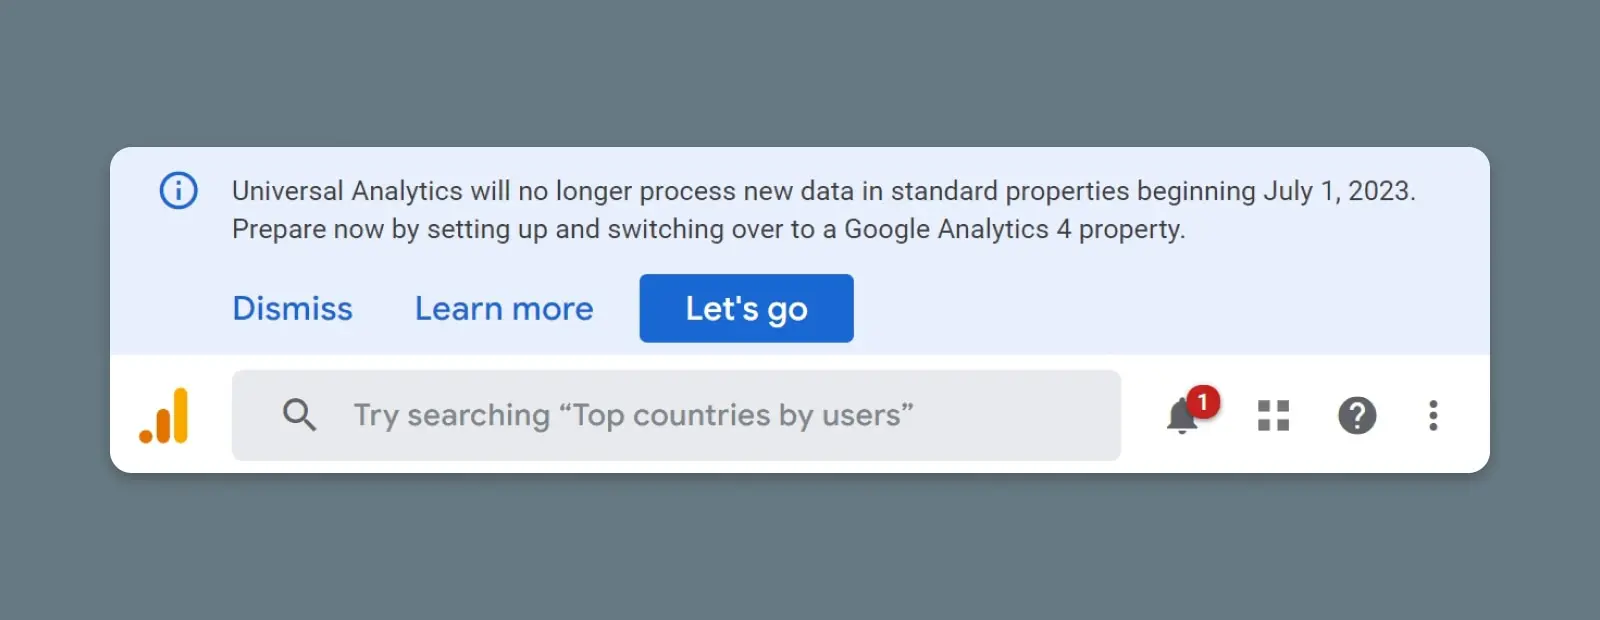
Now Google plans to retire Universal Analytics, starting on July 1, 2023. Existing analytics properties will stop collecting data on that date. If you’re using Universal Analytics 360, you get a few extra months of data collection, with the service retiring on October 1, 2023:

That means that if you still need to move from Universal Analytics to GA4, the time is now. Before we talk about how to do that, let’s go over the changes to the service.
What Are The Differences Between Universal Analytics And GA4?
In short, there are a lot of changes, new features, and new tips and tricks to learn. If you’re a UA pro but are unsure what to expect with GA4, here’s what’s changed.
GA4 Has A Whole New Dashboard
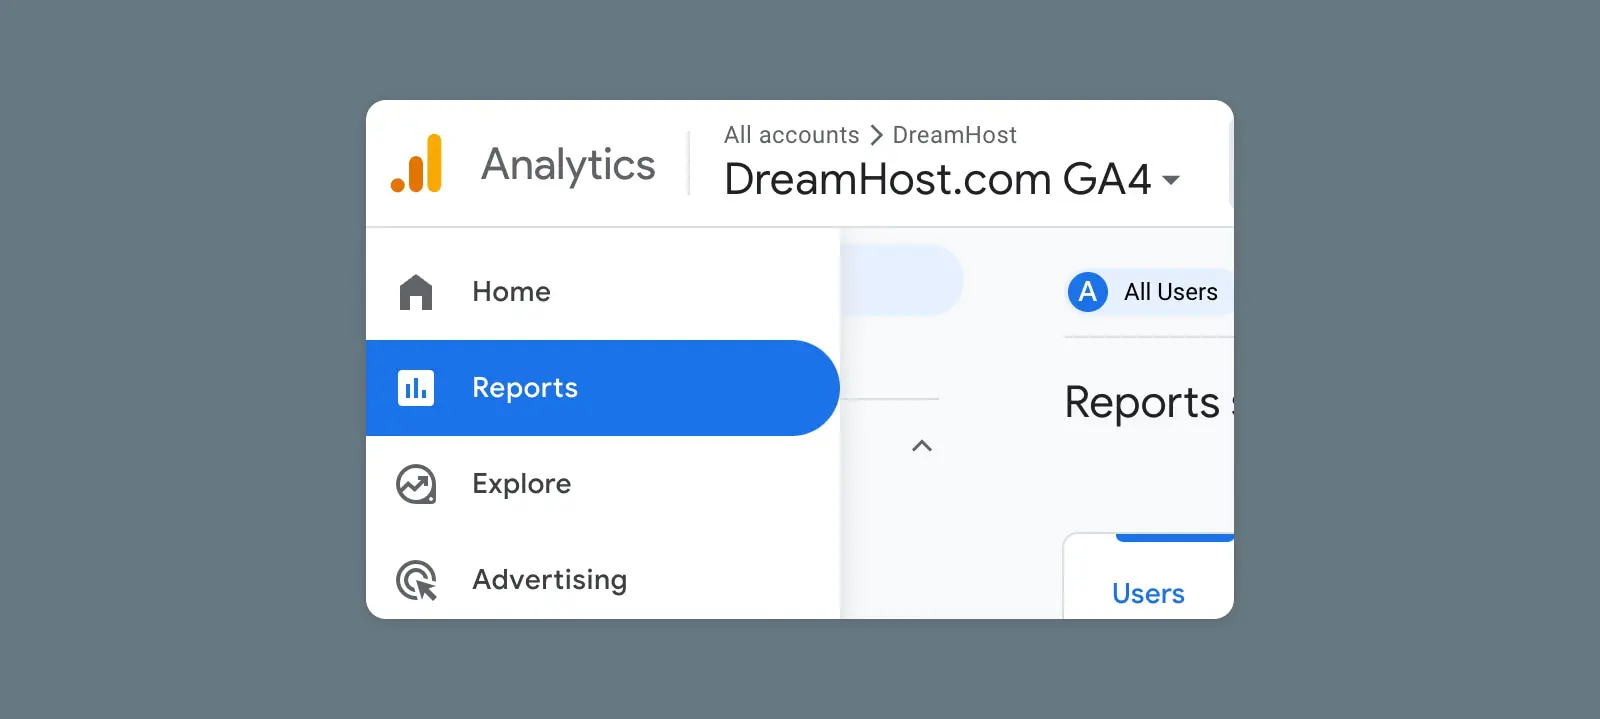
The most obvious change (that even first-time and new users are likely to notice right off the bat) is that GA4 has a whole new dashboard. It’s a bit more streamlined than UA was — there are fewer reports on the main page, and you have a new menu bar on the left where you can navigate to Home, Reports, Explore, Advertising, Configure, and Library.
GA4 Uses An Event-Driven Data Model
Another big change is GA4’s event-based data model, which allows for more flexible and detailed tracking of user interactions on websites and apps. Events are actions taken by users, such as pageviews, clicks, video plays, form submissions, and more. This model provides a more comprehensive view of user engagement across different platforms.
Event tracking means lots of new metrics — like attribution, demographics, and more. And while you can still view session-level reporting, events allow you to break everything down by interaction, giving you more detailed and in-depth reports.
GA4 Offers Enhanced Cross-Platform Tracking
GA4 combines website and app data into a single property, allowing businesses to track user interactions across multiple platforms and devices. This unified view helps understand user behavior throughout their entire journey, from web to app or vice versa.
This means being able to track the user experience throughout the entire lifecycle — from acquisition to engagement, monetization, and retention — across multiple platforms. That’s a game-changer.
User Experience (UX)
User Experience (UX) refers to how online visitors interact with a website. Users often evaluate their virtual experience based on a site’s usability and design, as well as their general impression of its content.
Read MoreGA4 Is All About User-Centric Measurement
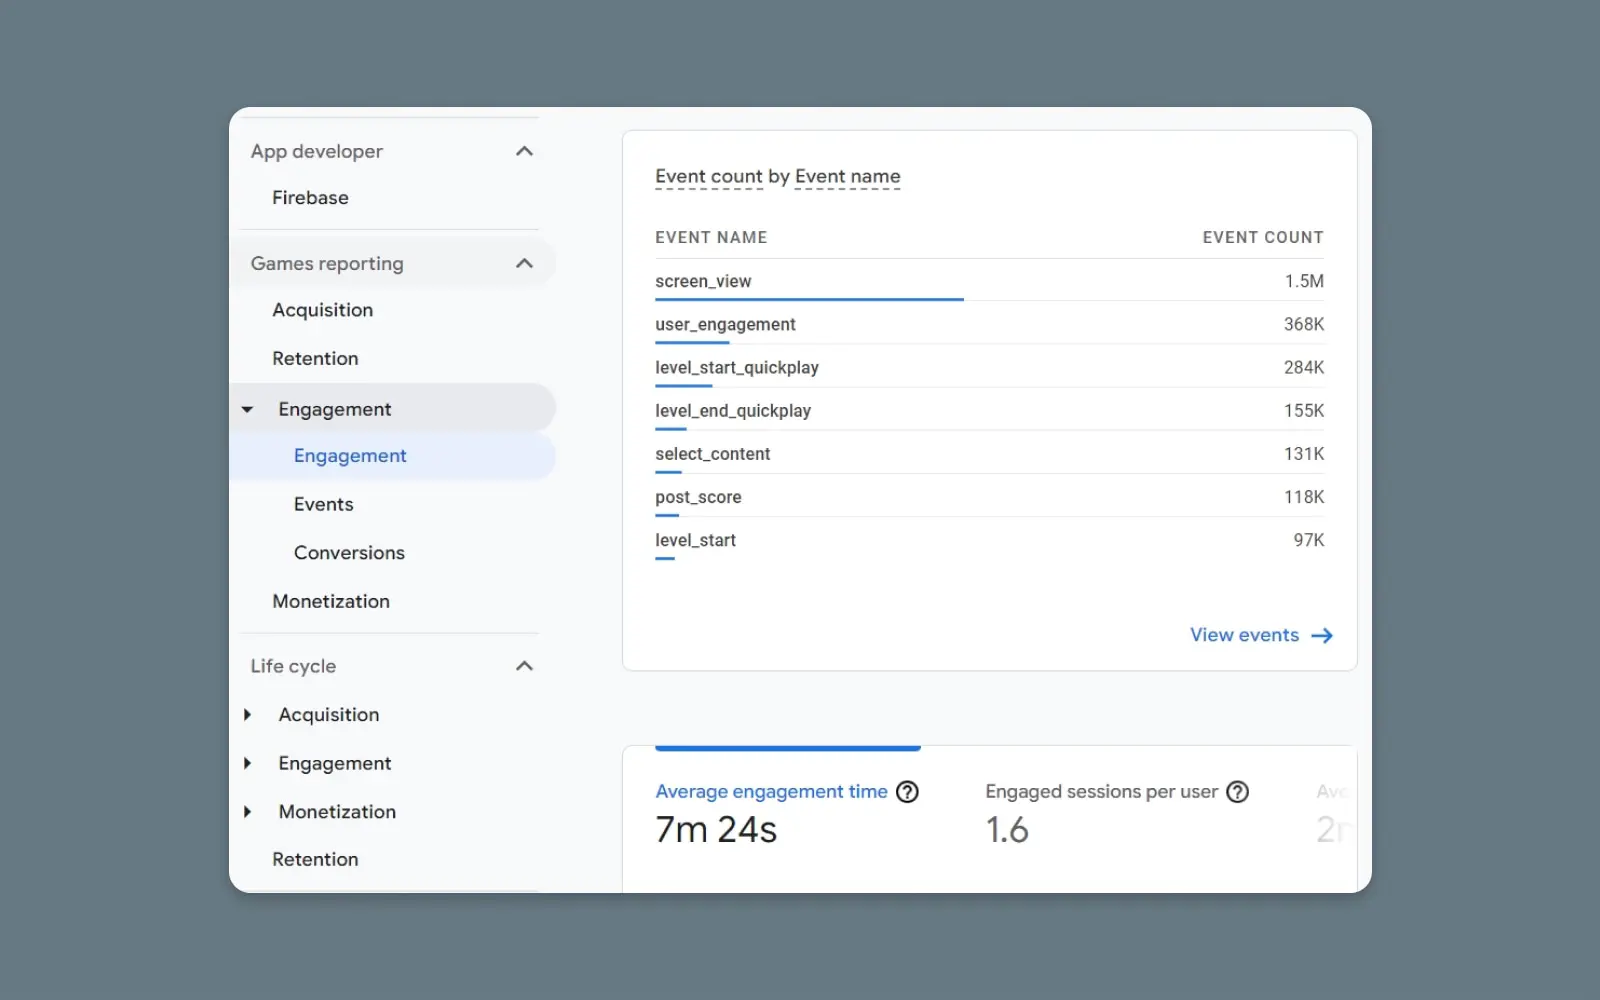
One of the most exciting changes in GA4’s event-driven model is the ability to track engagement metrics, like engaged sessions, engagement rates, and engagement time.
This represents one of the ways GA4 reflects how thinking about web and app metrics has evolved: GA4 emphasizes individual users more than sessions. It introduces a new metric called “User Engagement,” which measures users’ engagement level based on their interactions and conversions. This approach enables a deeper understanding of user behavior and the ability to personalize experiences based on individual preferences.
GA4 Embraces The Potential of AI
GA4 incorporates advanced machine learning and artificial intelligence (AI) to provide more than just snapshots of your past data — it can now provide predictive insights. Moreover, insights are automated, making them easy for even beginners to access and use.
GA4 also offers predictive metrics and audience discovery to help businesses identify valuable segments and optimize their marketing strategies. For example, you can generate a report that shows churn probability and revenue predictions, which can fully optimize your retargeting efforts.
GA4 Has New (And Better) Privacy Standards
GA4 addresses privacy concerns by providing more granular data control options. It is designed to align with regulations such as the General Data Protection Regulation (GDPR) and California Consumer Privacy Act (CCPA). GA4 supports data deletion, user-centric data controls, and provides options to handle user consent preferences.
GA4 Gives Marketers More Power And Control
And finally, one of the most exciting changes: GA4 is made for digital marketers.
This is a significant departure — UA was not a marketer’s tool, even though it quickly became a standard part of every marketer’s tech stack. GA4 comes packed with powerful features custom-made for marketers — like integration with Google Data Studio and custom segments based on trigger events. For example, you can create segments on all conversion events from a specific time period or location, allowing you to build a much deeper understanding of your users and their behavior.
How To Move From Universal Analytics To Google Analytics 4
Although we’re talking about transitioning from Universal Analytics to Google Analytics 4, you can use both services simultaneously (for now.) That means you can still collect data using cookies until Universal Analytics retires in 2023. At the same time, you can begin collecting data from events with Analytics 4.
Step 1: Create A Google Analytics 4 Property
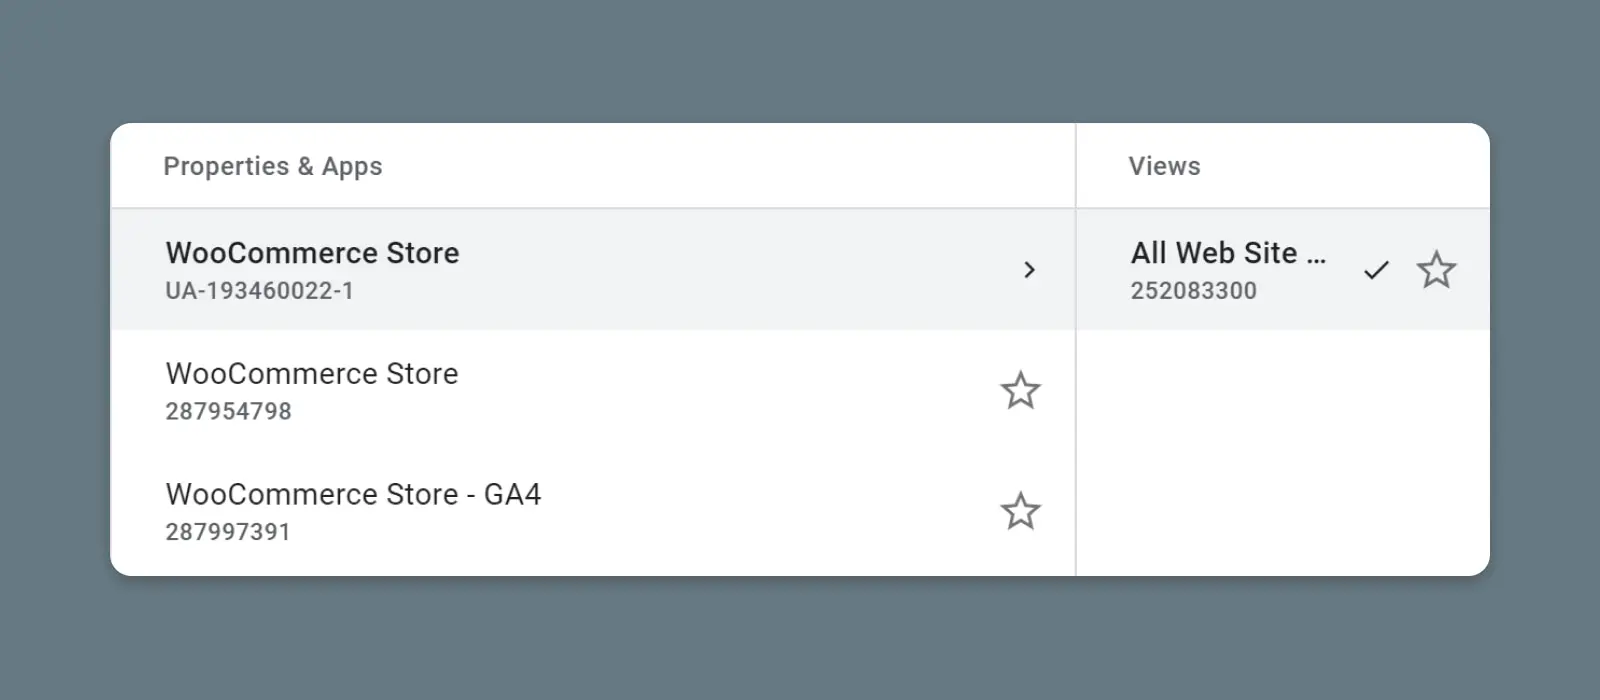
Firstly, you’ll want to ensure you’re not already using Google Analytics 4. If you set up a property after October 14, 2020, it’s likely already using Google Analytics 4. To verify this, access your Google Analytics account and look at your list of properties.
Properties using Universal Analytics will have a UA prefix in their analytics IDs. Properties using Google Analytics 4 will display G4A designations:
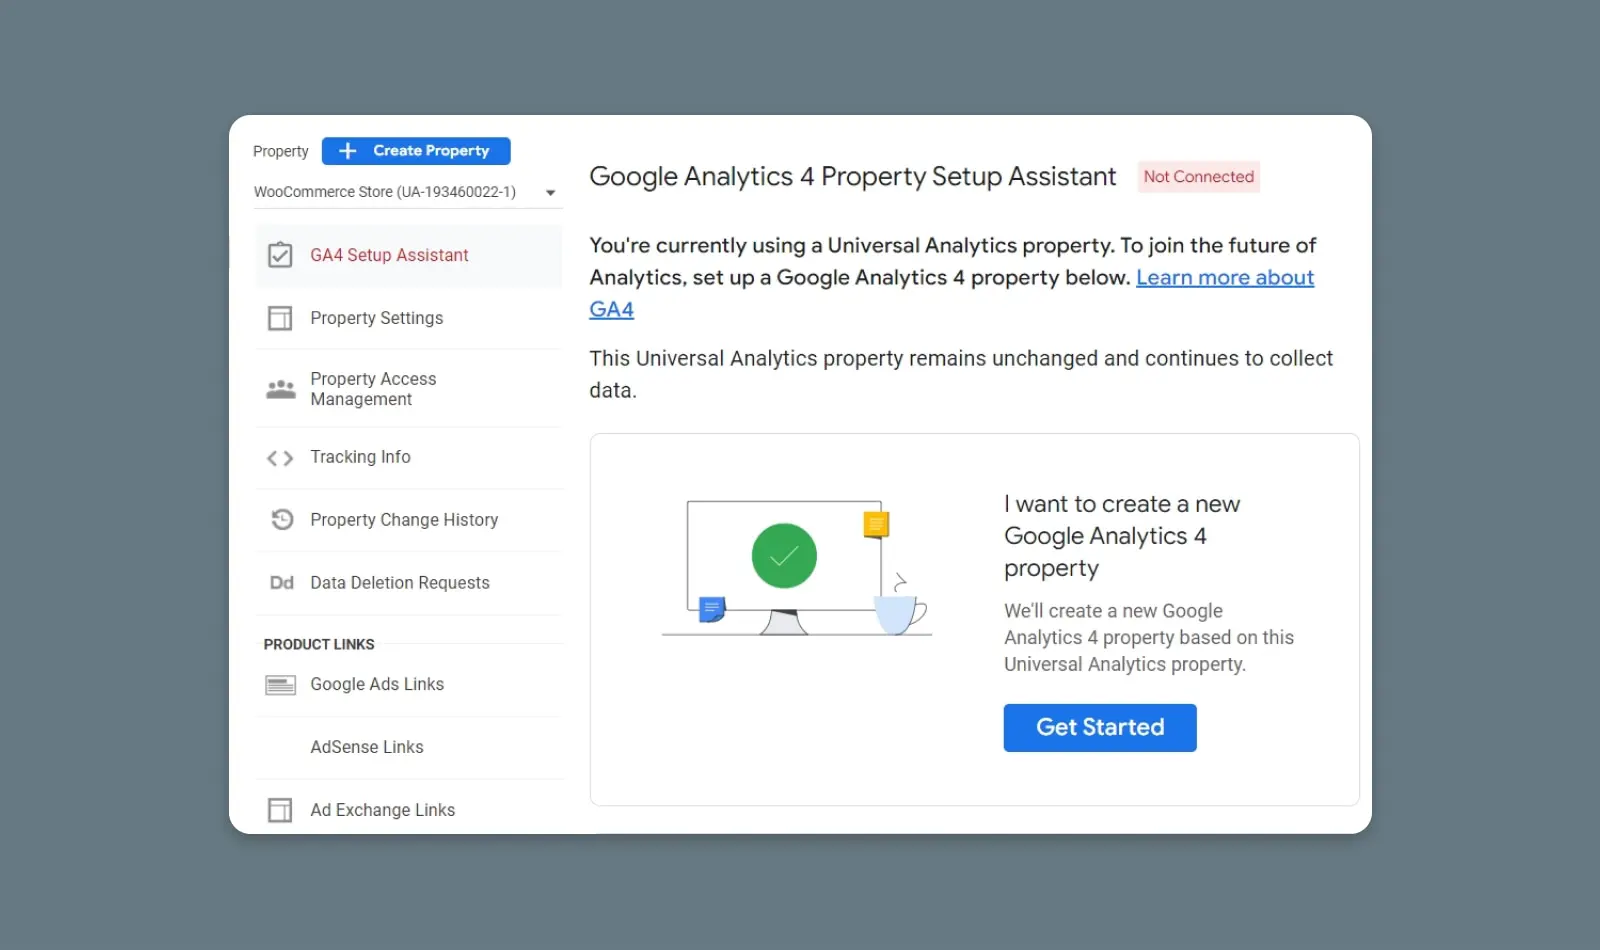
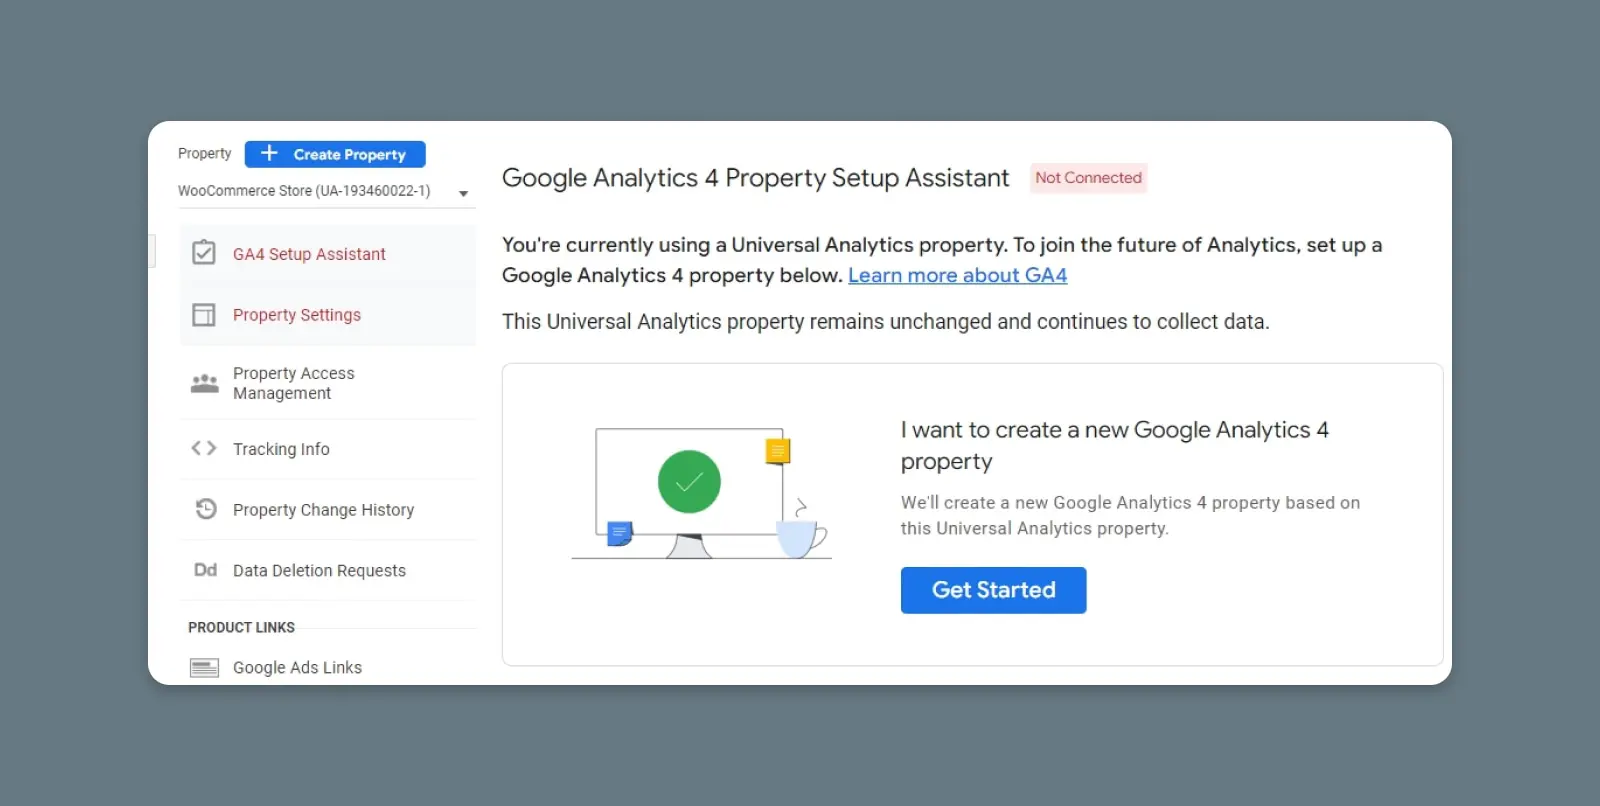
To get started, select a property using Universal Analytics and access its ADMIN settings. Select the option that says G4A Setup Assistant under the property’s name.
Now click on the Get Started button under the message that says, I want to create a new Google Analytics 4 property:
After clicking on that button, Google Analytics will show you a brief rundown of the setup steps. The platform will set up a new property for you without deleting your Universal Analytics configurations. It’ll copy data from the Universal Analytics property and enable “enhanced measurements” immediately, which means you can start measuring complex events from the get-go:
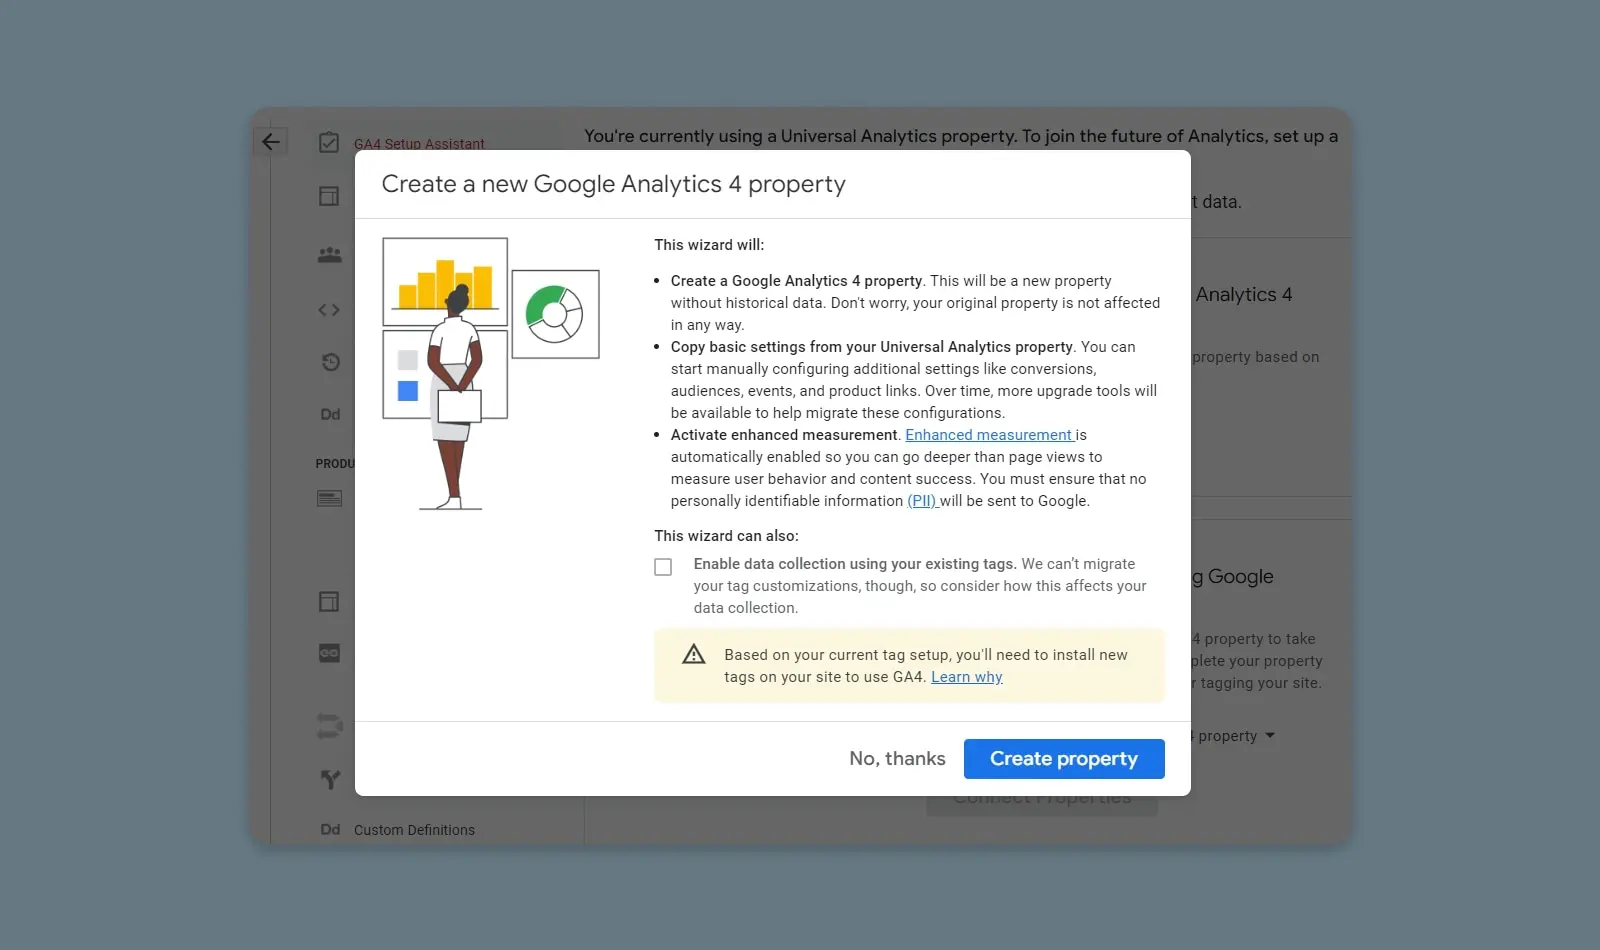
Click on Create property to get the process started. You’ll return to the GA4 Setup Assistant tab, indicating the property is ready.
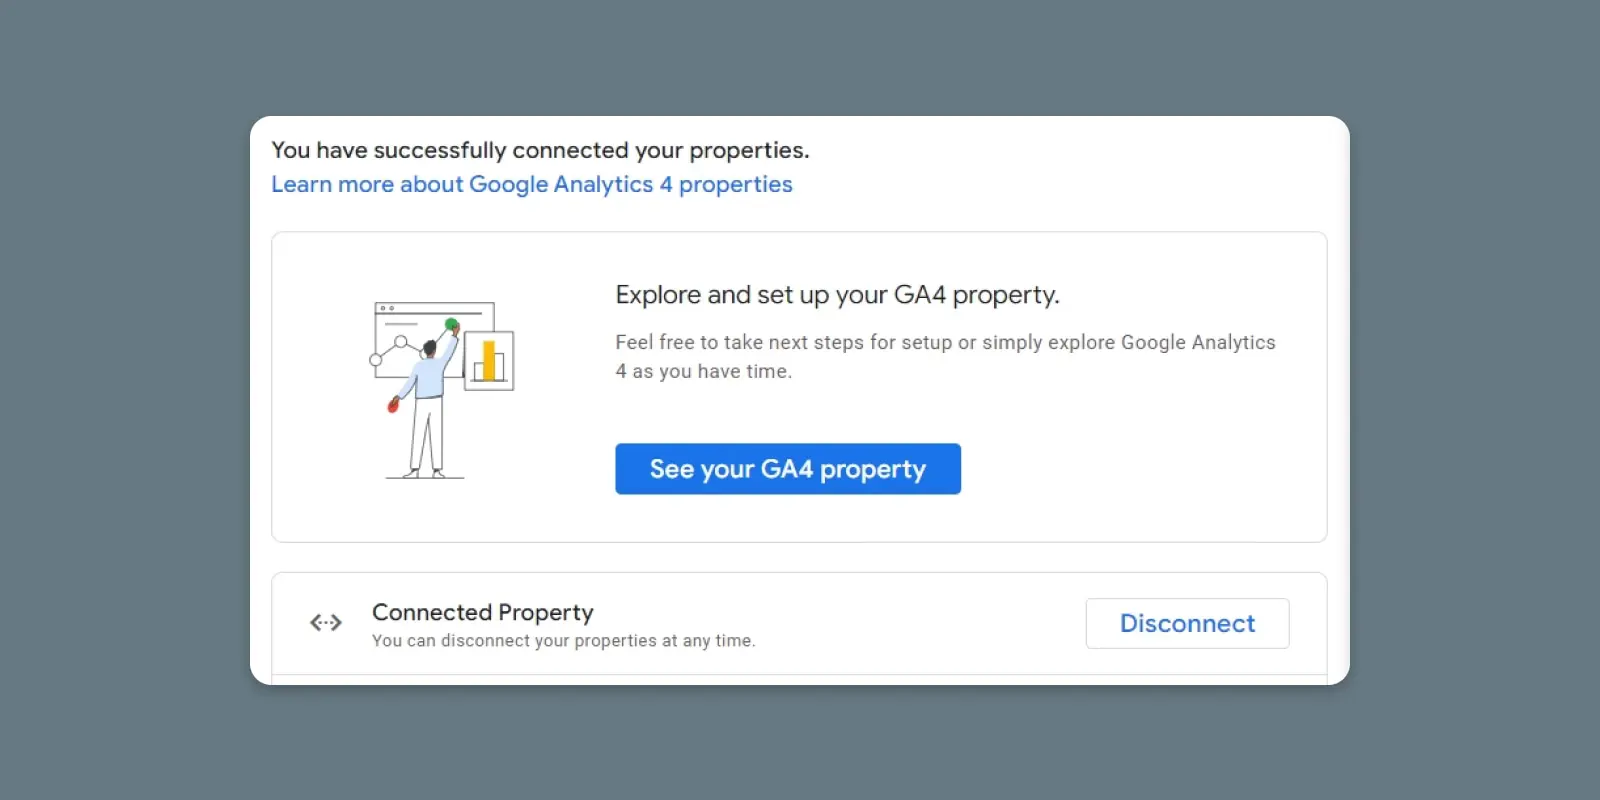
Step 2: Configure Your Google Analytics 4 Property
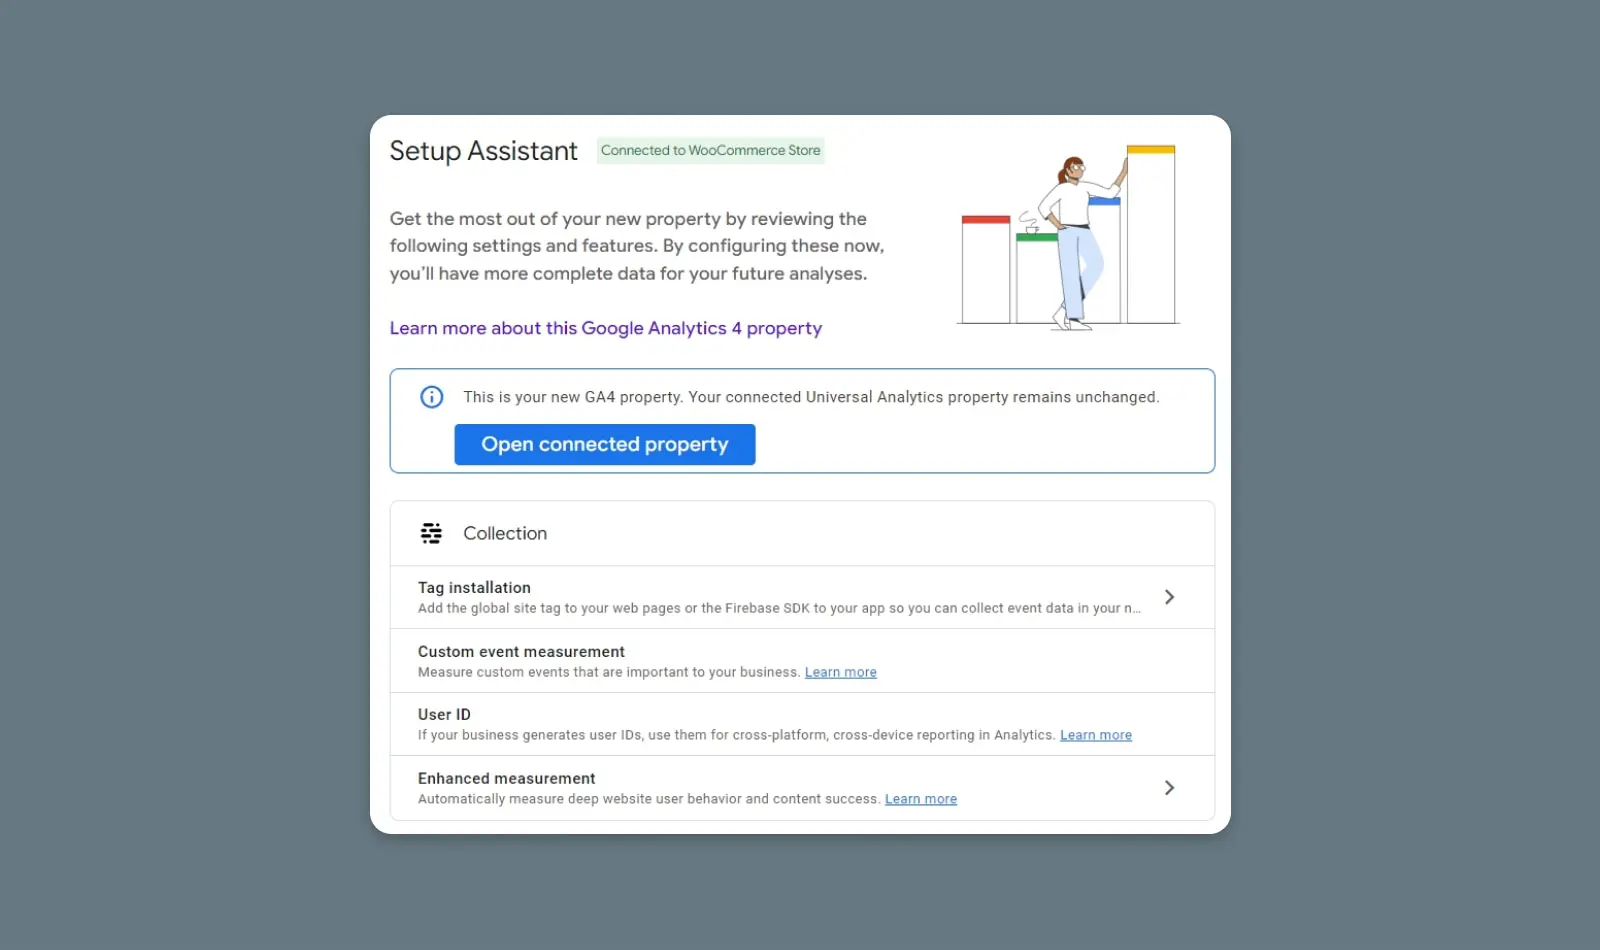
Now click on See your G4A property to configure its settings:
To get started using Google Analytics 4 correctly, you’ll need to configure one or more data streams.
When you open a new Google Analytics 4 property, the platform will send you to the Setup Assistant page. Here, look for the section that says Collection and select the Tag installation option:

The Tag Installation option lets you configure “data streams”. Each Google Analytics property can have streams of information from websites and apps. Typically, you’ll have one stream for the web and one each for iOS and Android devices if you utilize apps:
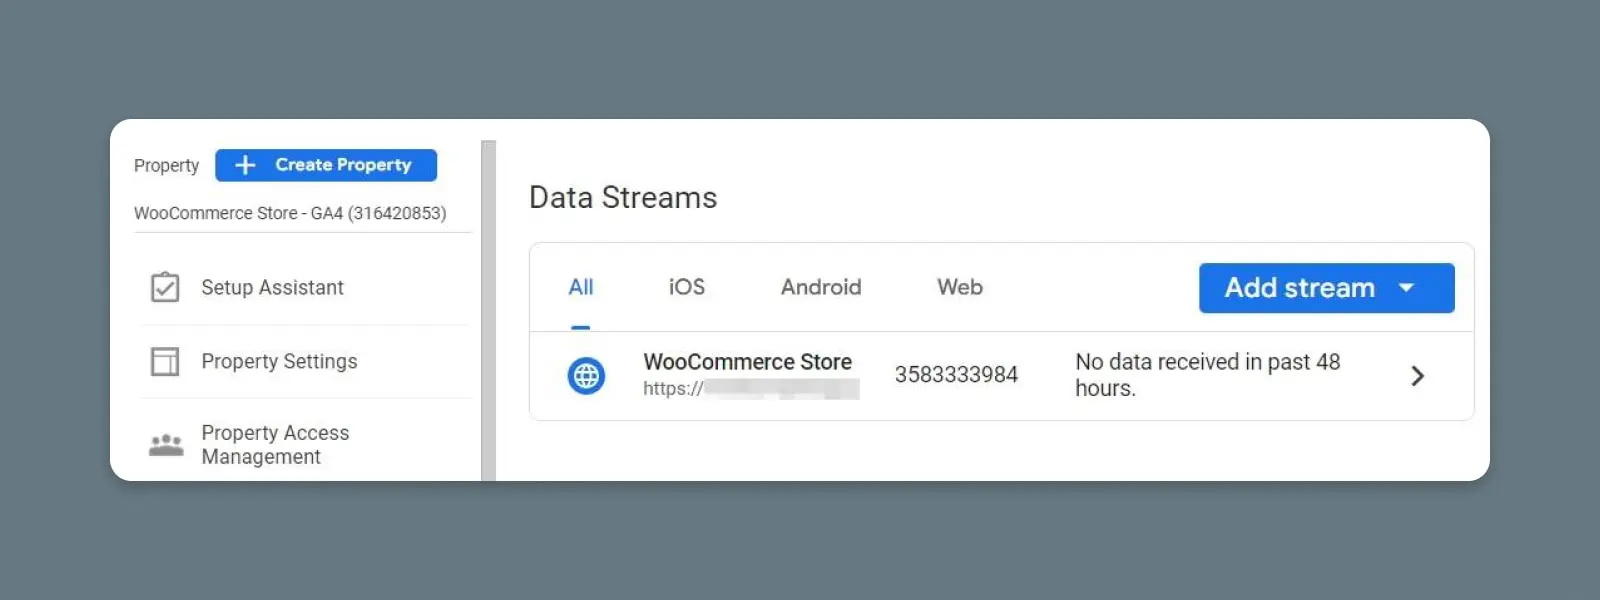
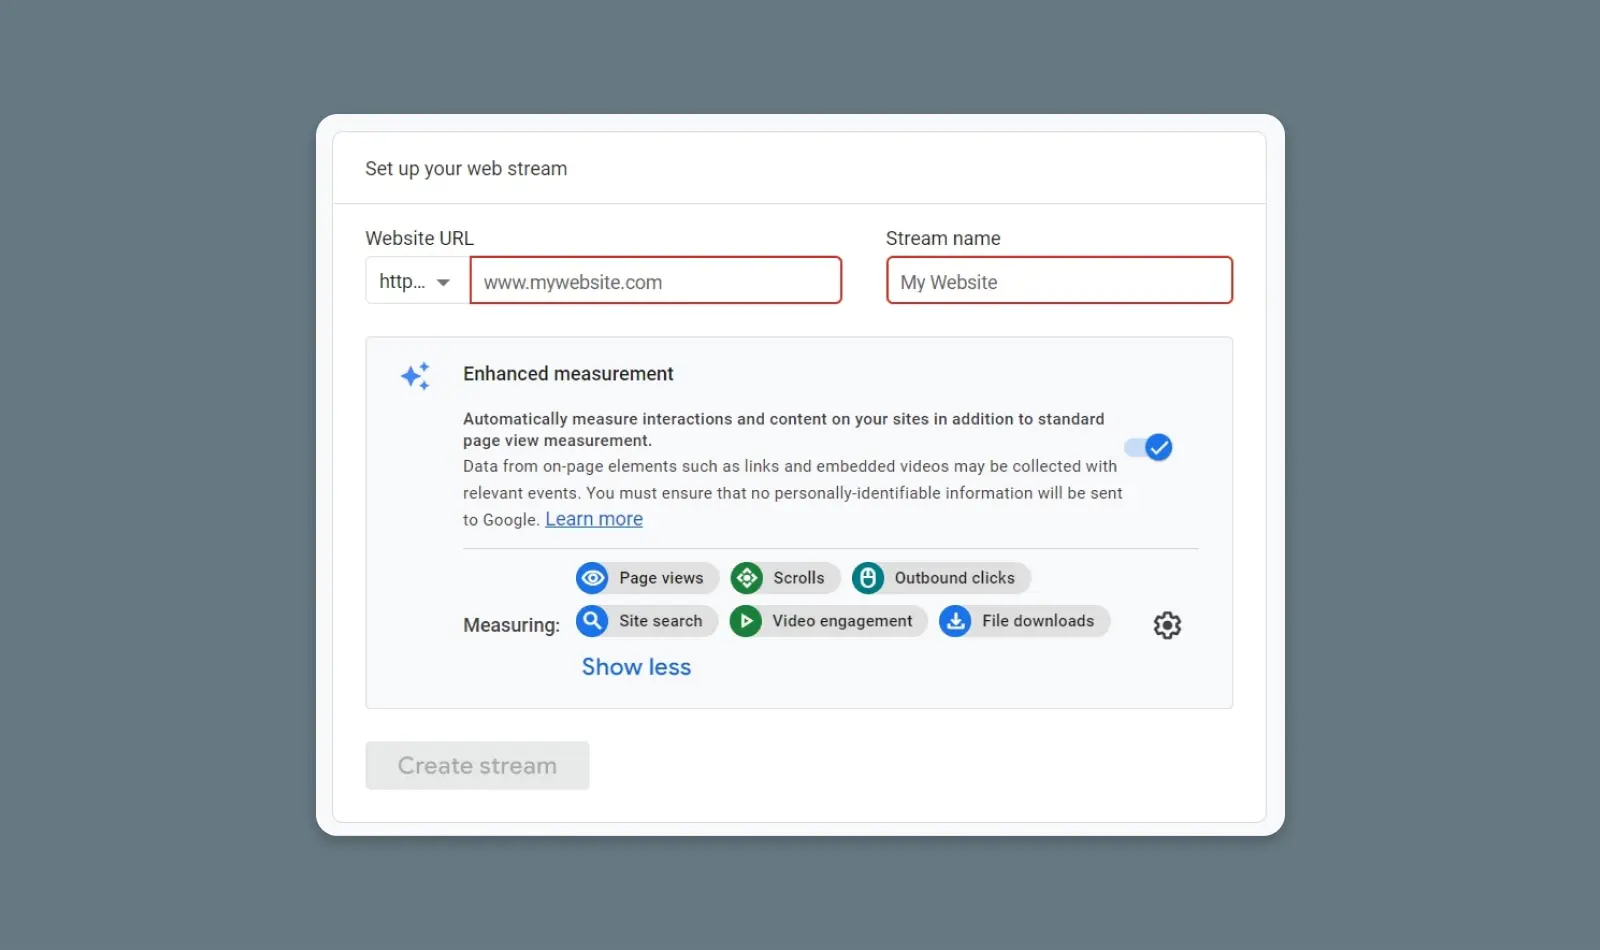
When you select the Add stream option, the platform will ask you what type of stream you want to set up. If you’re adding a web property, Google Analytics will ask for its URL, the site’s name, and which measurements you want to track:
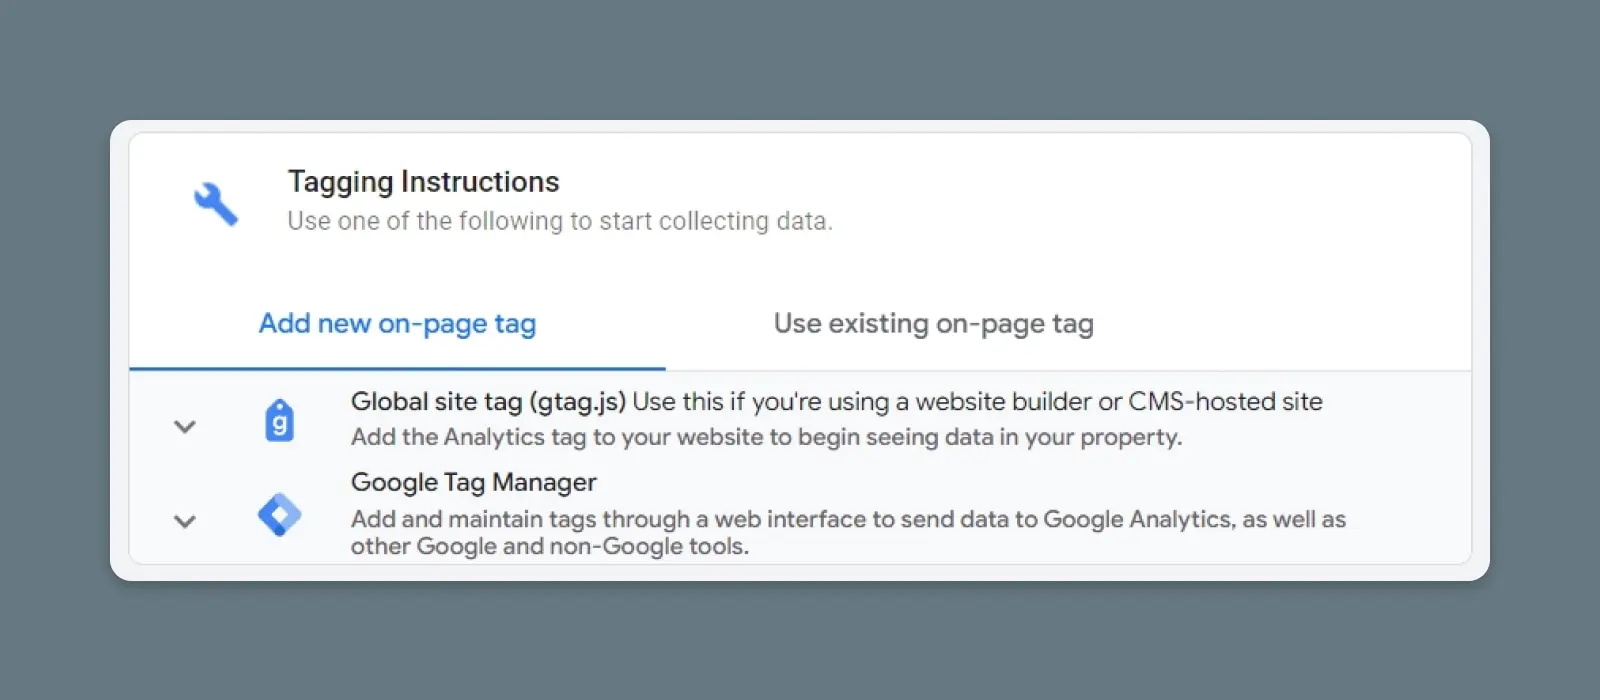
To confirm that you own the website, Google Analytics will ask you to add a tag to it. You can complete this step by adding a JavaScript tag manually or by https://developers.google.com/tag-platform/tag-manager:
Once you verify ownership of the property, Google Analytics will start collecting data from it. Like with Universal Analytics, you’ll be able to track all of that information from the dashboard.
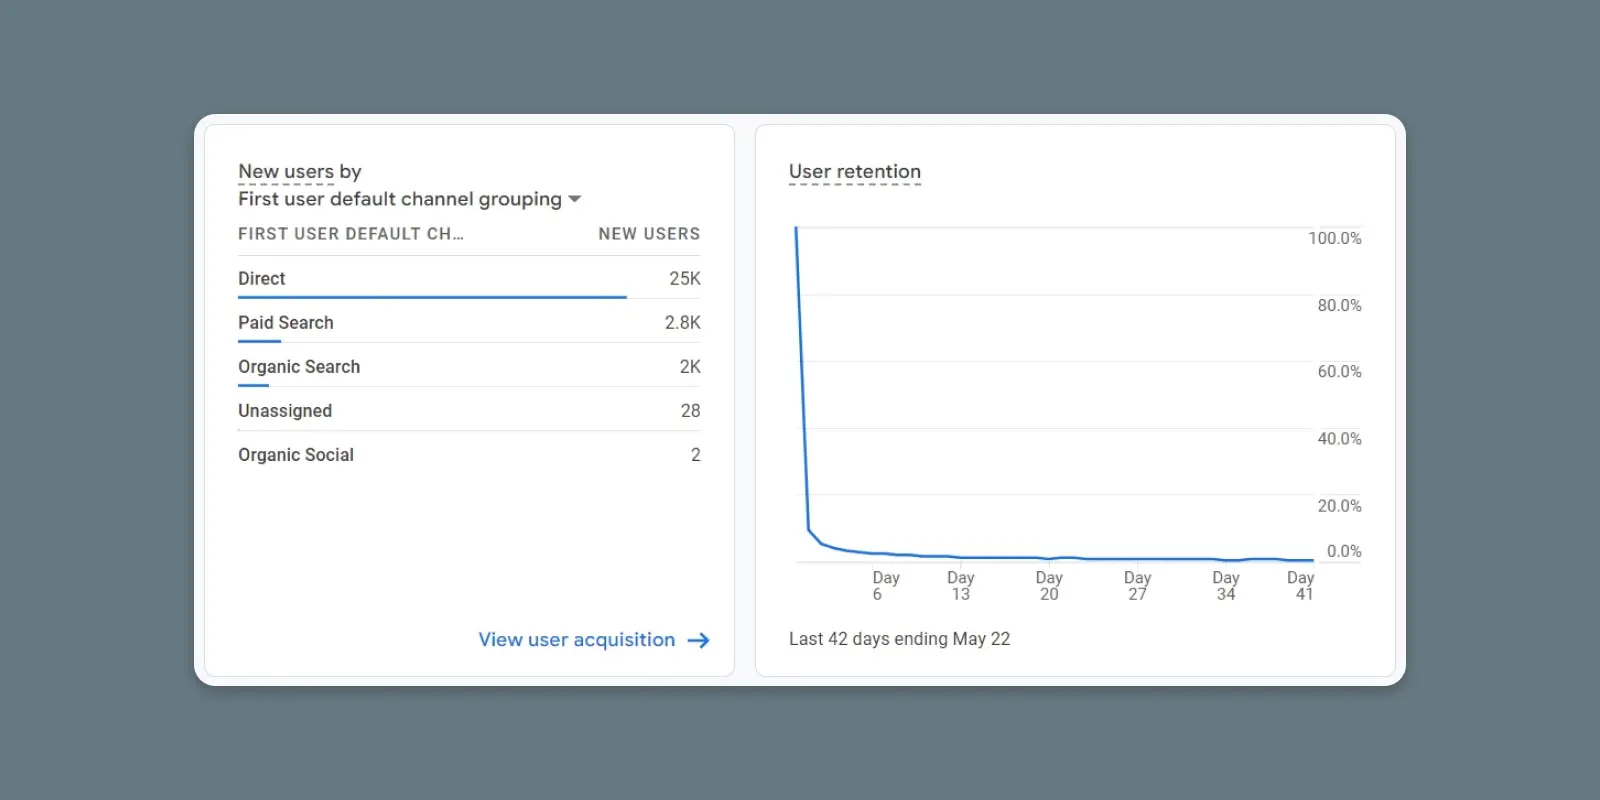
Once you start setting up custom insights, you’ll get an idea of how big the difference between Universal Analytics and Google Analytics 4 is:
If you want to experiment with Google Analytics 4 before setting up a new property, there’s an official demo account that you can use. Additionally, keep in mind that you can switch between Universal Analytics and Google Analytics 4 properties by selecting either option from your list of properties.
Getting Up To Speed On GA4
Once your GA4 properties are up and running, you can start exploring the new platform! Here are some good places to start as you familiarize yourself with GA4’s changes and new features.
Get To Know Your New Dashboard
When you open your GA4 dashboard for the first time, you’ll likely notice that the reports and visualizations you’re used to seeing aren’t where they used to be.
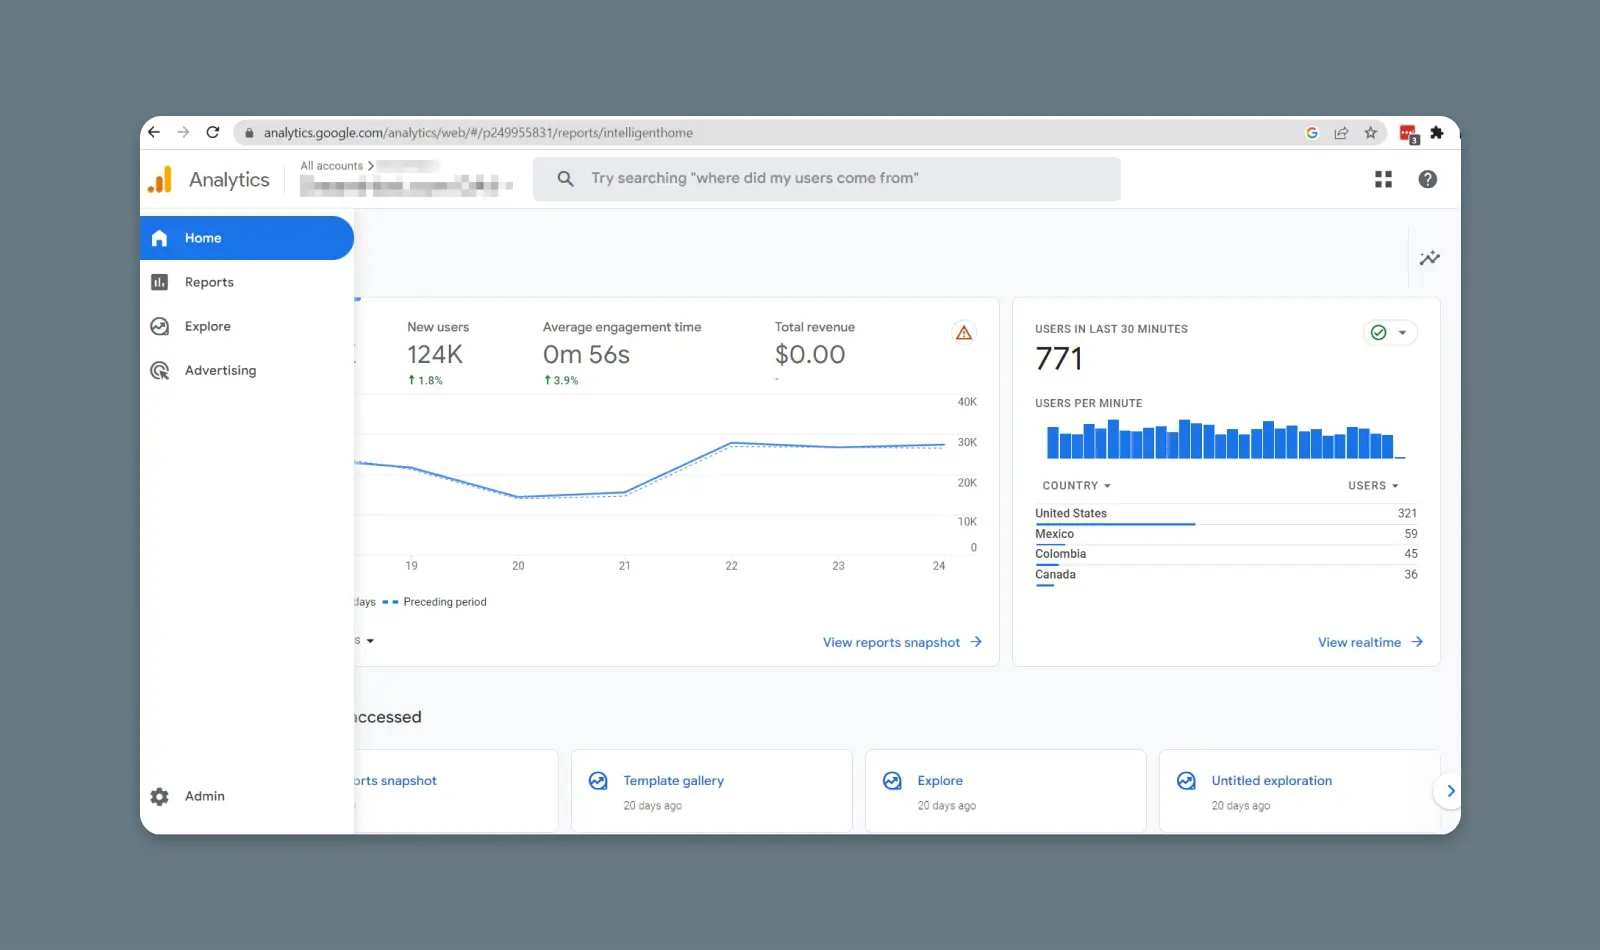
The middle of the dashboard offers a snapshot of your property. You’ll find a Recently Viewed section below, with all the reports you’ve accessed most recently. Below that is the Insights section, which shows some of the AI-driven insights Google thinks are most relevant to you and your properties.
On the left-hand side of the screen is a navigation menu, which you’ll use to access all the other areas of GA4.
Test Out The Powerful New Search Bar
If you’re brand new to GA4, a great place to start is the search bar. Google has revamped it, and it has an especially powerful, useful new feature: You can type a question in plain English, and the results will direct you toward the report, insight, or other page where you can find the information you’re looking for.
Here are some search bar queries you can try out to get the hang of the new search:
- What landing pages on my website are currently experiencing the most traffic?
- What is the overall bounce rate for my website?
- What is the conversion rate for my most popular product?
- What are the top traffic sources to my website?
- What is the average session duration for my website?
Check Out The Reports Dashboard
From the left-hand menu on your dashboard, click the second icon from the top (the one that looks like a graph). This will take you to your reports dashboard.
For longtime UA users, this dashboard will likely feel the most familiar. This is where you’ll find snapshots of all kinds of GA4 reports, including real-time site data.
Every report dashboard will look a little different because Google will choose the default reports it thinks are most relevant to each site, but GA4 allows you to customize reports on your dashboard – you can see all the data that matters most to you (at a glance!). Click the six dots to drag and reorder your snapshots, the X to remove cards, and the + to add new cards.
Get To Know Explorations
Explorations combine the features of GA4’s custom reports with its AI capabilities, and allow you to create extremely detailed, granular reports and visualizations from scratch.
Or, for more beginning users, there’s the template gallery. It contains a dozen pre-built reports exploring some of the most useful metrics GA4 offers:
- Free form
- Funnel exploration
- Path exploration
- Segment overlap
- User explorer
- Cohort exploration
- User lifetime
- Acquisition
- Conversion
- User behavior
- Ecommerce
- Gaming
Explorations templates are a great place to start when you set up GA4 for the first time. Play around with different segments, dimensions, and events to see how they change your reports and visualizations. You’ll get the hang of GA4 in no time!
Common Issues With Google Analytics 4
Although transitioning to Google Analytics 4 is simple, users report some common issues when first using the “new” platform. Let’s talk about some of those issues and how to tackle them!
Configuring Google Analytics 4 Takes Time
GA4 definitely has a learning curve. While it automatically sets up tracking for several types of events when you configure it for your website, the platform really shines when and if you take the time to set up custom events and reports.
If you don’t configure Google Analytics to track custom events, you’re missing out on what is perhaps the most powerful feature the platform offers. With custom events, you can collect data on the measurements that matter the most to you, all without adding custom code to your site.
Moving Your Historical Data To GA4 Is Tricky
After UA sunsets, users will have temporary viewer access, so they won’t immediately lose all their historical data. Can you migrate that data into GA4 to pick up where you left off? Unfortunately, not really.
While GA4 offers some solutions for importing and migrating data, the two versions have different data collection models, so not all data from UA will have a direct equivalent in GA4. It’s something we’re hoping Google will eventually address, but for now, historical data in GA4 is limited.
Reports In Google Analytics Are Limited
Out of the box, reports in Google Analytics 4 are somewhat limited. For the platform to provide you with deeper insights into your customers’ behavior, you need to configure it to track the specific events you want and show that data in the way you need.
Google Analytics 4 makes this process relatively straightforward, depending on what type of events you want to track. However, even after setting up custom reports, accurate numbers may take a while to show up on your dashboard, because Analytics 4 uses machine learning to improve how it reports information.
There Are Differences In Reports Between Universal Analytics And Google Analytics 4
One of the most common complaints among new Google Analytics 4 users is that the numbers you see in the dashboard might not match your Universal Analytics property. This difference in data is because both services collect and count data differently. Where Universal Analytics relies on cookies and sessions, Analytics 4 tracks events.
For now, you can rely on metrics from both services to inform your decisions. However, you’ll need to get used to the Analytics 4 approach as we near the retirement date for Universal Analytics.
Google Analytics 4 Doesn’t Track Bounce Rate
Bounce Rate
A website’s bounce rate indicates the percentage of users who try to access one of its pages but decide to leave before interacting.
Read MoreThere is a lot of discussion about whether the way bounce rate is currently measured makes sense or not. Google Analytics 4 does away with bounce rate entirely. Instead, it measures “engagement”:
Engagement reports use a broad range of metrics to provide a comprehensive overview of how users first perceive your website. If you want to continue measuring bounce rate, you can use Universal Analytics while it’s still active.
Frequently Asked Questions About GA4
What Is Google Analytics 4?
GA4 is Google’s latest analytics platform, providing businesses with advanced analytics capabilities, cross-platform tracking, user-centric measurement, and machine learning insights to understand user behavior and optimize marketing strategies.
What’s The Difference Between Universal Analytics And GA4?
Universal Analytics (UA) is the previous version of Google Analytics that primarily focuses on session-based tracking, while Google Analytics 4 (GA4) introduces an event-driven data model, cross-platform tracking, user-centric measurement, and enhanced machine learning capabilities for more comprehensive and personalized analytics.
Can You Use Both Universal Analytics And GA4?
Until July 1, you can use both, but Google is sunsetting Universal Analytics for most users on that date. This means, from then on, new data will only be collected in GA4.
Should I Switch To GA4?
Yes. As of July 1, UA will begin the process of shutting down. GA4 represents the direction of Google Analytics and offers a more robust and advanced set of features. By transitioning to GA4, you can take advantage of the latest tracking capabilities, gain deeper insights into user behavior, and stay ahead in the evolving landscape of analytics and marketing.
How Does GA4 Work With Google Ads?
GA4 works seamlessly with Google Ads to provide comprehensive insights and optimization opportunities. By linking GA4 with Google Ads, advertisers can directly access data-driven metrics and audience insights in the Google Ads interface. This integration allows for better measurement and attribution of campaigns, as GA4 tracks user interactions and conversions across multiple touchpoints.
How Does Google Tag Manager (GTM) Work?
In Google Analytics 4 (GA4), Google Tag Manager (GTM) is a powerful tool that simplifies the process of implementing and managing tracking tags on websites and apps. GTM allows you to deploy and update various tracking codes, including GA4 tracking codes, without directly modifying your website’s or app’s source code.
How Can I Learn More About Using GA4?
- Google Analytics Help Center: The official Google Analytics Help Center provides comprehensive documentation, guides, and tutorials on various topics related to GA4. It covers everything from implementation and configuration to reporting and analysis.
- Google Analytics Academy: Google offers online courses through its Analytics Academy platform. These courses cover different aspects of GA4, including implementation, data analysis, and advanced topics. The courses are self-paced and free of charge, providing a structured learning experience.
- Google Analytics YouTube Channel: The Google Analytics YouTube channel features videos and tutorials on GA4. It covers a wide range of topics, including best practices, tips and tricks, and updates on new features.
What The Future Holds For Google Analytics
If you use Google Analytics, it’s essential to start getting acquainted with Google Analytics 4 — time to migrate to the new version is quickly running out.
In the coming weeks, Universal Analytics will cease to collect data. You should have a GA4 property set up and configured by the time that happens. The best time to start is now — so follow the steps above and make sure your data doesn’t get left behind.

Need Help Getting Analytics Up and Running?
Our marketing experts will help you measure your website traffic and convert more website visitors so you can focus on running your business.
Learn More