Trespassing is illegal. But, if you’re encountering the 403 Forbidden error, you’re probably not trying to break into some sort of a top-secret black site.
The 403 Forbidden error typically occurs when you’re trying to log in to WordPress or visit a specific page, but can’t. This can be incredibly frustrating.
Fortunately, there are a few simple fixes for this common WordPress error. Depending on your hosting plan, you may even be able to resolve the issue with help from your web host.
In this post, we’ll take a closer look at the 403 Forbidden error and its main causes. We’ll then show you 12 ways to fix it.
What Is The 403 Forbidden Error?
The 403 Forbidden error means the server understood your request but refuses to authorize it — you (or your IP address) don’t have permission to access that particular page. On WordPress sites, the usual culprits are incorrect file permissions, a corrupt .htaccess file, or a security plugin or firewall blocking the request.
(It’s different from a 401 Unauthorized error, which means you haven’t logged in yet. A 403 says: logging in won’t change the answer — the server is refusing the request itself.)
The 403 Forbidden error typically appears when you’re trying to log in to your WordPress admin area or when visiting a specific page on your site. You may also encounter it while installing WordPress.
It’s one of several HTTP status codes used by servers to communicate with your browser.
The error is usually accompanied by one of the following messages (or similar variations):
- “HTTP 403 Forbidden – Access to this resource on the server is denied.”
- “HTTP Error 403 – Forbidden.”
- “Forbidden – You don’t have permission to access [directory name] on this server.”
- “You are not authorized to view this page.”
- “It appears you don’t have permission to access this page.”
- “403. That’s an error. Your client does not have permission to get URL [address] from this server.”
Instead of the “403 Forbidden” status, you might come across a simple notification that says “Access Denied.” It is also possible that you will get the following message: “Access to [domain name] was denied. You don’t have authorization to view this page.”
What Causes The 403 Forbidden Error?
There are several possible causes of the 403 Forbidden error code, and one of the most common is an incorrect file permission on your server.
File Permissions
File permissions are rules that govern which user roles can carry out which interactions with specific files and directories within a filing system, network, or device.
Read MoreThis means that one or more files the browser is trying to access are not accessible because of their permissions.
Permissions directives determine who can view and modify the files on your website and your web server. They protect your files from outside tampering. But, in some cases, if misconfigured, they can prevent your site from working correctly.
However, this error can also be triggered by a faulty plugin or a corrupt .htaccess file.
.htaccess
’.htaccess’ is a configuration file used by the Apache web server software. The .htaccess file contains directives (instructions) that tell Apache how to behave for a particular website or directory.
Read MoreOn modern WordPress sites, security tooling is just as common a culprit: a security plugin, a server firewall rule (mod_security), or a web application firewall (WAF) at your CDN can block a request — or your IP address — outright. Seeing the 403 only on wp-admin or wp-login.php? Skip straight to fix 11; that pattern almost always means a security rule, not permissions.
In most cases, you should be able to resolve the issue on your own. However, you might also need to get in touch with your hosting provider to access or change some settings on your site.
12 Ways To Fix The 403 Forbidden Error In WordPress
Now, let’s go through a few ways you can fix the 403 Forbidden error.
First, we recommend that you make a backup of your site just in case something goes wrong and you need to restore it to an earlier version.
We’ll explore some common causes and how to fix the problem:
- Check the URL
- Perform a (Hard) Refresh
- Clear Browser Cache
- Disconnect from VPN
- Check Index Page
- Change Your File Permissions
- Deactivate Your WordPress Plugins
- Delete and Restore the .htaccess File
- Deactivate Your CDN
- Check Your Hotlink Protection
- Check Security Plugins and Firewall Rules
- Contact Your Web Host
1. Check The URL
Before we delve deeper, let’s make an assumption — you’re operating on a private Wi-Fi network. It’s important to note that public networks often have different firewall rules that may prevent you from accessing your website.
With our Wi-Fi network disclaimers out of the way, let’s really begin.
First, double-check the URL that you’re typing into your web browser and make sure that it’s pointing to the correct website and web page.
Sometimes a small mistype can land you on a protected path or a bare directory the server refuses to list — both of which return a 403 instead of the usual 404.
If the URL looks correct and there are no problems with its structure, format, or spelling, then we’ll move onto refreshing the page.
2. Perform A (Hard) Refresh
Next, try refreshing the page.
In most browsers like Google Chrome, you can do this by simply clicking on the address bar to highlight the address. Then press “Enter.”
If refreshing doesn’t help, then let’s try a “Hard” refresh.
This is a simple trick that clears your browser’s cache for the specific page you’re trying to access. This forces the browser to download the latest version of the page and might fix the issue.
Cache
A cache is a temporary data storage layer that is designed to improve data access speeds by reducing the time needed to read and write data from a permanent data storage location.
Read MoreTo perform a hard refresh in Google Chrome: open the page and press Ctrl + Shift + R on Windows, or Cmd + Shift + R on Mac.
The page should refresh and you can see if this solved the problem.
If not, then let’s take it to the next step.
3. Clear Browser Cache
Website errors are either caused by server-side problems (issues with the website, server, or configuration) or client-side problems (issues with the browser or user’s device, settings, etc).
Your browser cache is one client-side problem that can cause many unexpected issues.
Luckily it’s easy to fix. You just clear the cache to force your browser to fully fetch content from the pages you’re trying to visit.
Follow these instructions to clear your browser’s cache.
Nerd note: If this doesn’t work and you really want to be sure it’s not a caching issue, you can try flushing your DNS cache, too. Just to be safe.
4. Disconnect From VPN
VPNs (Virtual Private Networks) are great for masking your location and protecting your privacy online. Because they route your internet activity through somewhere other than your actual location, they also change your IP address.
This is good for privacy, but it can create access and permissions issues on certain websites.
If you’re using a VPN, try disabling it and then repeating the above steps.
5. Check Index Page
Now we’re going to dig in a bit further and start diagnosing potential problems with your website files, permissions settings, and other problems that may give rise to the 403 error.
Most websites, including WordPress sites, expect your homepage to have a specific file name by default.
Unless otherwise specified, the site will look for a file named something like:
- Index.php
- Index.html
If the page is missing, you’ll likely have issues.
Before we start adjusting file permissions, let’s just make sure that your homepage file is intact and correctly named.
To do this, you’ll need to take one to two steps:
- Connect to your site with a Secure File Transfer Protocol (S/FTP) client, such as FileZilla
- Access your site through the file manager in your hosting account
If you have a DreamHost account, this guide from our knowledge base will walk you through accessing and utilizing the built-in file manager.
Whether you access your files through S/FTP or a file manager, you need to look for your “index” file.
Inside your root directory, you’ll likely find a folder called something like “myexamplesite.com” (If you’re a DreamPress user, the folder will be called “{YOURSITE}.dream.press”.)
This is the main folder that contains all of your website’s files.
Open it and look for a file called either “index.html” or “index.php”.
If you’re using WordPress, then you may need to take a few extra steps. Navigate to wp-content > themes > {YOUR THEME}. The index file for your specific site theme should live in this folder.
If you find an index.php or index.html file, then this is unlikely to be causing your 403 error.
If you can’t find an index file, then this could be the issue that’s generating the 403 error.
Start by creating and uploading a blank “index.html” or “index.php” file into the relevant folder.
Then go try your website again, performing a hard refresh.
You probably won’t see your website, but if you see a blank screen rather than the 403 error, then it’s likely that you’ve found the problem.
At this point, you’ll probably want to try contacting your web host for help. Alternatively, roll back your website to a previous backup version before the problem occurred.
If you’re using WordPress, you could consider installing WordPress again. (A core reinstall replaces WordPress’s own files without touching your database content — though depending on how you reinstall, you may need to re-add themes and plugins.)
6. Change Your File Permissions
Every WordPress file on your site’s server has its own access permissions. These settings control who can access and modify its contents. If these files have incorrect permissions, your server will stop you from accessing them.
As we covered in the last section, you can access your website either through S/FTP client or a file manager app. Once you do so, you’ll need to find your “public_html” folder or whichever folder contains all of your website files in the directory browsing window.
Then, right-click on it and choose File Attributes.
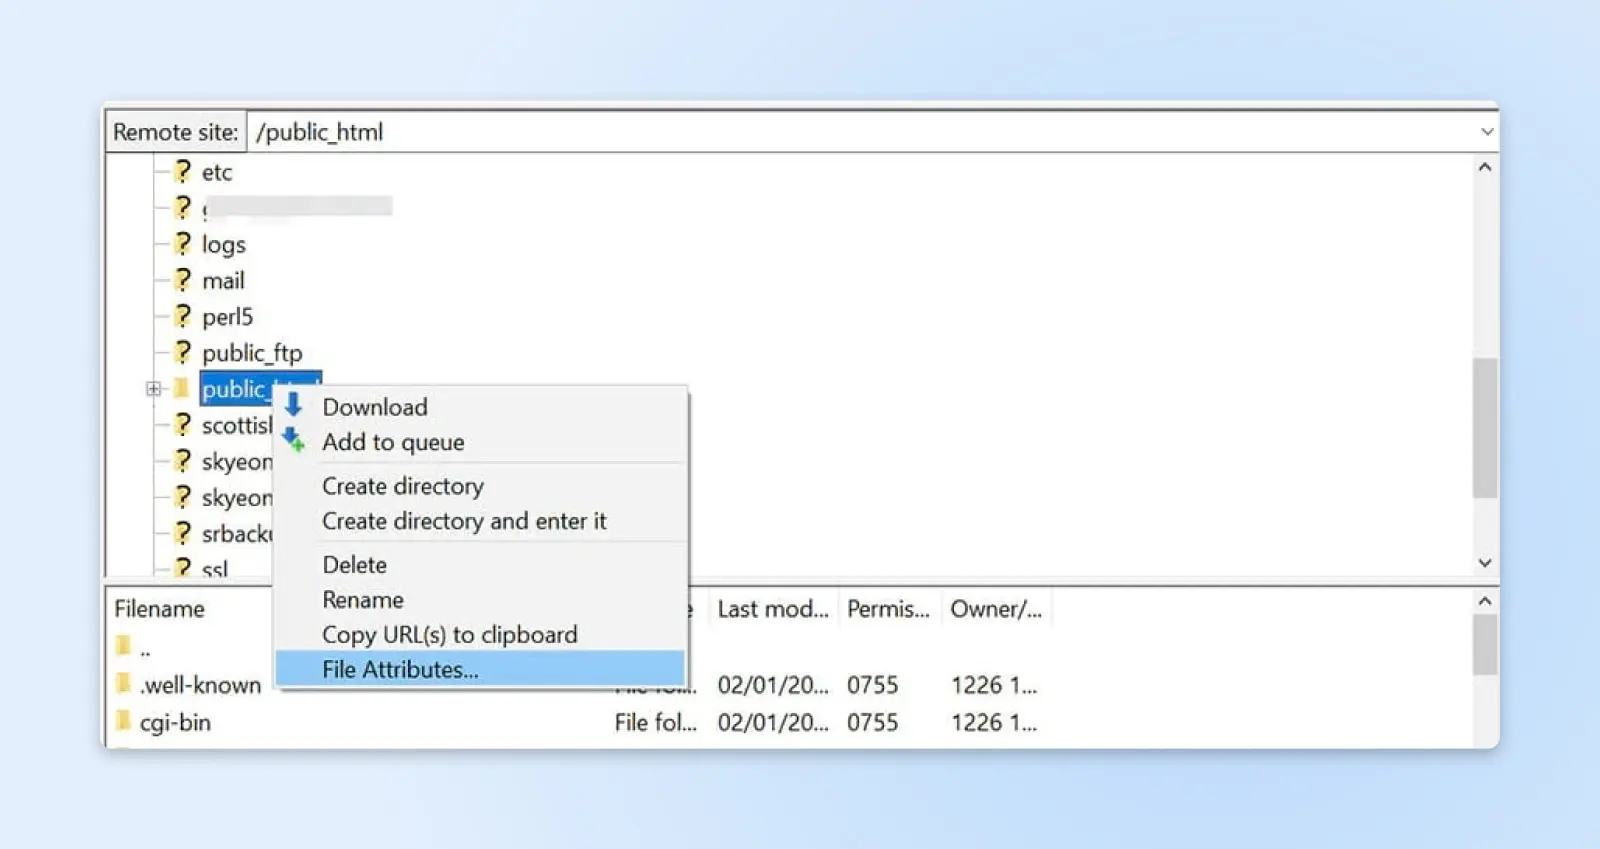
In the popup window, locate the Numeric field and enter “755” or “750” in the value box. Then select the “Recurse into subdirectories” and “Apply to directories only” options, and click on “OK.”
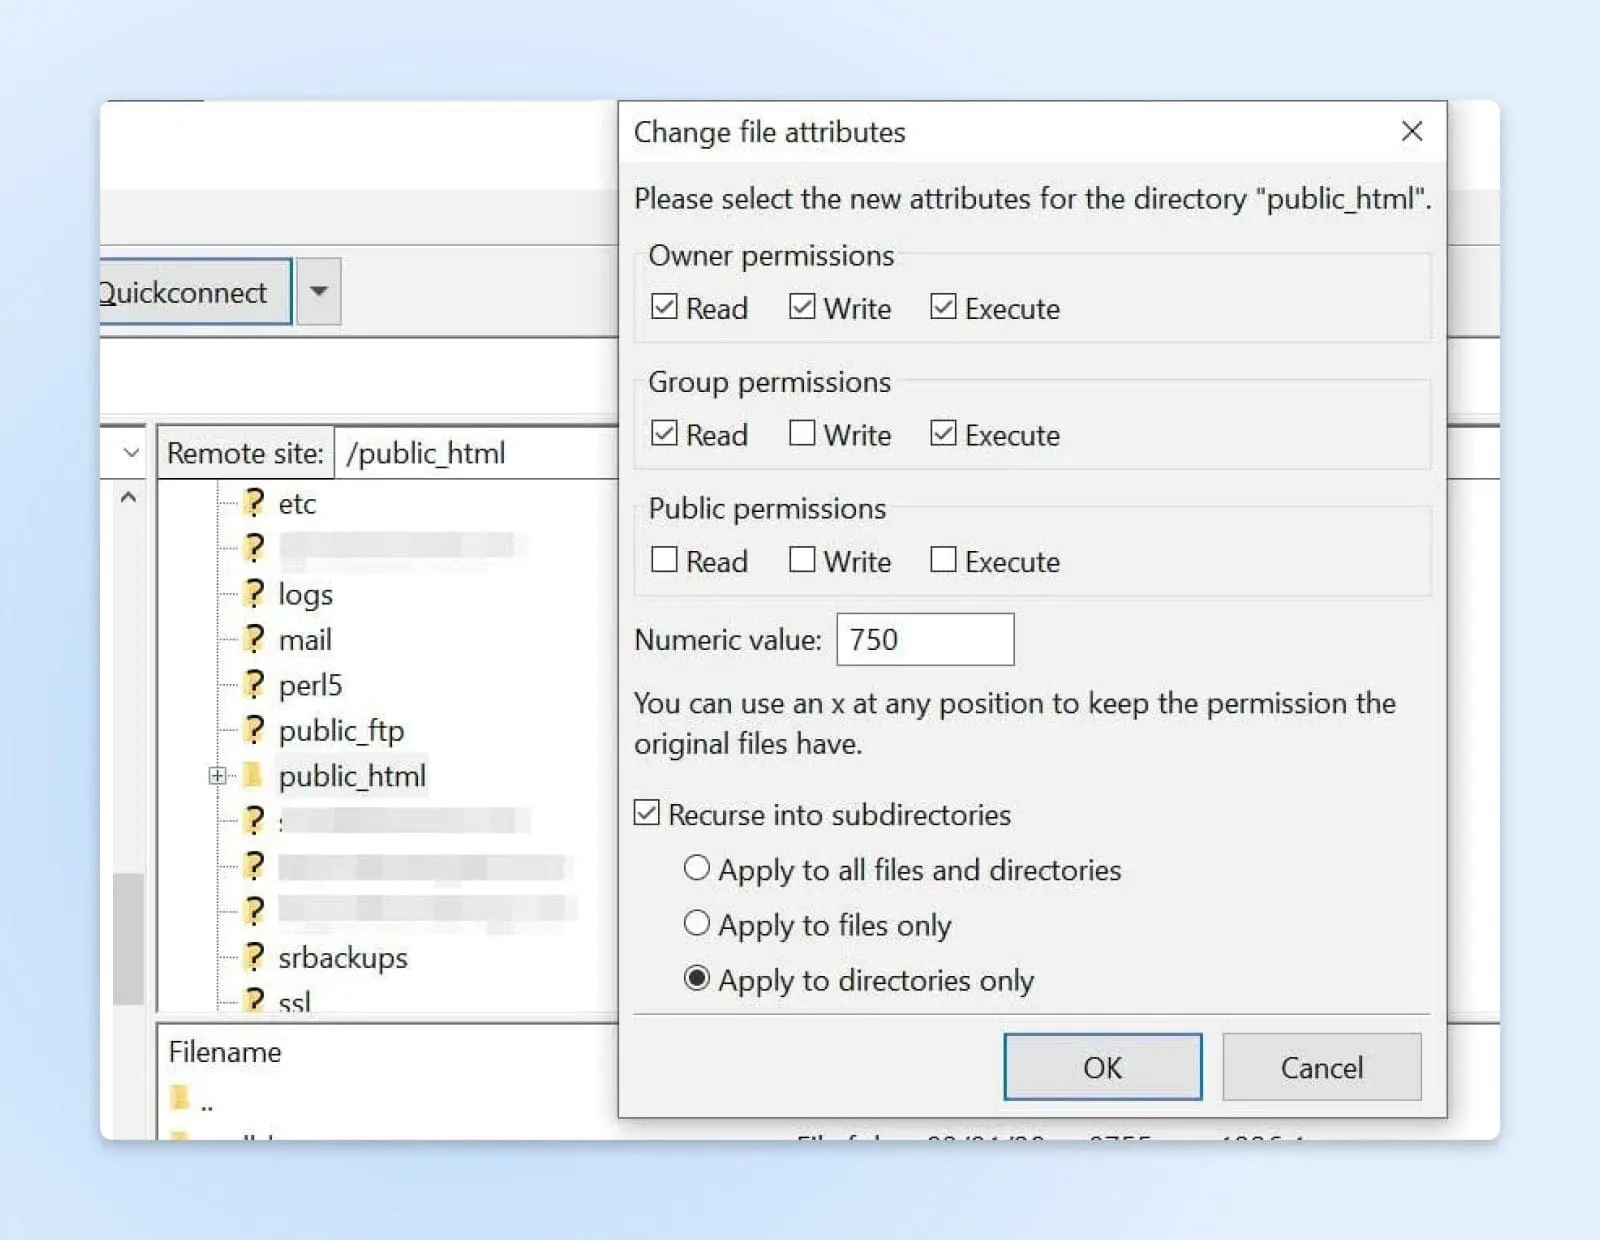
So far, you’ve applied the correct folder permissions just for your directories. You’ll now do the same thing for your files.
To start, right-click on your public_html folder and select File Attributes. This time, you’ll need to type “644” in the Numeric value field. Then choose Recurse into subdirectories, select Apply to files only, and click on OK.

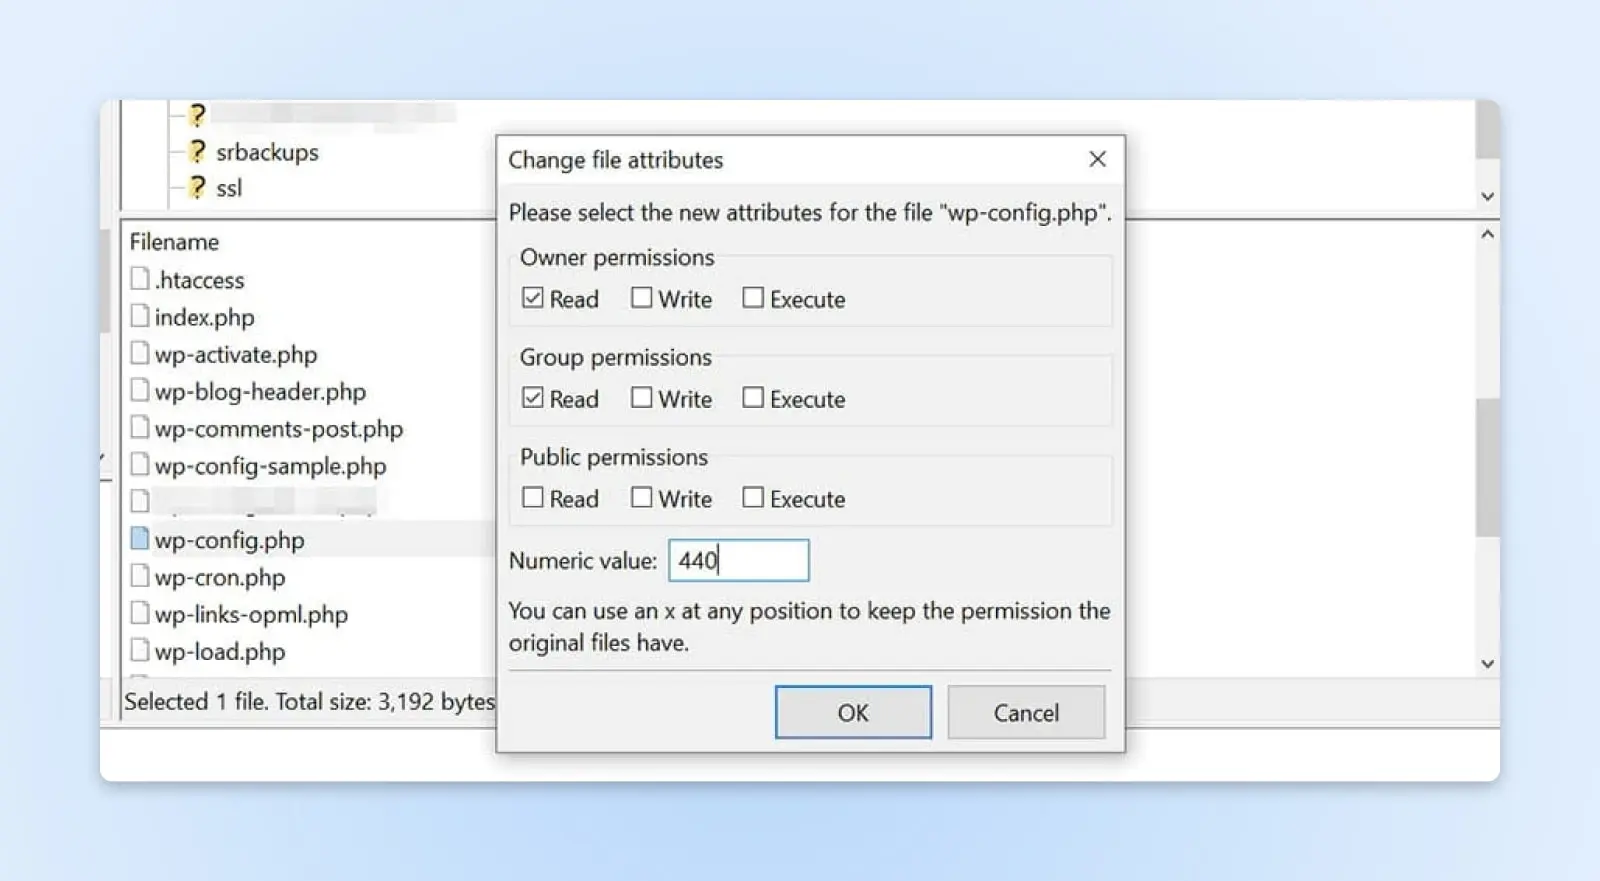
Nerd note: Your wp-config.php file requires a different numeric value than the ones stated here. This unique value prevents other users on your servers from accessing the file. Therefore, you’ll need to change its file permission manually.
In your root directory, find the wp-config.php file, right-click, and select File permissions. Next, set the numeric value to “440”, and click OK.
Now, every one of your WordPress files and folders should have the correct permissions. Once you’ve completed the above steps, go back to your site and try to reproduce the 403 Forbidden error. If your site works fine, you don’t need to do anything else.
However, don’t worry if you’re still facing the same problem. There are still a few more fixes to try.
7. Deactivate Your WordPress Plugins
As we mentioned earlier, the 403 Forbidden error can also be caused by a faulty plugin. To determine if this is the case, you’ll need to deactivate your plugins and then reactivate them individually.
To start, connect to your site via FileZilla or the file manager in your hosting account. Then, open the wp-content folder in your site’s root directory and locate the plugins folder. Right-click on the plugins folder and select Rename.
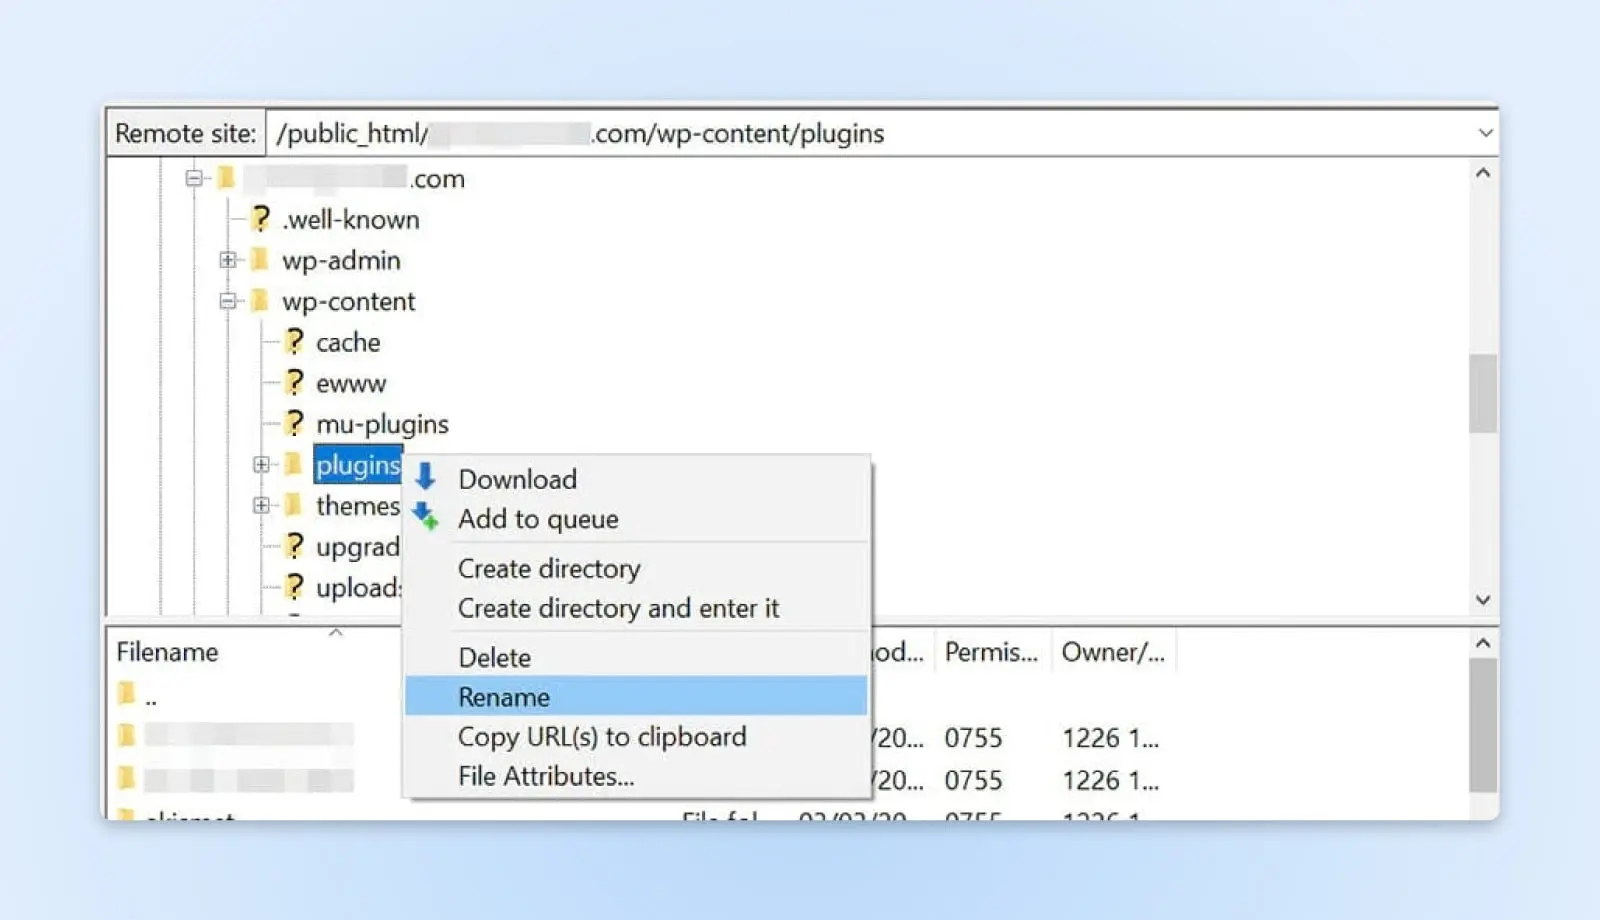
Next, give the folder a new name, for example, “plugins_test”. This will automatically deactivate all of your plugins.
If you can access your site after renaming the folder, then the 403 Forbidden error was caused by a glitchy plugin. Your next step is to find out which one it is.
First, return to your site’s root directory and rename the plugins folder back to “plugins”. Then, navigate to the Plugins page in your WordPress dashboard and activate the plugins one at a time. Keep doing this until you are able to reproduce the error.
Once you’ve identified the faulty plugin, you can either remove it or contact its developer for support.
8. Delete And Restore The .htaccess File
A corrupt or misconfigured .htaccess file can also trigger the 403 Forbidden error. This file is located in your site’s root directory and enables WordPress to interact with your server.
.htaccess is a file used on Apache web servers. It contains rules and directives about your website. If it becomes corrupted or misconfigured, it can create problems like the 403 error (among other things).
How do you fix it?
Inside your site’s root directory, locate the .htaccess file, right-click on it, and choose Delete.

Now, try accessing your site again. If the 403 Forbidden error has disappeared, then your .htaccess file may have been corrupted. This means you’ll need to create a new one.
To do this, navigate to Settings in your WordPress dashboard and select Permalinks. Then click on the Save Changes button at the bottom of the page, and a new .htaccess file will be generated. You can look for the file in your site’s directory to ensure that it has been restored. (If your host runs your site on nginx — DreamPress does — there’s no .htaccess file at all, and you can skip this step.)
9. Deactivate Your CDN
If you’re still getting the 403 Forbidden error after completing the above steps, you may have a problem with your Content Delivery Network (CDN). This is a network of servers located in different parts of the world, with each server hosting a copy of your website. Many hosting plans come with a CDN to help boost your site’s performance.
CDN
CDN is an abbreviation for “Content Delivery Network”. It refers to a geographically-distributed network of web servers (and their data centers). The entities that make up a CDN collaborate to ensure speedy content delivery via the internet.
Read MoreTo see if your CDN is the cause of the error, you’ll need to temporarily disable it. You can do this by logging into your hosting account and locating your CDN settings. If you’re unable to access your CDN, we recommend getting in touch with your hosting provider.
10. Check Your Hotlink Protection
Next, you might want to check your site’s hotlink protection.
Hotlinking is when someone embeds media files on their site by linking them directly from another site. Some individuals may do this to use another site owner’s bandwidth (rather than their own), which is effectively theft.
Some hosts and CDN providers offer hotlink protection.
However, if this is not set up properly, it can trigger a 403 Forbidden error on your site.
Therefore, you may want to contact your web host about this issue. While you may want to look into this yourself, it’s best to get help from a technical expert to ensure that your hotlink protection is configured correctly.
11. Check Security Plugins And Firewall Rules
On modern WordPress sites, this is one of the most common causes of a 403 — especially when the error appears only on wp-admin or wp-login.php. Security plugins like Wordfence return exactly this error when a firewall rule flags a request as unsafe (Wordfence’s outright IP blocks show a similar page, usually with a 503 code), and server-level firewalls — mod_security, or a web application firewall (WAF) at your CDN — refuse requests they consider suspicious.
Things to try:
- If you use a security plugin, check its firewall or blocking log for your own IP address, and allowlist it (add it to the list of addresses that are never blocked). Locked out of the dashboard entirely? Deactivate the security plugin over S/FTP by renaming its folder — the same technique as fix 7.
- If your site sits behind Cloudflare or another CDN with a firewall, review its security events for blocked requests. Country and firewall blocks surface as 403s (Cloudflare labels them error 1020); rate limits usually return a 429 instead.
- If the rule looks server-side (mod_security is a common one), your host can check and adjust it. Mention the exact time you hit the error so they can find it in the logs.
12. Contact Your Web Host
If all else fails, ask for help.
Your website hosting company’s support team should be able to provide additional steps and ideas for troubleshooting this issue.
In some cases, it could be triggered by a server configuration problem, changes to the DNS, or even malware or other website attacks.
403 Forbidden FAQ
Why Do I Get A 403 Error Only On wp-admin?
That pattern almost always points to a security rule, not file permissions. A security plugin, mod_security, or your CDN’s firewall is blocking the login path or your IP address. Check the firewall logs (fix 11) and allowlist yourself.
What’s The Difference Between A 401 And A 403 Error?
A 401 Unauthorized means the server doesn’t know who you are — logging in usually fixes it. A 403 Forbidden means the server understood your request and still refuses it: permissions, firewall rules, or a block on your IP address.
Does A 403 Error Mean I’ve Been Banned?
Sometimes. Security tools ban IP addresses after repeated failed logins, and some sites block whole countries or VPN ranges. If a site works with your VPN off but not on (or vice versa), an IP-level block is your answer.
Why Does My Whole Site Return 403 After A Migration?
File ownership and permissions usually don’t survive a server move intact. Reset directories to 755 and files to 644 (fix 6), set wp-config.php to 440, and check that the migrated .htaccess doesn’t reference paths from the old server.
Can A 403 Error Hurt My SEO?
Yes, if it lingers. Pages that return 403 to Google’s crawler get dropped from the index over time. Fix the error promptly, then check Search Console’s page indexing report to confirm the affected URLs recover.
Additional WordPress Resources
If you’re new to WordPress, you’re bound to run into some technical issues while setting up your site. To help you fix some of the most common WordPress errors, we’ve put together several how-to guides:
- How to Fix Common WordPress Errors
- How to Troubleshoot the WordPress White Screen of Death
- How to Fix the 500 Internal Server Error in WordPress
- How to Fix Syntax Errors in WordPress
- How to Fix the WordPress Not Sending Email Issue
- How to Fix the Error Establishing a Database Connection in WordPress
- How to Fix WordPress Error 404 Not Found
- How to Fix White Text and Missing Buttons in the WordPress Visual Editor
- How to Fix the Sidebar Below Content Error in WordPress
- What to Do When You’re Locked Out of the WordPress Admin Area
- How to Fix the WordPress Memory Exhausted Error By Increasing Your Site’s PHP Memory Limit
- How to Fix the “Upload: Failed to Write File to Disk” Error in WordPress
Meanwhile, if you’re looking for more WordPress tips and hacks, check out our WordPress Tutorials. This collection of guides will help you set up and design your first WordPress site like a professional.

