If you’re reading this, it’s too late.
(No, I’m kidding. That’s a Drake mixtape from 2015.)
If you’re reading this, you’ve probably just tried to visit your WordPress website and were greeted with a menacing message.
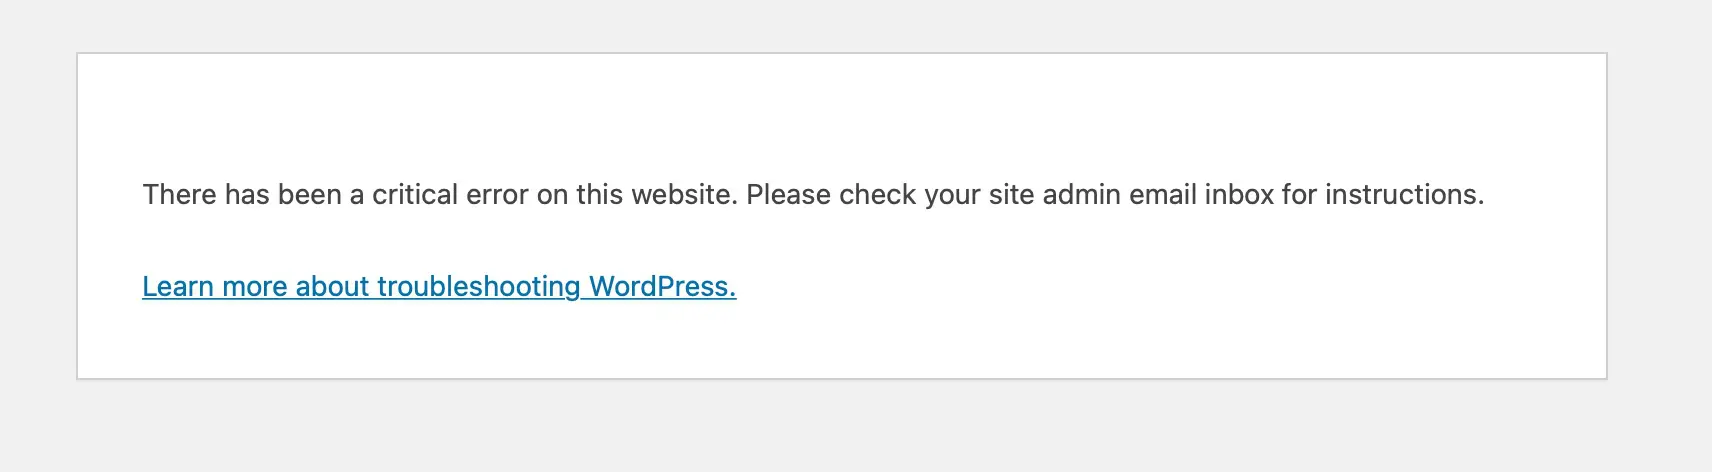
“There has been a critical error on this website.”
Gulp.
But it’s okay. We can fix it.
Step one: Don’t panic.
What you have encountered is the “critical error message.”
(Or, the artist formerly known as the White Screen of Death, AKA the WSoD.)
This is one of the most common WordPress errors, and while that moniker sounds intimidating, the reality isn’t as terrifying as you might imagine.
For many years, WordPress sites experiencing this issue would simply be greeted with a blank, all-white screen.
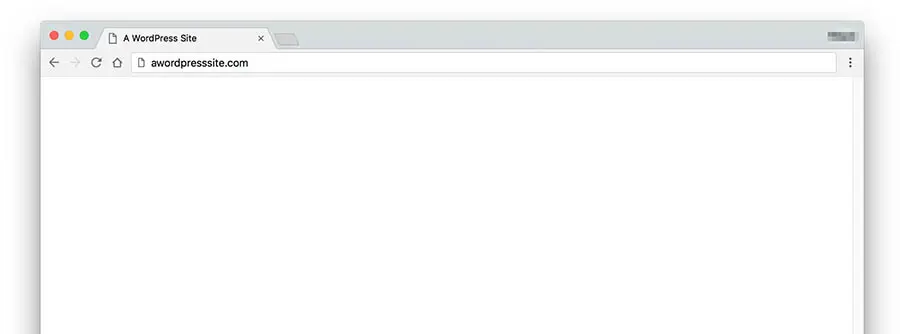
(It wasn’t very helpful.)
But, since WordPress version 5.2, there’s an error message that lets you know when things have gone wrong and gives you an idea of how to fix the issue.
In this guide, we’ll dig deeper into the reasons why the critical error message occurs and how to deal with it when it does.
Let’s party!
What Is A WordPress Critical Error?
The fabled critical error or WSoD can occur when certain things go wrong with WordPress.
Usually, you’ll see the above message (or, in some cases, the plain white screen) when trying to access your site’s frontend. In some cases, you’ll see the same result when trying to access the WordPress admin panel (“wp-admin”), making the error especially scary for someone experiencing it for the first time.
Don’t worry, though — Your site is still there. You just need to resolve the error to bring it back to life.
Before we get to that, what causes the critical error to happen in the first place?
The problem often stems from an issue with your site’s PHP, which is the programming language WordPress is based on.
PHP
PHP (Hypertext Preprocessor) is an open-source scripting language. It’s widely used in web development and can be embedded in HTML. Several popular Content Management Systems (CMS), such as WordPress, are built with PHP.
Read MoreThe error is usually triggered because of:
- Faulty code added to your website
- Conflicts between plugins
- PHP version issues/memory limitations
We’re going to help you figure out which issue is causing your case and how you can fix it. You’ll probably learn a lot about WordPress along the way, too.
Restoring From A Backup
The quickest and easiest way to resolve the critical error issue is to simply revert your website to a previous version.
In most cases, the problem was caused by a change made to WordPress.
For instance, if you recently installed a new plugin, added some code to your site, or made edits to your site’s theme files.
Before we dive into how to fix those problems, consider restoring a backup copy of your website.
Many WordPress hosting providers offer managed backup services.
If that’s the case, then all you need to do is log into your hosting account and find where the backups are stored. Look for a backup that was created before the error started to occur.
Sometimes this may not be an option — Maybe your web host doesn’t provide backups, or perhaps you’ve recently made a lot of changes to your site or added a lot of content that you don’t want to lose.
If that’s the case, then we’ll need to dig in to solve the issue another way.
(It’s worth noting that if you do restore an earlier version of your site, you will likely lose all changes made to your site between now and when the backup was created. That includes new posts or pages, uploaded image files, and any other updates you made during that time.)
Quick Fixes For The Critical Error Problem
Let’s start with a few easy fixes first.
Read The Email From WordPress (If Applicable)
Best case scenario: Once this error is triggered on your site, you may receive an email from WordPress sent to the admin email address.
The error you see will say something like:
If you check your email, you should receive a notification about the error and some details about troubleshooting.
Follow the instructions from the email and see if that resolves the issue.
In some cases, you’ll see just the plain white screen or receive an error message without mentioning an incoming email.
If that’s the case, check out the next few steps to resolve the problem another way.
Try Using Recovery Mode
In some cases, the email you receive from WordPress will prompt you to initiate a special feature called Recovery Mode.
This will let you regain access to your WP admin panel to troubleshoot errors, but importantly, this will not fix the problem. Instead, it will just grant you access to the WP admin panel to disable plugins or fix any code errors without resorting to FTP/SFTP access.
Even if you didn’t receive an email with instructions or the instructions didn’t work, you can still try using Recovery Mode manually.
To log into your site via Recovery Mode, just visit this URL:
yoursite.com/wp-login.php?action=entered_recovery_mode
From there, you’ll be prompted with a WordPress login screen where you can enter your username and password.
Jump in and revert any changes, roll back your themes, plugins, or whatever else may have caused the issue.
Revert The Last Thing You Did On Your Website
Adding a line of code or pasting in a PHP script from the internet could break your site.
If you were recently tinkering with your WordPress site immediately before the issue occurred, the easiest option might be to remove or revert that website change manually.
If you can access the WP admin panel:
Log into your WordPress backend and try removing or reverting the change that you recently made.
For instance, if you added some code from an online tutorial, try deleting that code from your theme files and see if it fixes the issue.
If you recently installed or updated a plugin, try deactivating that plugin.
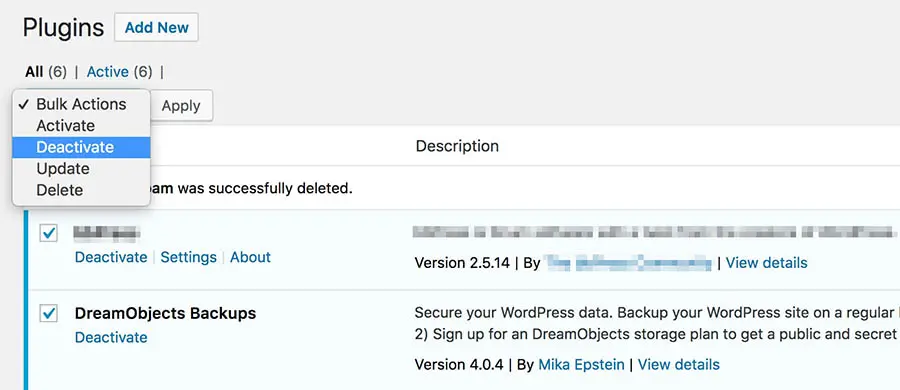
Plugins are the most common culprit behind the WSoD error, so if you made changes to one lately, your first action should be to deactivate it. If you reload your site and everything is back to normal, you’ve found the source of your problem! You should then contact the plugin’s developer or log a ticket in its support forum for further assistance.
If you’re not sure which plugin might be the problem, you can deactivate all your plugins at the same time by going to the Plugins screen in your WordPress dashboard and using the Deactivate option in the Bulk Actions dropdown menu.
If you cannot access the WP admin area:
You’ll need to make these changes by accessing your site’s web server via SFTP/FTP client or using your host’s file manager.
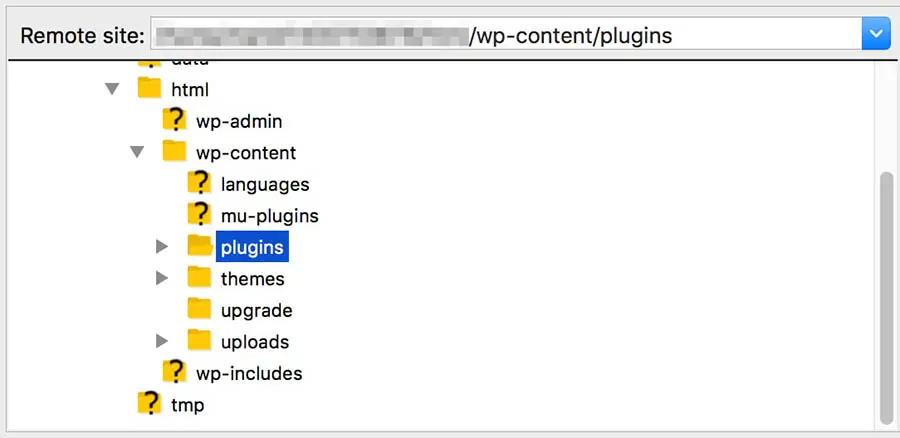
Once you get access to your site, navigate to the main WordPress directory. (Usually named “wordpress” or something like “home,” “html,” or “www.”)
Find the wp-content folder.
From there, you’ll need to make the changes directly in the relevant file.
For instance, say you changed your site’s theme file, which resulted in an error.
Navigate to wp-content > themes > your-theme-name. Then, find the relevant file you edited (e.g., “header.php”). Open the file.
You can edit it using a desktop text editor like Notepad or an IDE like Sublime Text. Remove the code that you added and save the file.
Another situation may be that you installed a new plugin, which caused the error.
In that case, navigate to the /wp-content/plugins folder.
Find the folder of the relevant plugin. Now, rename the folder to anything other than its current name. E.g., change the name from “simple-plugin” to “simple-plugin.renamed.”
This will deactivate the plugin and should fix the issue.
Change Your Theme
Just as plugins can contain outdated or incorrect code, so can themes. Some themes can be improperly coded or cause a conflict with one or more of your plugins. There may have also been a problem with installing or updating the theme that has left it incomplete. Finally, if you’ve made changes to the theme’s functions.php file, that can also cause an error.
Fortunately, checking to see if your theme is causing the WSoD is simple. All you need to do is to disable it and revert to a generic theme instead.
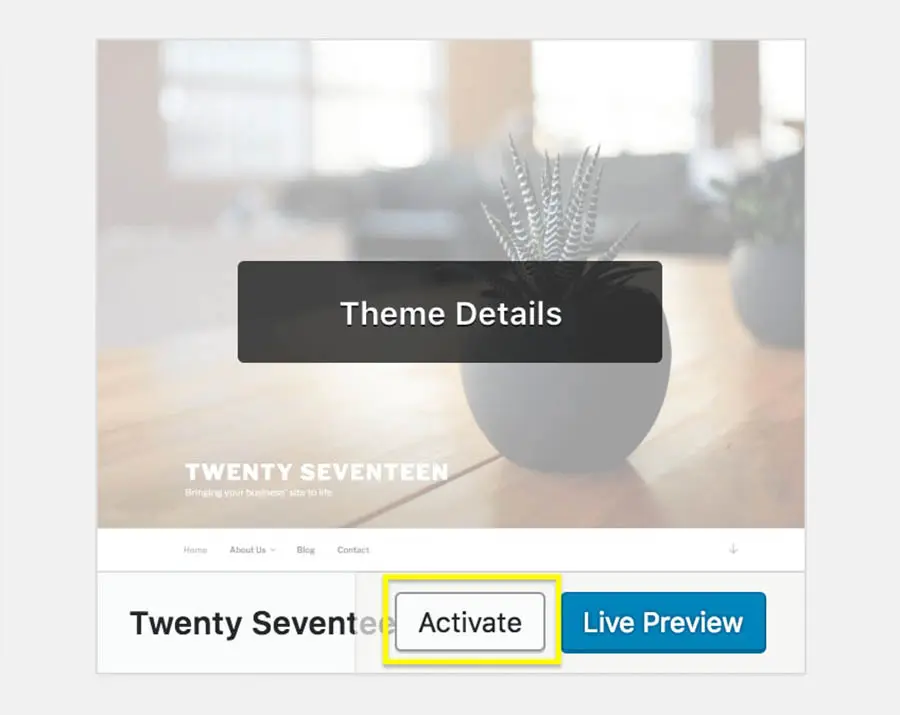
If you have access to the admin dashboard:
Go to Appearance > Themes. Hover over one of the default WordPress themes, such as Twenty Twenty-Three, and click Activate.
If the admin dashboard is not available, you can also do this using SFTP/FTP or File Manager.
Open the /wp-content/themes folder and simply rename the folder for the theme you are currently using. (E.g., change the folder name from “current-theme” to “current-theme_test.”)
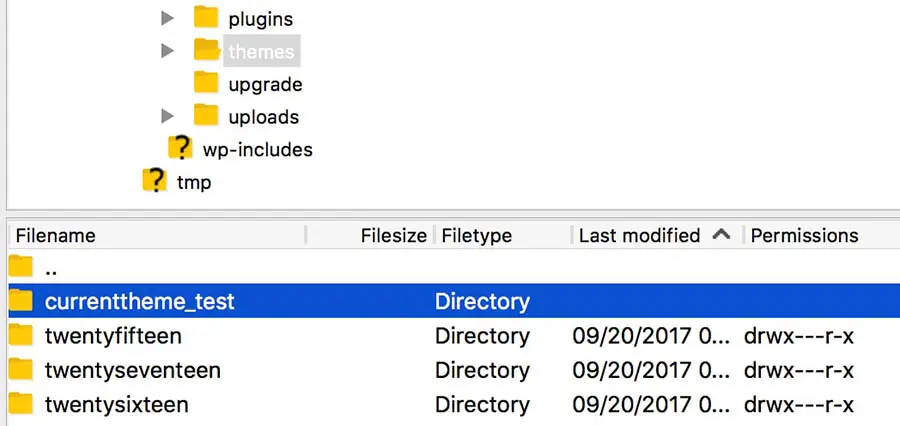
This will cause WordPress to deactivate your theme, and automatically apply the default theme instead. You can now check your site to see if the fatal error is gone.
If this method fixes the problem, you know that your theme was the cause of the error. If you have recently made changes to the theme, you should try removing those changes or deleting the theme and reinstalling the original version. If this does not fix the problem, you’ll want to refer to the theme’s official documentation or reach out to the developer for more assistance.
Enable Debug Mode To Diagnose The Problem
If you have come this far without finding the solution to your woes or you’ve diagnosed the problem but still need a way to actually fix it, well, it’s time to stop playing nice.
Meet: WordPress debug mode.
This is a tool built into all installations of WordPress. Normally, this is turned off because it’s strictly intended for testing purposes, but you can activate it at any time.
Activating the debug mode allows you to create an error log of everything that happens when your site tries to load. You can even choose to display this information directly on the page.
It’s recommended that you do this on a testing or staging version of your site, as the information gathered by the debug mode can be sensitive. For example, it could contain personal information or highlight security flaws.
To activate the debug mode, you’ll need to edit your site’s wp-config.php file. This file is a hugely important building block on your site, as it contains all your database information (including your passwords). You should, therefore, refer to the official documentation before you start editing it.
When you’re ready to start debugging, access your site through SFTP, SSH, or your host’s file manager. (See the earlier section on reverting changes for more details.)
Navigate to the root directory of your WordPress installation. (This should be the folder that contains folders like “wp-content.”)
Look for the wp-config.php file.
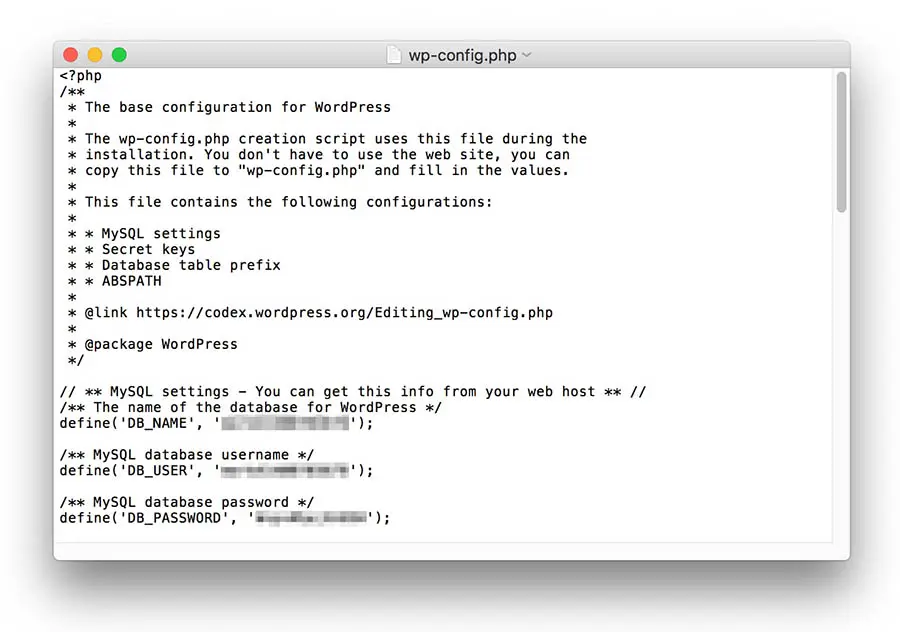
Open it up and look for the following line in the file’s code:
define( 'WP_DEBUG', false );
This code sets the debug mode to “false” or off.
Replace this line with the following two lines:
define( 'WP_DEBUG', true );
define( 'WP_DEBUG_LOG', true );
(If you don’t see anything that looks like the original line in the wp-config, you can insert the two lines anywhere in the file before the final line, which should read, “/* That’s all, stop editing! Happy blogging. */.”)
When you save the file, the debug mode will be activated. This will also enable the WP debug log, which generates a debug.log file in the /wp-content/ directory. This error log file can be opened and read using most standard text editors, such as TextEdit or Notepad.
Nerd note: You could also choose to display the error messages directly on the page. To do this, add the following code to wp-config.php: define( ‘WP_DEBUG_DISPLAY’, true );
Now, try visiting your website again.
Then open the log file in the /wp-content/ directory.
You should see some details about the PHP error that occurred.
(Heads up: Remember to disable debug mode and debug logging after you’ve solved your issue. Keep in mind that the debug log can sometimes expose vulnerabilities and other issues with your site.)
With this info in hand, we’ll jump into solving the problem.
Fixing The Issue
If you’ve followed along this far in the article, then presumably you’ve hit the part where you’re now looking at the log file and thinking, “what the heck does this mean?”
Let’s get this thing fixed once and for all.
Deleting Or Fixing Theme Code
One of the most common problems that triggers the critical error message is that you simply have broken or malformed code somewhere in your site’s theme files.
For example, you may see an error like this one:
Parse error: syntax error, unexpected $end in /home/name/public_html/wordpress/wp-content/themes/your_theme/functions.php on line 231
In this case, you can see that the problem lies in the functions.php file, specifically on line number 231. This tells us exactly where to look in order to fix the problem.
You can now open up the functions file, check the noted line, and investigate to see what could have caused the syntax error. Usually, it’s something simple, like a missing semicolon or a typo.
If you get error messages that are less straightforward, you can generally enter them into Google or another search engine to find more information. You’ll rarely encounter a unique problem, so somebody is always likely to have faced — and solved — your specific issue before. As such, you can usually refer to the WordPress Codex and support forums for assistance.
Not comfortable or familiar with PHP, and this whole thing looks like a foreign language to you? Consider reaching out to your hosting provider’s technical support.
Share the error with them and see if they can help you address the issue.
As soon as you have corrected the problem, you can save the file and then check your site again.
Disable Plugins
Even if you haven’t installed a plugin recently, it can still cause an error.
Many sites are set to update plugins automatically, and a new update to either the plugin or your WordPress installation could create the error.
How can you tell if this is the case and determine which plugin is to blame?
Referring to your error code, you should see evidence that a plugin is causing the issue.
You might see an error like this:
Parse error: syntax error, unexpected $end in /home/name/public_html/wordpress/wp-content/plugins/your_plugin/plugin.php on line 231
You can tell that this is a plugin-related error because the location of the error is a file within the /wp-content/plugins folder.
If you’re a savvy PHP coder, you can address the issue (as discussed in the first section.)
If not, you’ll probably just want to disable the plugin until a solution is found.
To do that, navigate to the /wp-content/plugins/your_plugin folder. Rename the folder to anything but its current name (e.g., “your_plugin_disabled”).
This will disable the plugin causing the error and restore your site while you figure out how to fix the problem that’s creating the error.
If this doesn’t fix the issue as expected, or you’re having trouble, consider temporarily disabling all of your plugins.
Do this by simply renaming the entire “plugins” folder to something new like “plugins_test.”
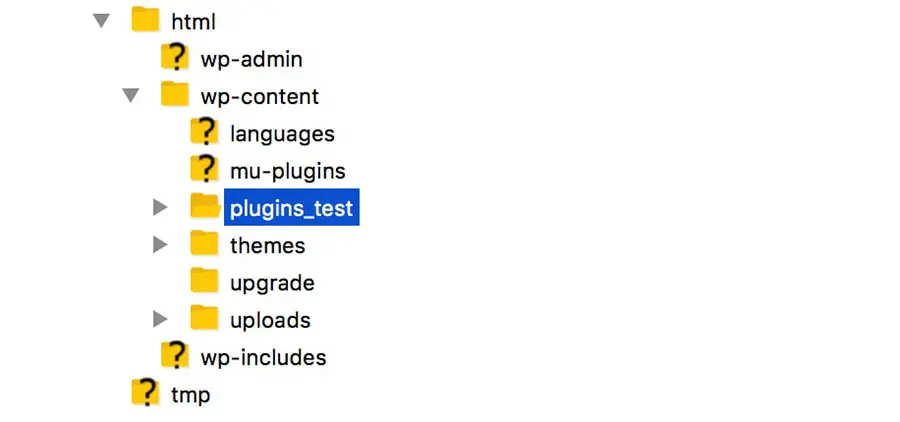
This won’t be a long-term solution, but it is an important part of troubleshooting.
If this fixes the issue, you can create a new folder called “plugins” and then move the plugin folders into it individually to see which plugin causes the site to break.
Related: How to Create Your First WordPress Plugin (With a Minimal Amount of Coding)
Increase Your Memory Limit
If the WSoD only appears occasionally or on certain parts of your site, it may be because your site has exceeded its maximum memory limit. This refers specifically to the PHP memory limit, which is the amount of memory allocated to the PHP that WordPress runs on. You can use the site health info screen to find details about the configuration of your WordPress site. The limit will usually be set to 40MB by default, but sometimes that’s not enough.
To fix this, you need to assign more memory to your installation. The exact way to do this may vary depending on your specific setup and host, but let’s cover some of the most common methods.
To increase your site’s PHP memory:
- Access your site via SFTP/FTP, File Manager, or SSH
- Navigate to the WordPress root folder
- Open wp-config.php
All you need to do is add the following line anywhere in the file before the closing line:
define( 'WP_MEMORY_LIMIT', '128M' );
The number + “M” is the amount of MB (megabytes) you want to allocate to the PHP memory.
However, you can only increase the memory limit by so much. Your site and installation will have a set maximum that you can’t exceed, so at a certain point you simply cannot keep bumping up the limit. If this occurs and you find that increasing the memory limit does not fix the problem, you might want to consider upgrading your current hosting plan. It’s possible that your site has outgrown the hosting environment and you’ll need to consider upgrading to a different hosting plan.
Check Uncommon Errors
If you have made it this far and still haven’t been able to resolve your WSoD, you have our sympathies. You are also in the minority, as the techniques we’ve covered so far will resolve the vast majority of errors. However, there is still hope!
We’re now going to quickly run through some of the more uncommon issues that can cause problems with WordPress (resulting in the WSoD). These are less likely to be the cause but are not unheard of, so they’re important things to check if you’ve tried everything else already.
See If Your Server Is Down
It’s possible that your site’s issues could stem from your host server experiencing problems. The server could be down completely, so check other sites that you know are hosted on the same server. It’s also possible that there’s a server error or the server is not functioning correctly. It could even be down for maintenance.
One way you can check this is to review your host’s service status:
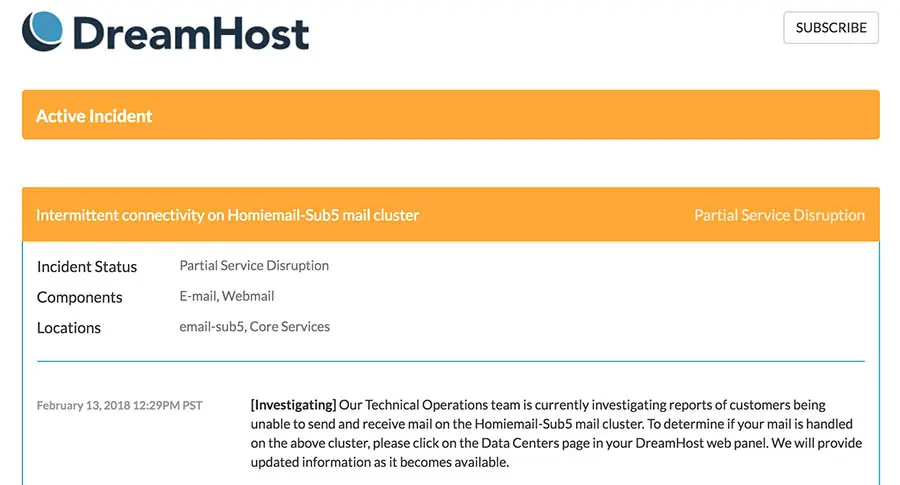
Even if your server seems to be fine and the host is not experiencing issues, you should still attempt to contact their support. Your site may still be experiencing troubles as a result of the server, even if nobody else is having the same problem. Therefore, they may be able to help you.
Check Your Caching Solution
Implementing a caching solution in WordPress is an excellent way of speeding up your site. However, because it saves old versions of files, there’s a risk that outdated content can cause problems.
This can be fixed by purging the cache, which will clear all that unnecessary stored data from your site. When you’ve done that, check your site again to see if you’ve fixed the problem. If so, you may want to contact the developers behind your caching solution to find out why the WSoD happened, or get in touch with your host’s support team.
Related: Optimizing Your Website for Speed Tutorial
Investigate Your Site For Corrupted Files
It’s rare that WordPress core files get corrupted, but it can happen.
For example, an error could occur when a new version of WordPress is installed, causing one or more of the files to be incomplete. When this is the case, you’ll usually see something in the error log created by the debug mode – but not always. If you suspect that there’s an issue with your site’s core files, you’ll want to contact your host and ask them to help you diagnose and fix the problem.
What To Do If Nothing Fixes The Critical Error
In the unlikely event that the critical error remains after you’ve performed all of the above troubleshooting techniques, it’s time to employ some last-resort solutions.
However, before you do anything else, you should first contact your host’s support team if you haven’t done so yet. In many cases, they will be able to help you out.
One final possible problem could be that the version of PHP running on your server is outdated and no longer supported by WordPress. This happens every once in a while if you don’t keep your hosting environment up to date as new WordPress versions will sometimes require newer PHP in place. (As of the time of writing this, WordPress requires PHP 7.4 or later.)
If that doesn’t work or your hosting support can’t provide assistance, then you may have to reinstall WordPress altogether.
Sometimes if your site was hacked or malware was somehow added to your site, it can be very difficult to remove the problem without starting fresh.
Malware
Malware is a type of malicious software that is specifically designed to cause harm to the victim’s computer or server. Most commonly, it’s used to access private information or to hold files at ransom.
Read MoreBut if you follow our instructions on how to recover a hacked site, you should be able to reinstall WordPress and reconnect it to your existing database without losing all of your files and content.
Is It Fixed?
Hopefully this guide helped you fix your website 20 minutes ago and you didn’t even make it this far into the article.
But bless your heart if you’re still reading anyway.
Keep in mind that while many of these fixes can seem simple, they can quickly turn into much bigger problems if you’re not sure what you’re doing.
So don’t be afraid to ask for help.
After all, that’s what we’re here for.

You Dream It, We Code It
Tap into 20+ years of coding expertise when you opt for our Web Development service. Just let us know what you want for your site — we take it from there.
Learn More