
As you get more comfortable developing WordPress, you’ll want some tools that will help you complete your tasks quickly and efficiently. The WordPress admin dashboard is intuitive and comprehensive, but it can also be time-consuming to navigate.
What if you want to manage your site more directly, with just a few easy commands? This is where the WordPress Command Line Interface (WP-CLI) comes in handy.
The WP-CLI is a tool that enables you to interact with your WordPress site directly by using commands in a text-based interface. It’s also very comprehensive, with a wide variety of potential commands. Almost anything you can do on the back end of your site, you can do much faster using the WP-CLI.
An Introduction to the WordPress Command Line Interface (WP-CLI)
Like most WordPress users, you’re probably very familiar with the WordPress admin area. It works well, but it’s not the only option for managing your site. In fact, it’s not even the most direct or efficient way of doing so. Having a graphical interface is certainly preferable for some users. However, it does mean you’ll spend a lot of time navigating through menus or waiting for pages to load.
Enter the WordPress Command Line Interface (WP-CLI).
As the name suggests, this tool enables you to perform administrative tasks on your WordPress site using a command line. With this method, you can complete a task by simply typing in a line of code and hitting Enter.
The beauty of the WP-CLI is that it gives you direct control over your site. Anything you can do in the WordPress admin dashboard, you can do using the WP-CLI instead. It’s not nearly as complicated as you may fear, and there are plenty of resources available if you want to learn more about it.
To use the WP-CLI, you’ll need to install it on your WordPress site. Let’s look at this process in more detail now.
How to Install the WP-CLI on Your WordPress Website
If your site is hosted with DreamHost, it will already have the WP-CLI installed. If you need to, however, you can also install this tool manually.
You’ll first need to make sure that your environment is compatible, meaning that it conforms to the following specifications:
- A UNIX-like environment (OS X, Linux, FreeBSD, Cygwin)
- PHP 5.6 or later
- WordPress 3.7 or later
That first point might be a problem for some users. The WP-CLI is made with UNIX-like environments in mind and has limited support for Windows. It is still possible to install it on Windows, but beware that it may require some additional tinkering.
To install the WP-CLI in one of the environments on the above list, you’ll need to use Secure Shell (SSH) to download and configure the necessary files. First, you need to download the wp-cli.phar file to your root directory, using the following command:
curl -O https://raw.githubusercontent.com/wp-cli/builds/gh-pages/phar/wp-cli.phar
You should then check to make sure that the file is working, using another command:
php wp-cli.phar --info
Next, you’ll want to make the file executable, which will enable you to use the wp command. You’ll also want to move it to another directory. This final command will perform both tasks:
chmod +x wp-cli.phar

sudo mv wp-cli.phar /usr/local/bin/wp
With that, the WP-CLI should now be successfully installed. You can test it by running the command wp –info. If everything works, you’ll see information about your version of the WP-CLI displayed.
That’s it! You’re now ready to use this tool to manage your site more efficiently. Before we move on, however, let’s run through some alternative methods of installation.
Alternative Ways to Install the WP-CLI
As we alluded to earlier, there are actually several methods to install the WP-CLI. We won’t detail all of them in this article. However, we’ll list them out briefly and link to more information on each, so you can choose the technique that best suits your needs.
You can use the following tools to install the WP-CLI on your site:
Finally, you may want to get involved in developing the WP-CLI yourself. You can easily get involved with its development by using the Git installation instructions.
5 Ways to Use the WP-CLI to Manage Your WordPress Site
The WP-CLI provides total access to your site — right at your fingertips. There are dozens of commands you can use to manage nearly everything from comments to core updates. Plus, you can even create custom commands.
We’re now going to look at just a few of the standard commands available to you. This is to give you an idea of how you can use WP-CLI to manage your site before you dig deeper into the rabbit hole of possibilities.
1. Install and Update WordPress
The most fundamental task you can accomplish with the WP-CLI is to download and install WordPress on your site. The command for downloading WordPress is simply:
wp core download
This will download and extract WordPress in the current directory. You can also add additional parameters to refine the download further. For example, the locale parameter determines which translation of WordPress will be used. This command will download the Brazilian Portuguese version of WordPress:
wp core download --locale=pt_BR
Once downloaded, you can install WordPress using the install command. This command contains a number of parameters that configure the setup. Let’s take a look at an example:
wp core install --url=example.com --title=Example --admin_user=supervisor --admin_password=strongpassword --admin_email=info@example.com
As you can see, this is all fairly self-explanatory. Simply replace the example data in each parameter with your own values. To ensure that everything has worked as expected, you can use the following command to test the installation:
wp core version
This will return the version number of your installation, proving that WordPress has been successfully installed! Now you can make sure it’s updated with the following command:
wp core update
If a newer version of WordPress is available, it will be downloaded and installed automatically after you run this command.
2. Manage Themes and Plugins
There are many ways you can manage themes and plugins using the WP-CLI, so let’s look at some of the basic options now. First, you can use the list command to view a list of your themes or plugins. Using parameters, you can filter the display by items with a specific status (such as inactive) or a particular output format.
For example, if you want to list all inactive themes as a CSV list, you can use the following command:
wp theme list --status=inactive --format=csv
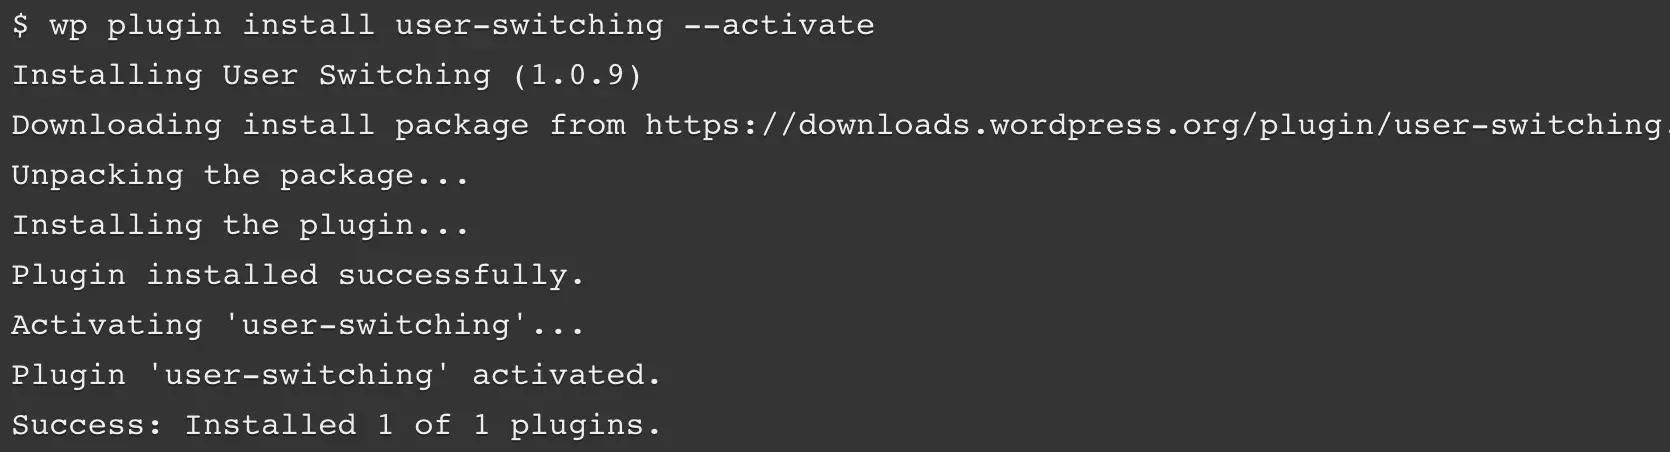
You can also install a plugin by specifying its slug in the plugin directory, providing the path to a local file, or entering the URL for an external file. In this example, we’re also going to activate the plugin at the same time:
wp plugin install ../my-plugin.zip --activate
It’s also easy to change the status of a plugin or theme. This command can be used to enable a theme, which in this example is Twenty Twenty:
wp theme enable twentytwenty
There’s also a command for deactivating a plugin. In our example, we’ll use this command to disable the Hello Dolly plugin. We’ll also uninstall the plugin at the same time:
wp plugin deactivate hello –uninstall
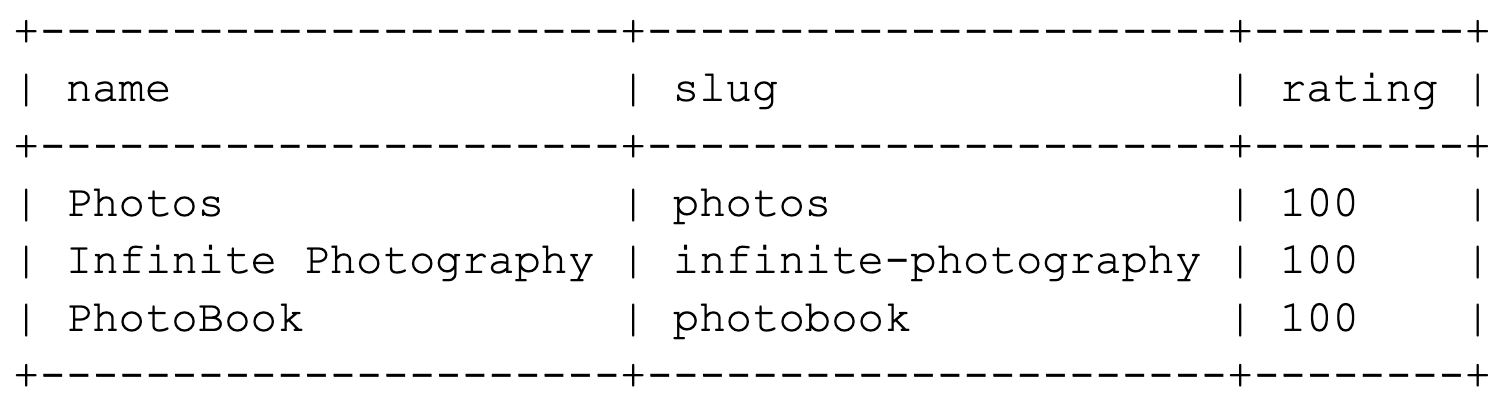
Finally, you can search the respective directories looking for a specific plugin or theme. For instance, let’s search for a theme containing the string “photo”. We’re also setting it to return three results instead of the default ten:
wp theme search photo --per-page=3
This will display the following table:
As we mentioned, this is only a small taste of how you can manage themes and plugins using the WP-CLI. Hopefully, you’re getting a sense of how useful this tool can be.
3. Create a Child Theme
By using the scaffold command, you can generate a child theme that includes the functions.php and style.css files. We recommend that you do this if you want to make changes to an existing theme. When you use a child theme, any customizations won’t be lost after new software updates.
To do this, you’ll simply need to specify the slug for the new child theme, and for the theme you’re using as the ‘parent.’ In this example, we’re creating a child based on the Twenty Twenty theme, and we’re giving it the slug twentytwenty-child:
wp scaffold child-theme twentytwenty-child --parent_theme=twentytwenty
If the process is successful, you’ll see a message that the child theme has been created. This will also include the path to its directory:
Success: Created '/var/www/example.com/public_html/wp-content/themes/twentytwenty-theme'.
You’ll now find the child theme in the specified template, ready to be edited!
4. Moderate Comments
Moderating and managing comments is made a lot easier in the WP-CLI, which enables you to quickly create, delete, and edit them. There are many comment subcommands you can use, but let’s look at some of the most basic options.
First, you can add a new comment. The following command will add a comment to a post with the post ID of 20, and specifies the contents and author:
wp comment create --comment_post_ID=20 --comment_content="This is my comment" --comment_author="author-name"
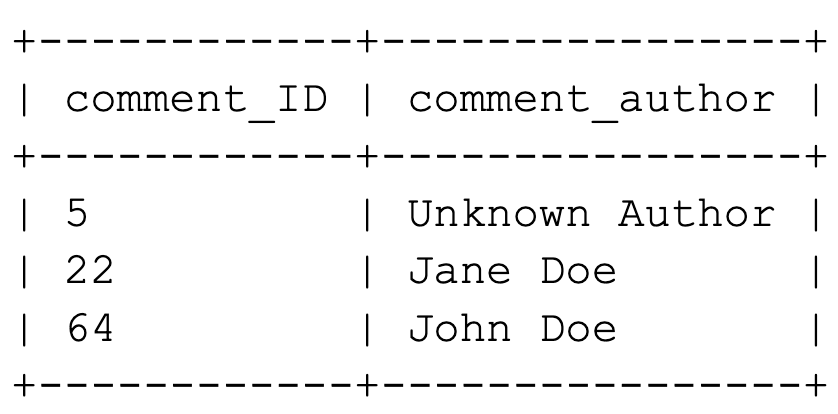
Before you manage existing comments, it can be helpful to get a current list. You can do this with the list command, and the results can be filtered in multiple ways. For example, using this command will return a table containing the comment ID and author name for all approved comments on the post with an ID of 3:
wp comment list --number=3 --status=approve --fields=ID,comment_author
This is what the resulting table will look like:
If you want to delete comments, you can do that by specifying the comment IDs individually, like this:
wp comment delete 64
You can also delete multiple comments by separating each ID with a space. In this example, we’re also using the force parameter, which permanently deletes comments instead of adding them to the trash bin:
wp comment delete 5 22 64 64 --force
With a little practice, you can work through your site’s comments very quickly using WP-CLI commands.
5. Update the WP-CLI
As with every aspect of WordPress, you should always make sure that the WP-CLI is up-to-date. Fortunately, this is very simple. All you need to do is run the following command:
wp cli update
If your version is the most recent available, you will get a message confirming this. However, if a new version can be downloaded, you’ll be prompted to accept the installation. If you select yes, the WP-CLI will be updated, and you’ll see a confirmation message:
Success: Updated WP-CLI to 0.23.1
With that, you’ve updated your installation of the WP-CLI.
By now, you’re beginning to see what you accomplish using this simple interface. There’s more to learn, but you should be proud of how far you’ve come already!
Work More Efficiently with the WordPress CLI
Speed, accessibility, and efficiency are all traits that any smart developer looks for in their tools. The WP-CLI offers all of these and more while enabling you to manage your WordPress site remotely. Using the WP-CLI, you can perform any action that’s possible in the WordPress admin — just much more quickly (once you’ve had a bit of practice).

Do More with DreamPress
DreamPress Plus and Pro users get access to Jetpack Professional (and 200+ premium themes) at no added cost!
Check Out Plans