
TL;DR: You don’t need to be a developer to make a website. Pick one of four paths — an AI website builder like Remixer, a drag-and-drop website builder, WordPress on managed hosting, or hand-coded. The detailed seven-step walkthrough below covers the WordPress-on-managed-hosting path; if you choose an AI builder, drag-and-drop builder, or custom code, adapt the setup and design steps to that platform.
To make a website, you follow 7 steps: define its purpose, register a domain name, choose a web host, install WordPress (or open your builder), pick a theme, add your content, and test before you publish. The sample weekend checklist below can help you organize a WordPress build, but launch time varies with your site’s scope, content, and your experience. Below, we walk you through each step, plus a weekend launch checklist and a 30-day growth plan.
So you’ve been thinking about building a website. Maybe it’s for your side hustle, maybe it’s for your main hustle (like a digital service or a rapidly scaling e-commerce business), or maybe you just want a digital home for your cat’s ever-growing photo collection.
Either way, the same thought keeps tripping you up: “Isn’t this going to be complicated? Don’t I need to know how to code?”
Actually, the hardest part of building a website isn’t HTML, or hosting, or figuring out what CMS even stands for (content management system, by the way).
The hardest part is choosing the right path to get started. And once you pick a path, the rest is just following a series of steps — kind of like assembling IKEA furniture, but without the missing screws and confusing diagrams.
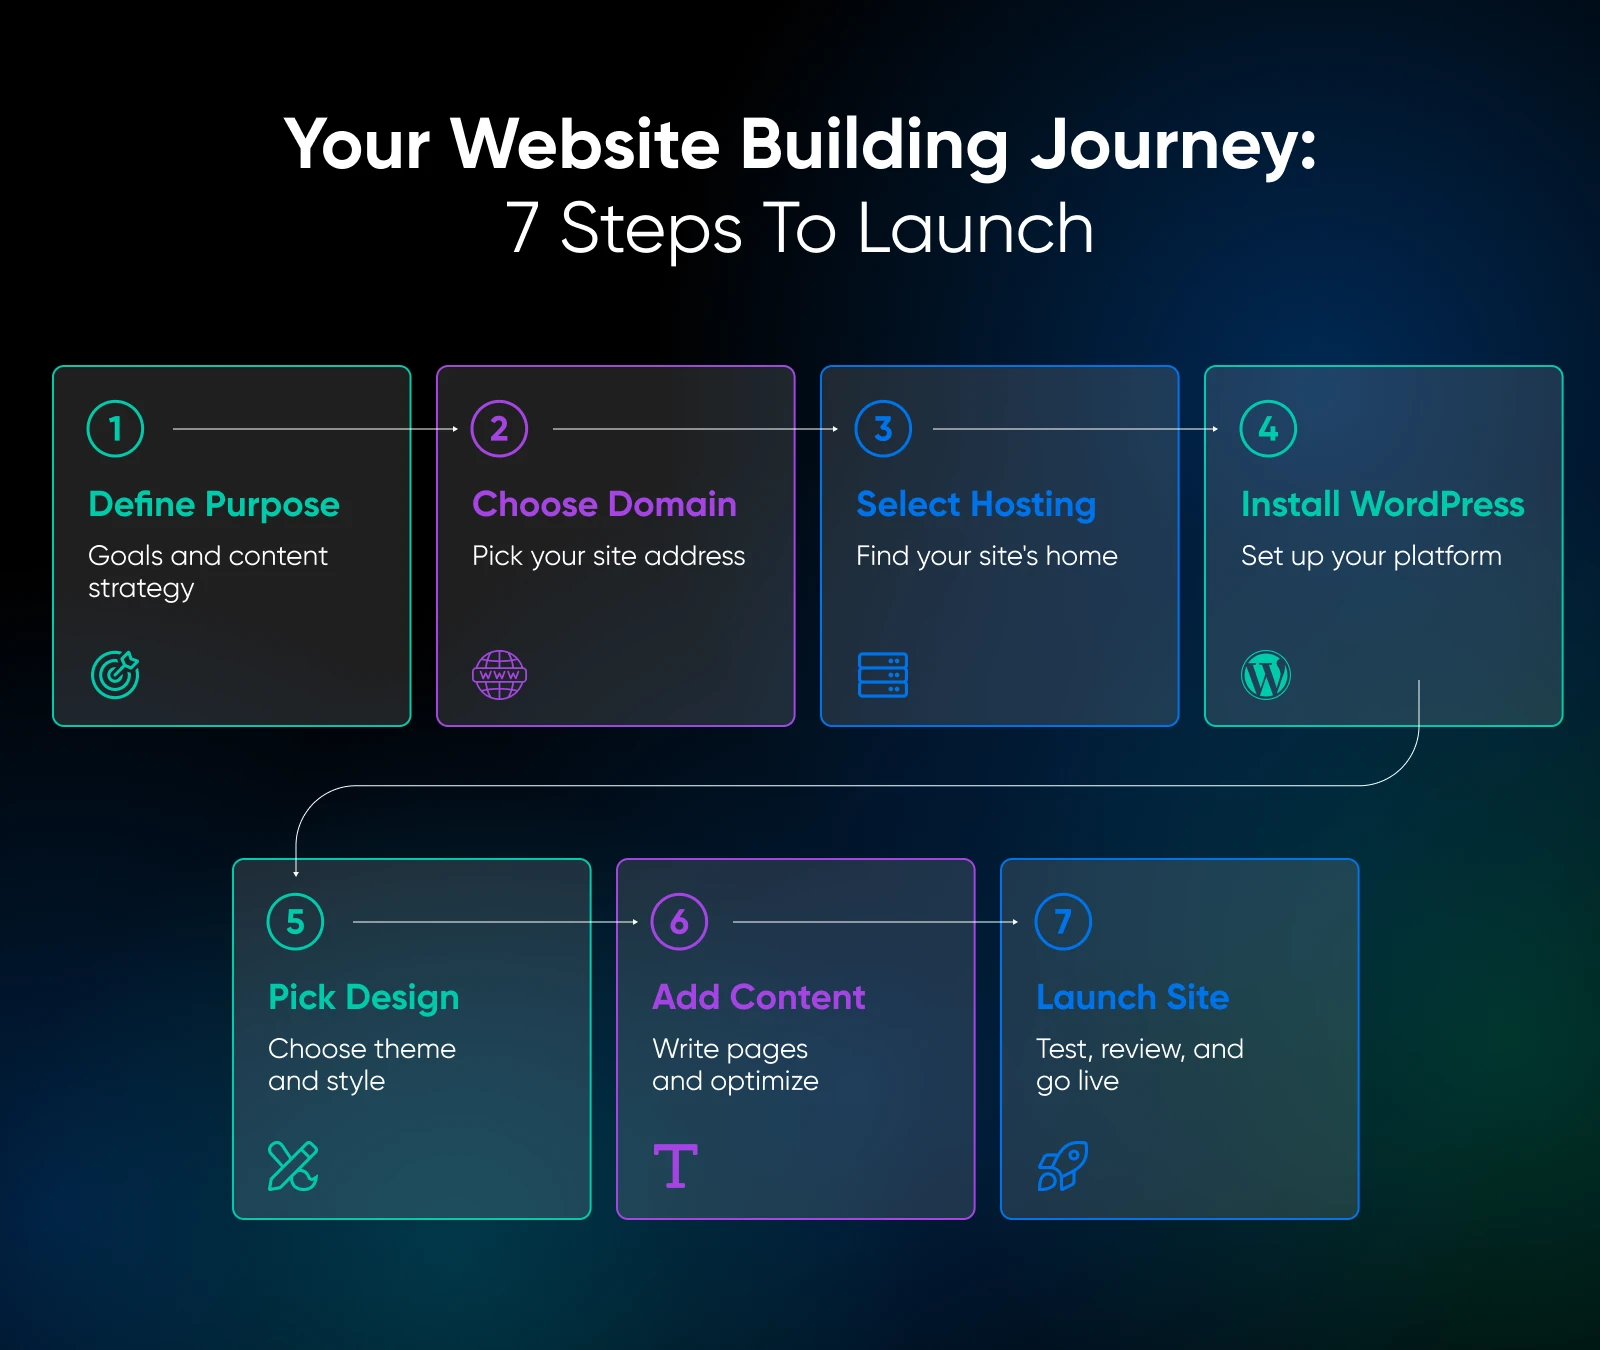
In this guide, we’re walking you through the options to help you pick the one that fits your goals, then laying out a beginner-friendly roadmap you can actually follow. By the end, you’ll know exactly how to go from “someday I’ll build a site” to “look at my live website” — and you’ll actually own the foundation (but more on that in a minute).
Oh, and one more thing: if you’d rather skip the DIY parts altogether, DreamHost will build you a custom, four-page website for free when you sign up for web hosting (Yes, really. We’ll explain how below).
The AI website builder that turns conversation into designer-level sites. Free with hosting.
Start Free Trial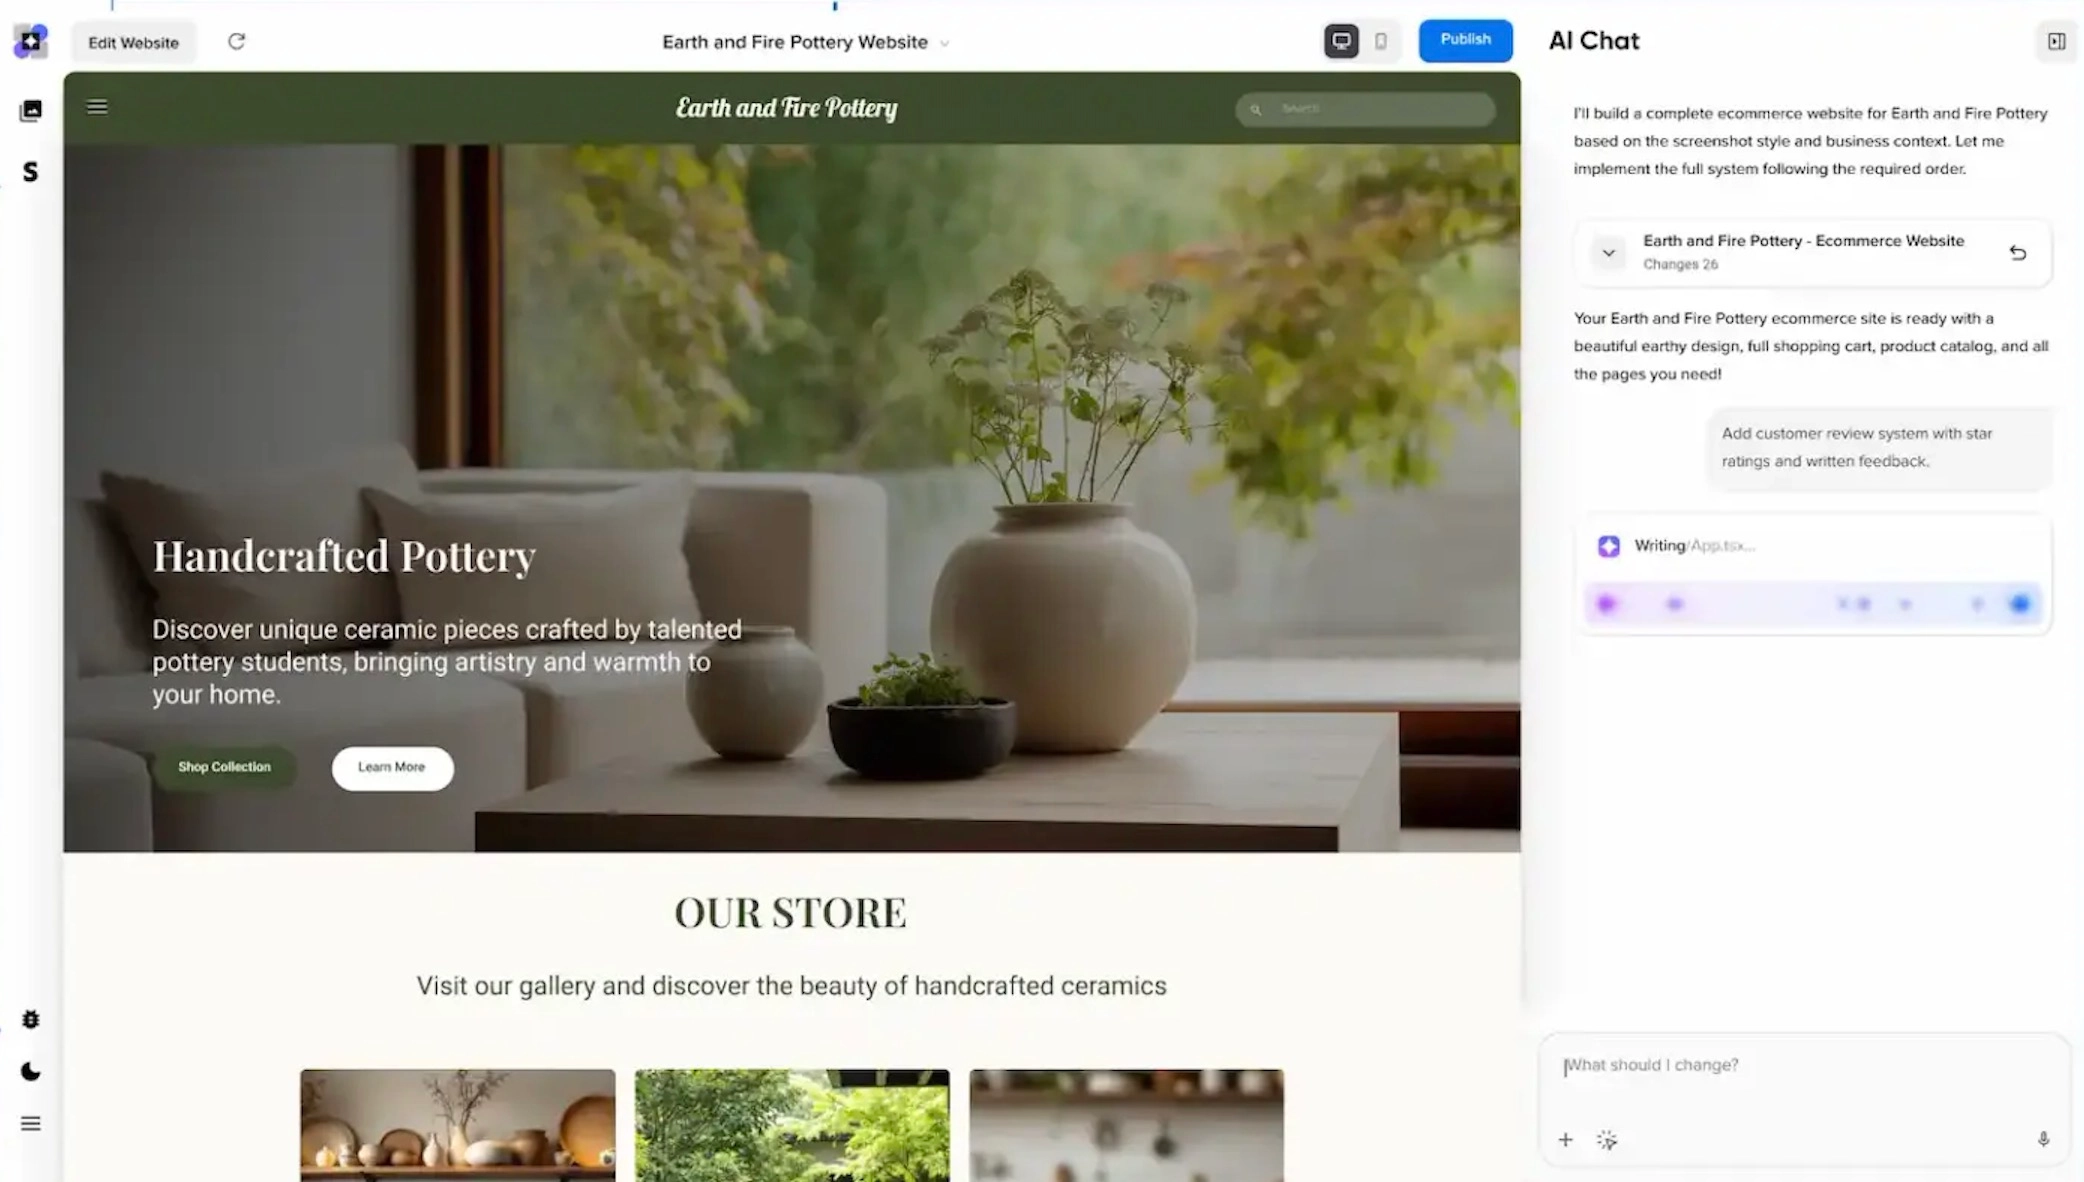
What Are the 4 Ways To Make a Website?
The four main ways to make a website are an AI website builder, a drag-and-drop website builder, a CMS like WordPress on managed hosting, or custom code. The best choice depends on how fast you need the site and how much control you want later.
At a glance, here are your four main options:
- AI website builders: A fast option for getting started. You describe your site in plain words, and the builder creates it. Remixer, DreamHost’s AI website and app builder, generates a complete site in 2 to 3 minutes on average, and you can try it free for 30 days with no credit card.
- Website builders: Think “plug and play.” They’re fast and easy, with pre-made templates and drag-and-drop editors. Perfect if you just want something simple without the tech learning curve.
- Managed hosting + CMS (like WordPress): The best balance of ease, flexibility, and ownership. You get a flexible site that can expand through themes, plugins, and an appropriately scaled hosting plan.
- DIY/custom code: Maximum control, but also maximum effort. AI coding assistants like Anthropic’s Claude and OpenAI’s ChatGPT can speed up the work, but you still handle hosting, security, and maintenance yourself. Great if you’re technical, but probably overkill for most beginners.
Want a website but don’t want to build it yourself? We’ll build you a custom, four-page website for free when you sign up for web hosting.
AI Builders vs. Website Builders vs. Managed WordPress vs. DIY
| Feature | AI Website Builder | Website Builder | Managed WordPress | DIY |
| Setup speed | Fastest (a complete site in minutes) | Fast (hours with a template) | Quick (one-click installs) | Slow (weeks or months) |
| Ease of use | Easiest (describe it in plain words) | Beginner-friendly, drag-and-drop | Moderate learning curve, but lots of help docs | High technical expertise required |
| Design flexibility | Generates websites and web apps from a plain-English description | Limited templates | Thousands of themes and full control to customize | Unlimited (if you can code it) |
| Scalability | Grows from a site into a web app on one plan | Can hit walls quickly | Scales with hosting plan | Fully scalable, but all on you |
| Data ownership | Hosted on the Remixer plan; connect your own domain | Export and portability options vary by platform | WordPress content and files are generally portable; dependencies may vary | Control depends on the hosting and third-party services used. |
| Cost predictability | One flat plan, hosting included | Low upfront, often with pricey add-ons later | Typically transparent, with scalable hosting costs | Varies (hosting + dev time) |
| Best for | Business owners who want a done-for-you site fast | Quick personal sites, portfolios | Small businesses, blogs, and online stores | Developers, custom projects |
Choose Your Approach (Quick Decision Guide)
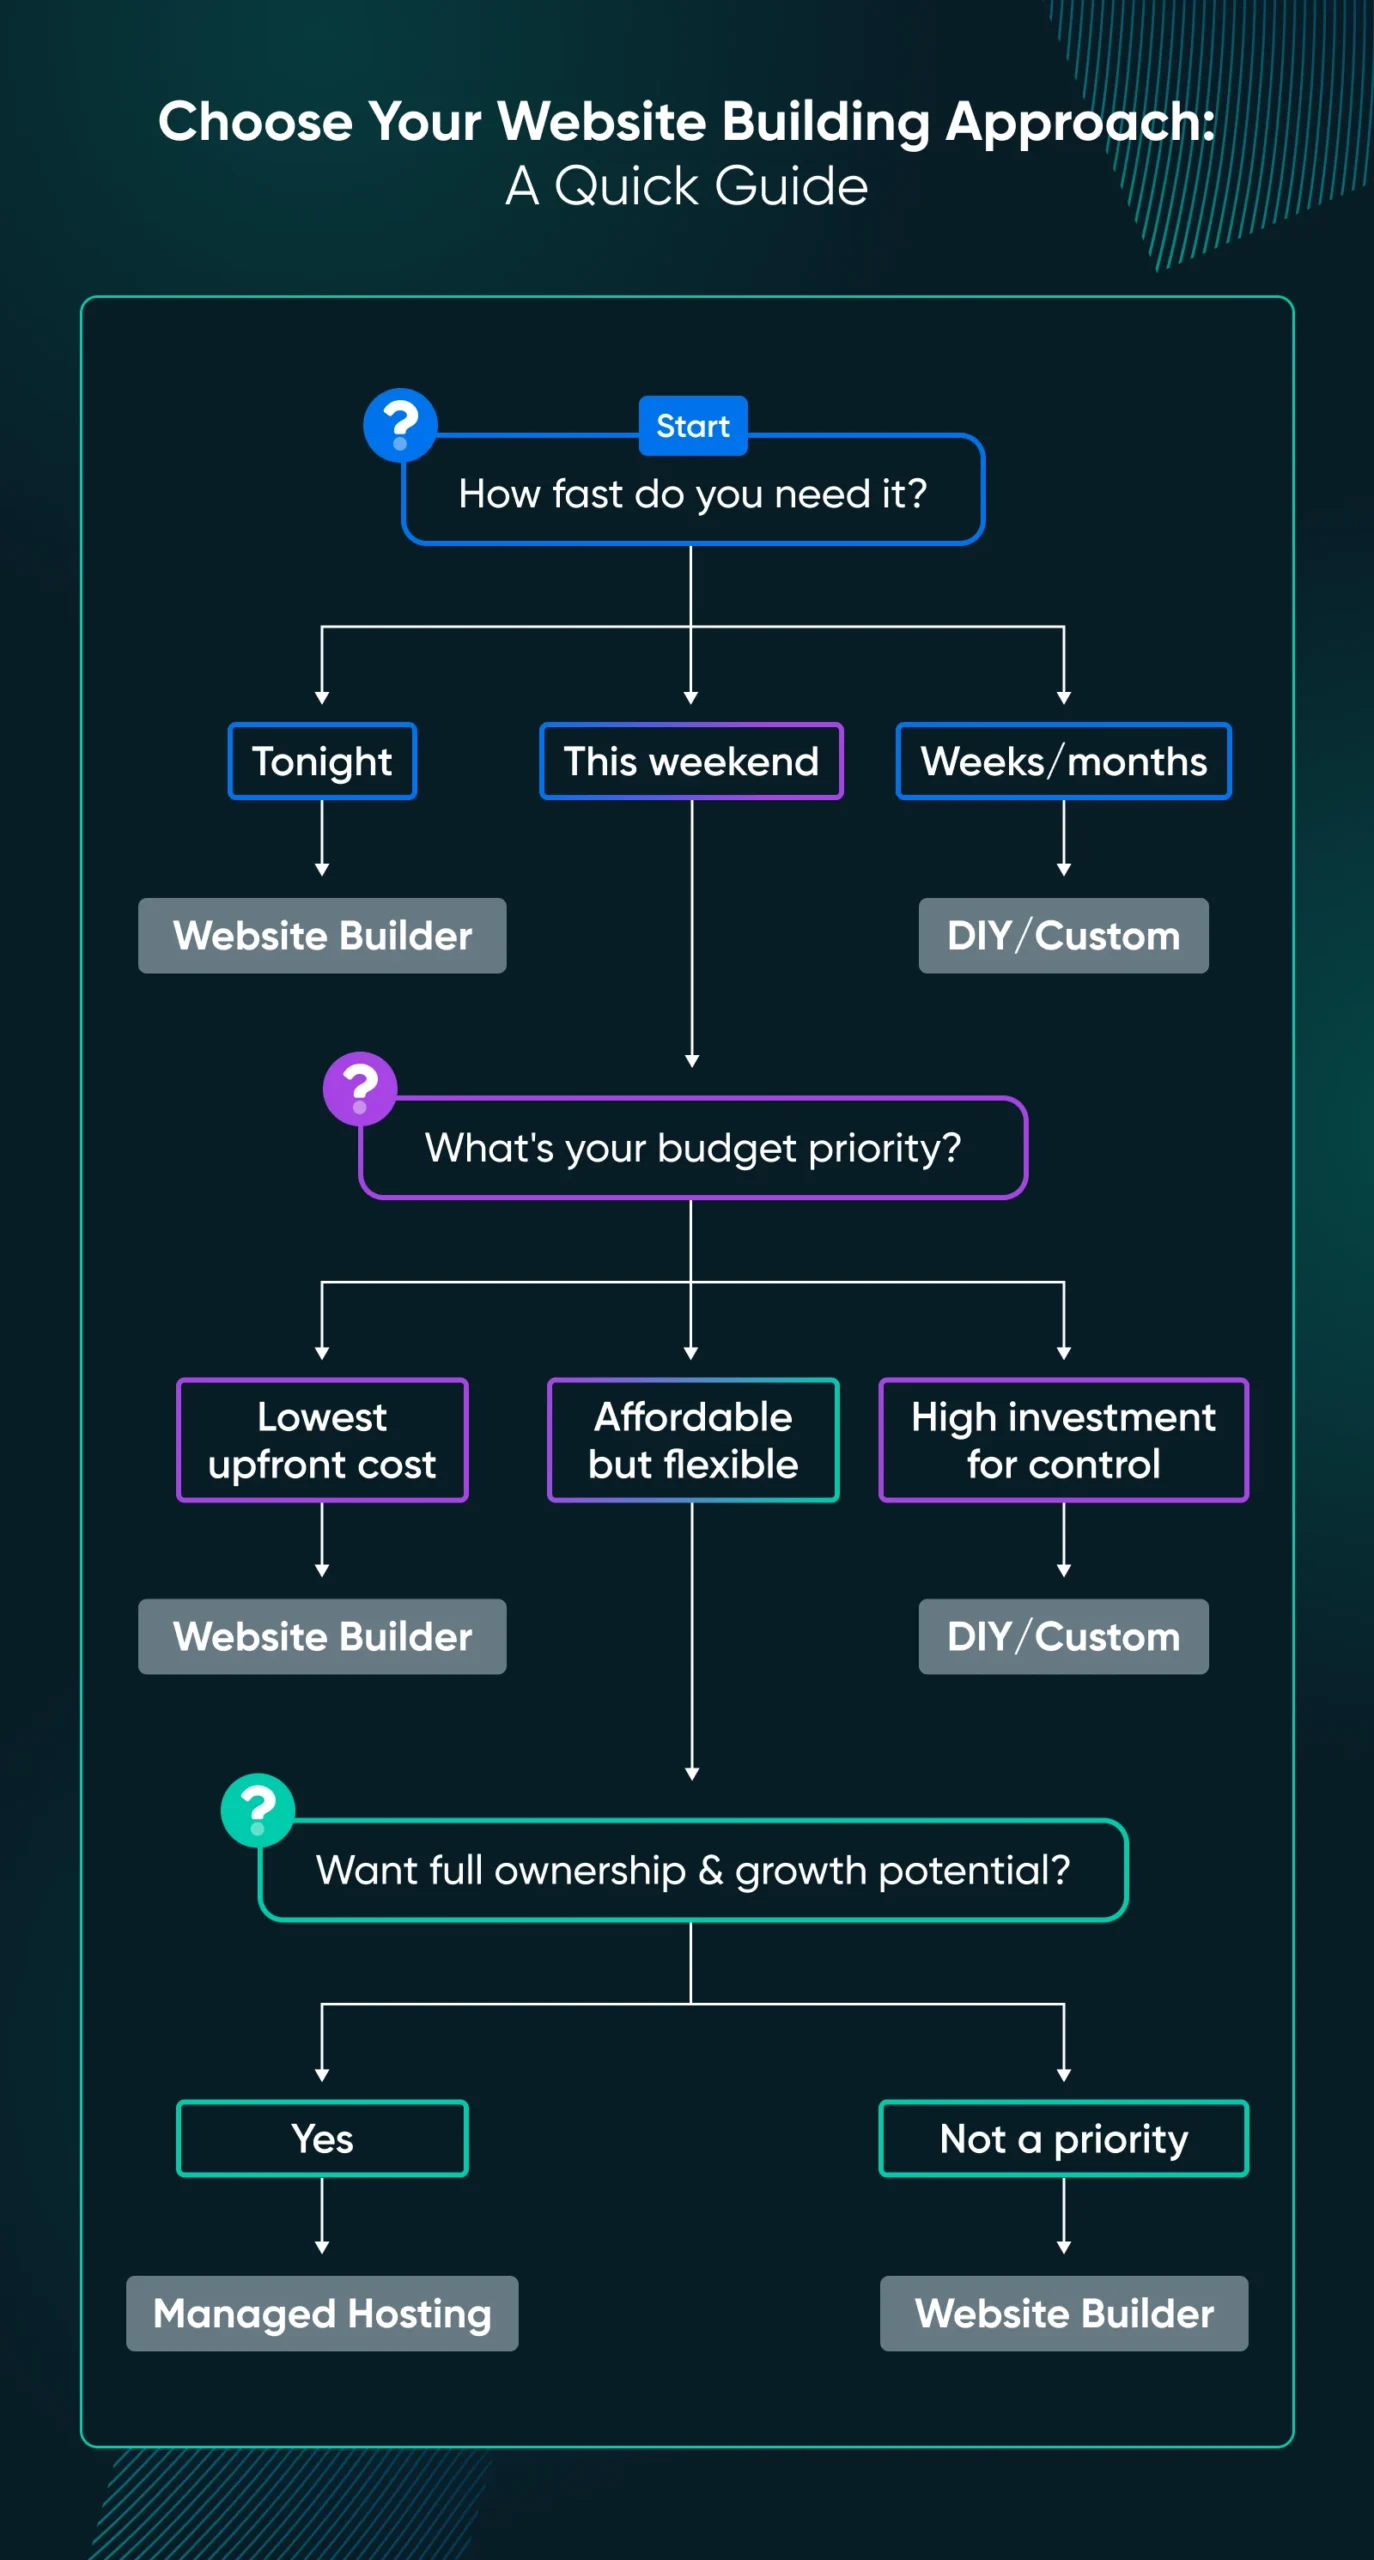
Still not sure which path to take? Here’s a quick guide to help you decide:
1. How fast do you need it?
- I want a finished site tonight, without touching templates → AI website builder (like Remixer)
- I want to drag and drop it together myself → Website builder
- I can spend a weekend setting it up → Managed hosting
- I’m fine tinkering for weeks or months → DIY/custom
2. What’s your budget?
- I want a builder plan with hosting and support included → AI website builder
- I want to compare template-based builder plans and add-on costs → Website builder
- I want to compare WordPress hosting plans and renewal terms → Managed hosting
- I can budget separately for hosting and development time → DIY
3. Do you want ownership of your content and flexibility to grow?
- Not a priority → AI website builder or website builder
- Yes, I want full control and scalability → Managed hosting or DIY
Here’s how the three traditional paths compare — AI website builders are the newer fourth option.
Most people land somewhere in the middle: they want control without complexity. That’s why WordPress, paired with a transparent and beginner-friendly host (like DreamHost), is often the best long-term choice. Torn between the AI path and WordPress? Our AI website builder vs. WordPress comparison walks through that decision.
Why Managed WordPress Hosting Wins for Most Small Businesses
If you’re serious about your website, whether it’s a blog, a portfolio, or a full-blown business site, WordPress on managed hosting usually gives you the best balance of freedom and support.
Here’s why.
- It’s everywhere: WordPress powers 40.7% of all websites, per W3Techs, August 2026. That means tons of tutorials, themes, and plugins are at your fingertips. If you need help, you’ll find it.
- It grows with you: Start with a simple blog, then add an online store, a booking system, or a membership community as you grow. No need to rebuild from scratch.
- You own it: With managed hosting, you control your content and data. You’re not locked into a platform that could change pricing or policies overnight.
- Help is built in: With DreamPress, DreamHost’s managed WordPress hosting, WordPress comes pre-installed, and every plan includes daily backups stored offsite, free SSL, and 24/7 support from WordPress experts.
- It’s future-proof: Unlike closed builders, WordPress has an open-source community constantly creating new tools, ensuring your site can evolve with the web.
Bottom line: If you’re building a website you want to last, managed WordPress hosting is the path that balances ownership, cost, and long-term scalability.
How To Build Your Website in 7 Simple Steps
Ready to roll up your sleeves? While every website journey is unique, these seven steps form the typical workflow for crafting your own site from the ground up. By the end, you’ll have a professional site built on a solid foundation for growth.
Step 1: Identify the Purpose of Your Website
Before purchasing a domain or signing up for web hosting, clearly define your website’s purpose. Understanding exactly what you want to achieve with your online presence will inform many choices, from site structure to platforms, features, and design aesthetics.
Pinpoint Your Business Goals
If building a business site, begin by narrowing down your goals.
- Are you building a personal website for your freelance services?
- Are you planning on selling products?
- Creating a lead generation site, growing your email list, and contacts?
- Or building an online course or membership site with gated content?
Your objectives will guide your website setup process, ensuring you select platforms with functionality built in.
For example, e-commerce sites require shopping carts and payment gateways, while lead-generation sites need forms and marketing automation. Defining these details early allows you to pick the best tools for the job right from the get-go.
Map Out Your Content Strategy
Begin brainstorming the pages, posts, and media content you’ll need to execute your goals successfully.
At this stage, don’t worry about the copy on the pages. Focus instead on structuring your information at a high level.
For example, an e-commerce store might include pages like:
- Homepage
- Product category pages
- Individual product pages for product descriptions
- Shopping cart
- Checkout pages
- FAQ
- Contact
- About us
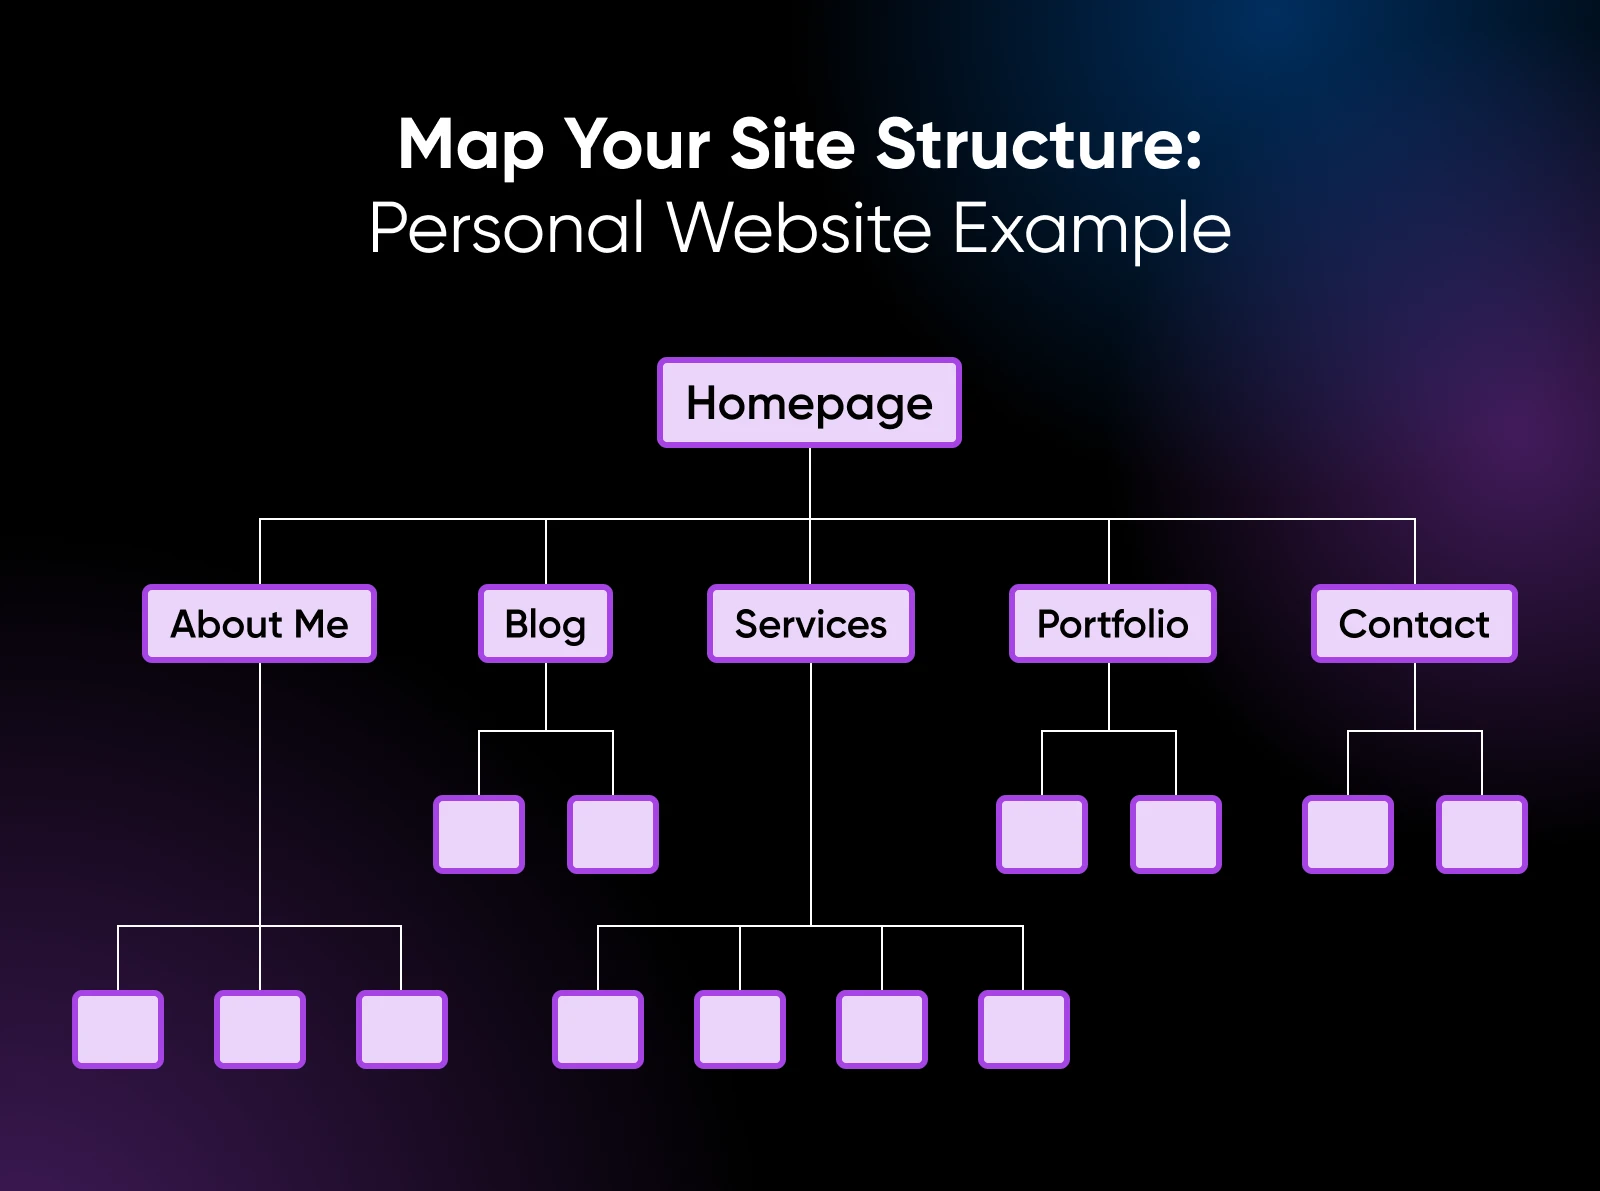
A personal site, on the other hand, may include:
- Homepage
- About me
- Blog
- Services
- Portfolio
- Contact
💡Pro tip: Create a basic sitemap to visualize the connections between pages and how your target audience will navigate your content.
Step 2: Choose a Domain Name
A domain is a unique web address that points visitors to your online destination. Think of this as your business address — it helps people know where your business exists online.
For example, “dreamhost.com,” or “johnsmith.blog.”
Picking a short, memorable domain name relevant to your offerings can pay dividends when driving traffic and conversions.
Here are some best practices for choosing a good domain:
- Keep it short: Shorter domains with fewer syllables are easier to convey verbally and remember.
- Make it descriptive: Try to pick a “brandable” domain that conveys what the site could be about without opening it.
Choose a TLD (Top-Level Domain)
The letters after the dot are known as the top-level domain, or TLD. Common options include:
- .com – The classic, versatile option
- .net – Originally for network providers, now widely used
- .org – Traditionally used by non-profits and purpose-driven organizations
- .info – Focused on providing information
- .blog – Implies that the site is a blog
.com tends to be the default choice for businesses and personal sites, but try to review all options to see if another extension is more fitting and more available.
As you brainstorm potential names, verify domain availability in real-time, or you risk becoming attached to an unavailable option.
Register Your Domain
Once you’ve selected an available domain, it’s time to officially register it in your name. You’ll need to sign up with a domain name registrar. DreamHost is a domain registrar with more than 400 domain extensions, and private registration (Domain Privacy) is included at no cost for the life of your domain.
The domain registration process only takes a few minutes. Renewal fees vary by TLD and registrar, so check current pricing before you commit.
If you plan to go with one of DreamHost’s web hosting plans on a 1-year or multi-year term, you can get the domain for free for the first year. Once purchased, you’ll fully own and control that custom domain name (as long as you keep renewing it).
Step 3: Pick a Reliable Web Host
A web host is a company that provides servers where your website’s files physically live. It takes care of serving the files to your visitors.
When someone types your custom domain name into their browser, the web host pulls up the right site files to display based on that request. There are many types of hosting plans and services, but we’ll focus on the three most common options relevant to small sites and online stores:
Shared Hosting
With shared hosting, your site lives on a server that also hosts hundreds or thousands of other websites owned by a hosting provider.
Resources like disk storage space and memory are pooled together and shared by all sites using that server. It’s by far the most budget-friendly hosting option, but it offers less control. This class of hosting is ideal for personal sites, blogs, and small business pages just getting off the ground.
DreamHost’s entry-level option here is Web Hosting, with unmetered bandwidth on every plan and a free domain for the first year on 1-year and multi-year terms. Not sure which type you need? See our managed WordPress hosting vs. shared hosting comparison.
Virtual Private Server (VPS) Hosting
VPS plans allocate a certain portion of a physical server dedicated just for your site.
So while the underlying machine is shared, your site is quarantined with its own partitioned resources like storage, memory, and processing power. This balances robust performance and control with affordability compared to dedicated servers.
VPS hosting works well for medium-traffic sites that need more juice than basic shared hosting provides.
DreamHost’s Managed VPS plans are fully managed for you, so you get the benefit of dedicated resources without having to handle server updates, security, and the rest yourself.
Dedicated Hosting
As the name suggests, dedicated hosting gives your website its very own physical machine accessible only by you. These can be expensive and are generally not required for sites just starting out.
However, dedicated hosting offers maximum control of your site and data. Costs scale with the server configuration you choose.
The isolation and raw power make dedicated servers ideal for large, high-traffic sites and mission-critical web apps that need the highest performance and security.
Step 4: Install WordPress
Assuming you’re going with managed hosting and building a WordPress site, installing WordPress is a breeze. With most reputable hosts, it’s literally a one-click option in your dashboard. (And if you go with DreamPress, WordPress comes pre-installed — there’s nothing to install at all.)
Step 5: Choose Your Design Foundation
Once WordPress is installed, you’ll log in at “yourdomain.com/wp-login.php.” From there, you’ll see a user-friendly dashboard where you’ll manage everything from posts to plugins.
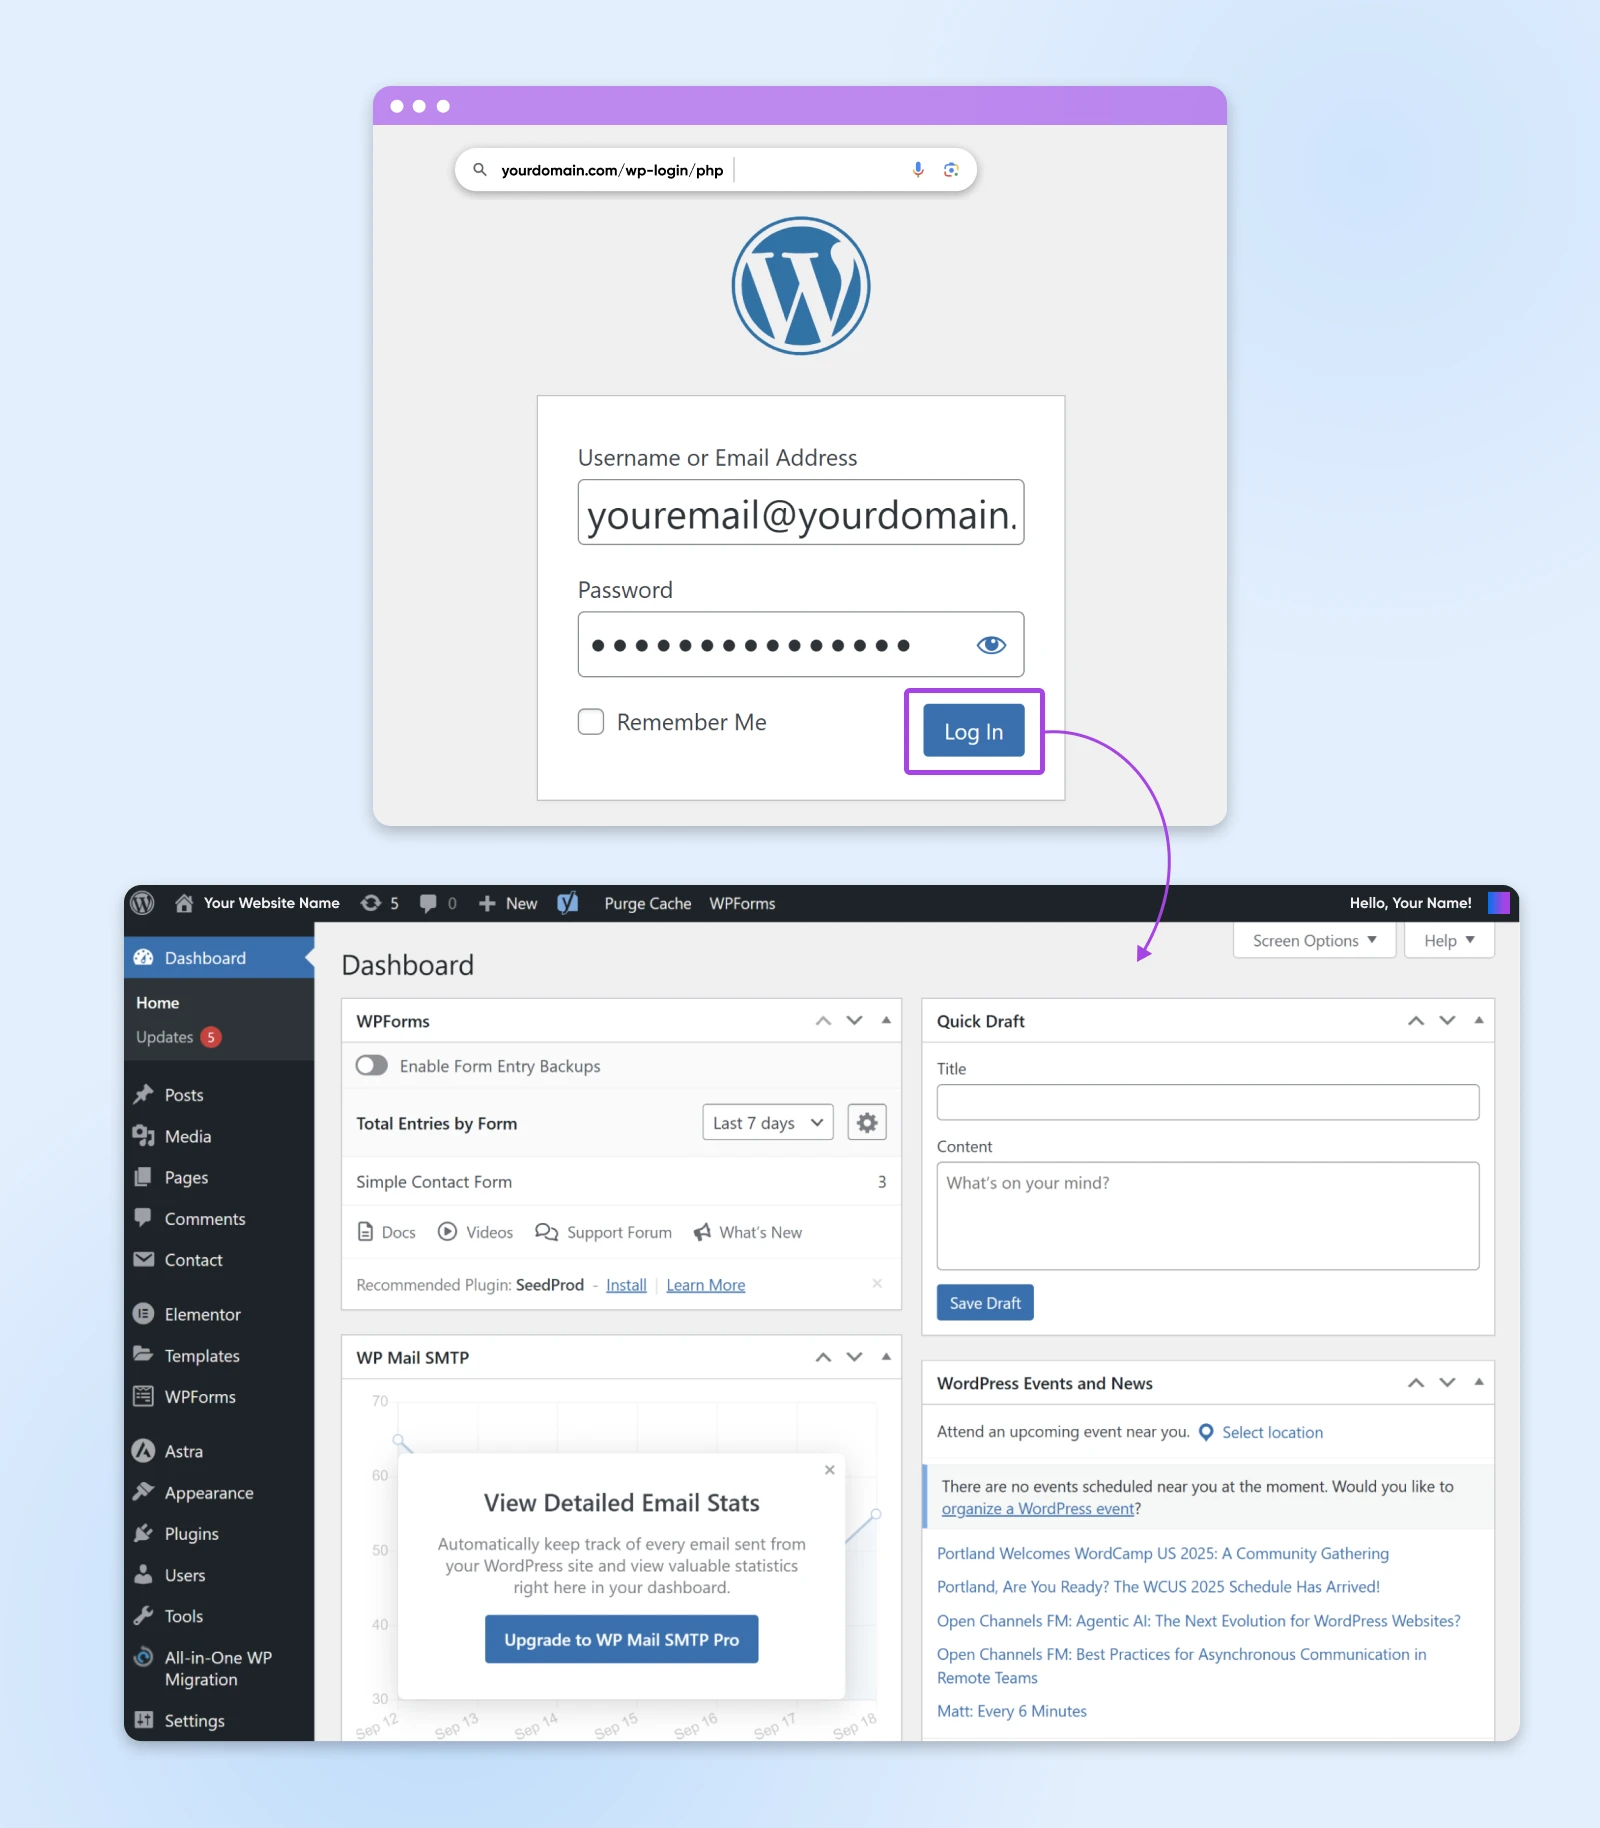
Then, it’s time to start shaping your site’s design. The WordPress.org theme directory alone lists more than 15,000 free themes (as of August 2026), from sleek portfolios to e-commerce-ready storefronts.
Start with one that fits your purpose, then customize it to match your brand. You may need to add plugins for SEO, e-commerce features, or security, depending on your site’s purpose and your business needs.
Step 6: Add Content
For visitors to stick around and convert into leads and customers, your website needs compelling content that speaks to their problems and interests. Here are a few tips to create engaging content.
Using Visual Media
While text continues to be the primary medium for communication, images, infographics, animations, and video breathe life into websites.
When adding visuals:
- Use high-resolution, eye-catching imagery.
- Ensure proper licenses are purchased for stock photos.
- Optimize images for fast loading with compression.
- Add descriptive alt text for accessibility.
Optimize Your Site for Search Engines
Most visitors discover websites through search engines like Google. That’s why SEO should be part of your strategy from day one.
SEO includes creating useful content around topics people search for and making that content easy for search engines to understand. These practices can improve discoverability, but they do not guarantee visibility or rankings.
Here are some core SEO best practices to weave in as you build out your site.
- Conduct keyword research: Identify terms and questions with sufficient search volume that align with your offerings. Keyword planner tools, like Semrush and Ubersuggest, help uncover SEO opportunities.
- Create useful, original long-form content: Make sure it answers search queries in more depth than competitors. Include related keywords throughout naturally.
- Use descriptive slugs: Include target keywords when naming site pages rather than generic IDs.
- Format content for scannability: Use bullets, bold keywords, sub-headers, short paragraphs, etc. Break up dense blocks of text.
- Enable SSL Encryption: Serve your site over HTTPS to encrypt traffic and show visitors a secure connection instead of a “not secure” warning.
- Embed helpful multimedia: Videos, audio, and infographics make dense topics easier to digest and give visitors a reason to stay on the page.
- Build backlinks: Have other reputable sites link back to your content over time, increasing domain authority.
- Engage on social media: Encourage social actions with follow/share buttons.
Connect Google Analytics
Understanding how visitors interact with your content is key to continually optimizing it. Install Google Analytics to identify visitor metrics like:
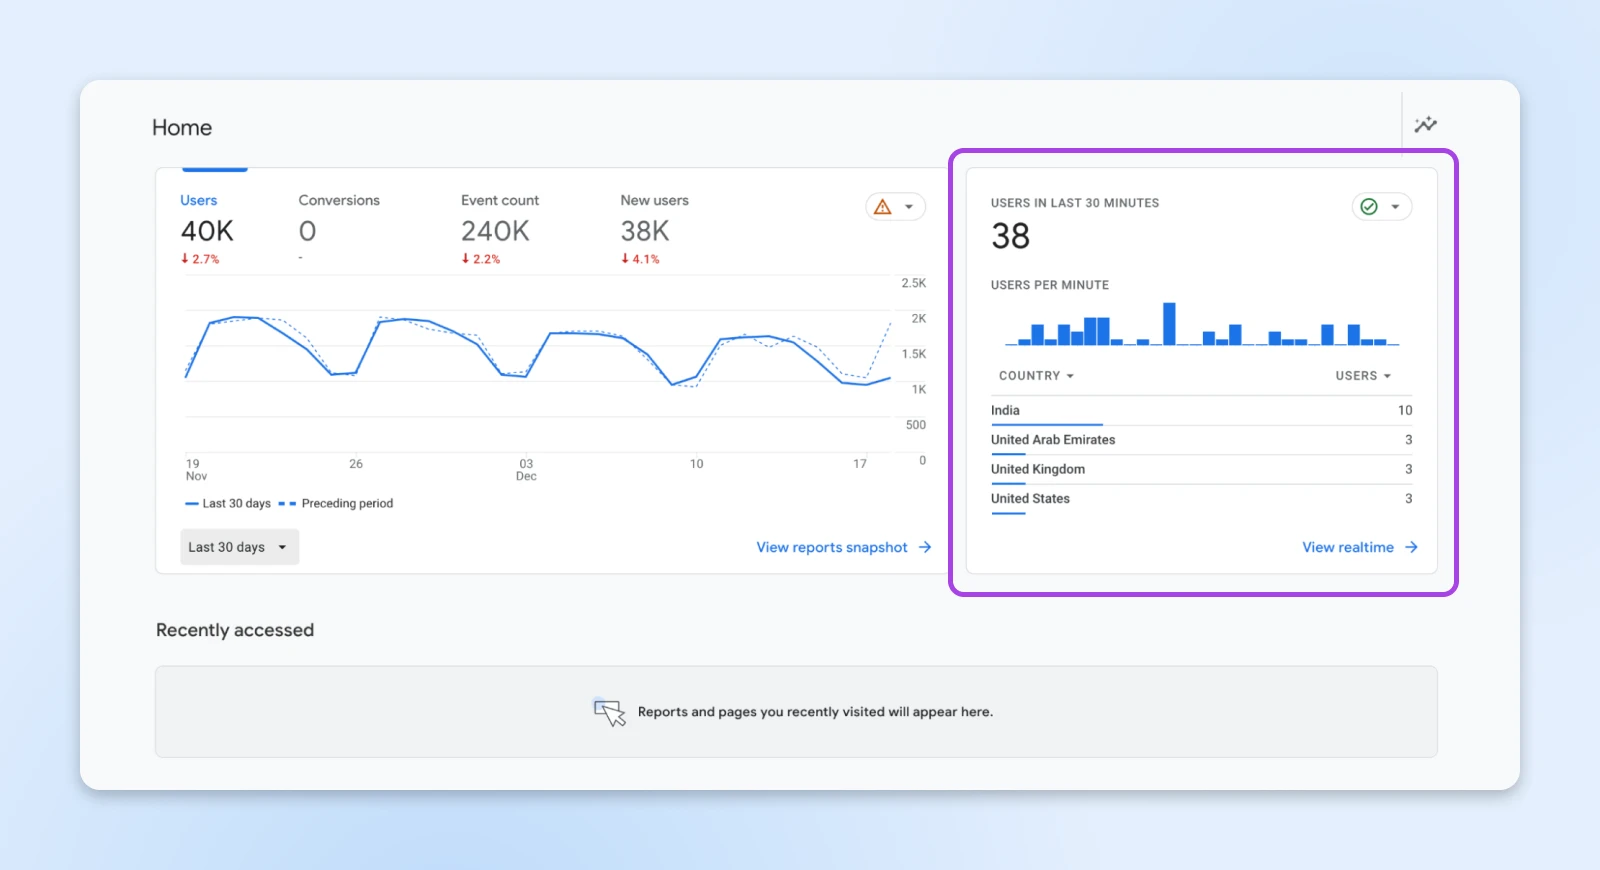
- Traffic source
- Pages visited
- Bounce rates
- Conversion actions
- Location demographics
Step 7: Review and Publish Your Site
Before releasing your new website to the public internet, thoroughly test and review all pages to catch any lingering hiccups.
- Check page speed metrics: Use Google PageSpeed Insights and GTmetrix. Optimize images and use cache plugins to hit site loading benchmarks.
- Verify all page links and site navigation menus work as expected: Do this for both desktop and mobile. Fix broken paths.
- Spellcheck all text content: Also, test embedded media formats to prevent crashes.
- Confirm security protections: Make sure SSL certificates are active and using the latest platform versions.
- Review the site on multiple browsers: Try Chrome, Safari, and Firefox to catch CSS quirks.
When everything looks good, publish your pages and confirm that the site is publicly accessible. If you built it on a staging site, push the tested version live using your host’s staging tools.
Give yourself a high five for all the work you’ve put in. You’re now sharing your website with the world!
Weekend Launch Checklist
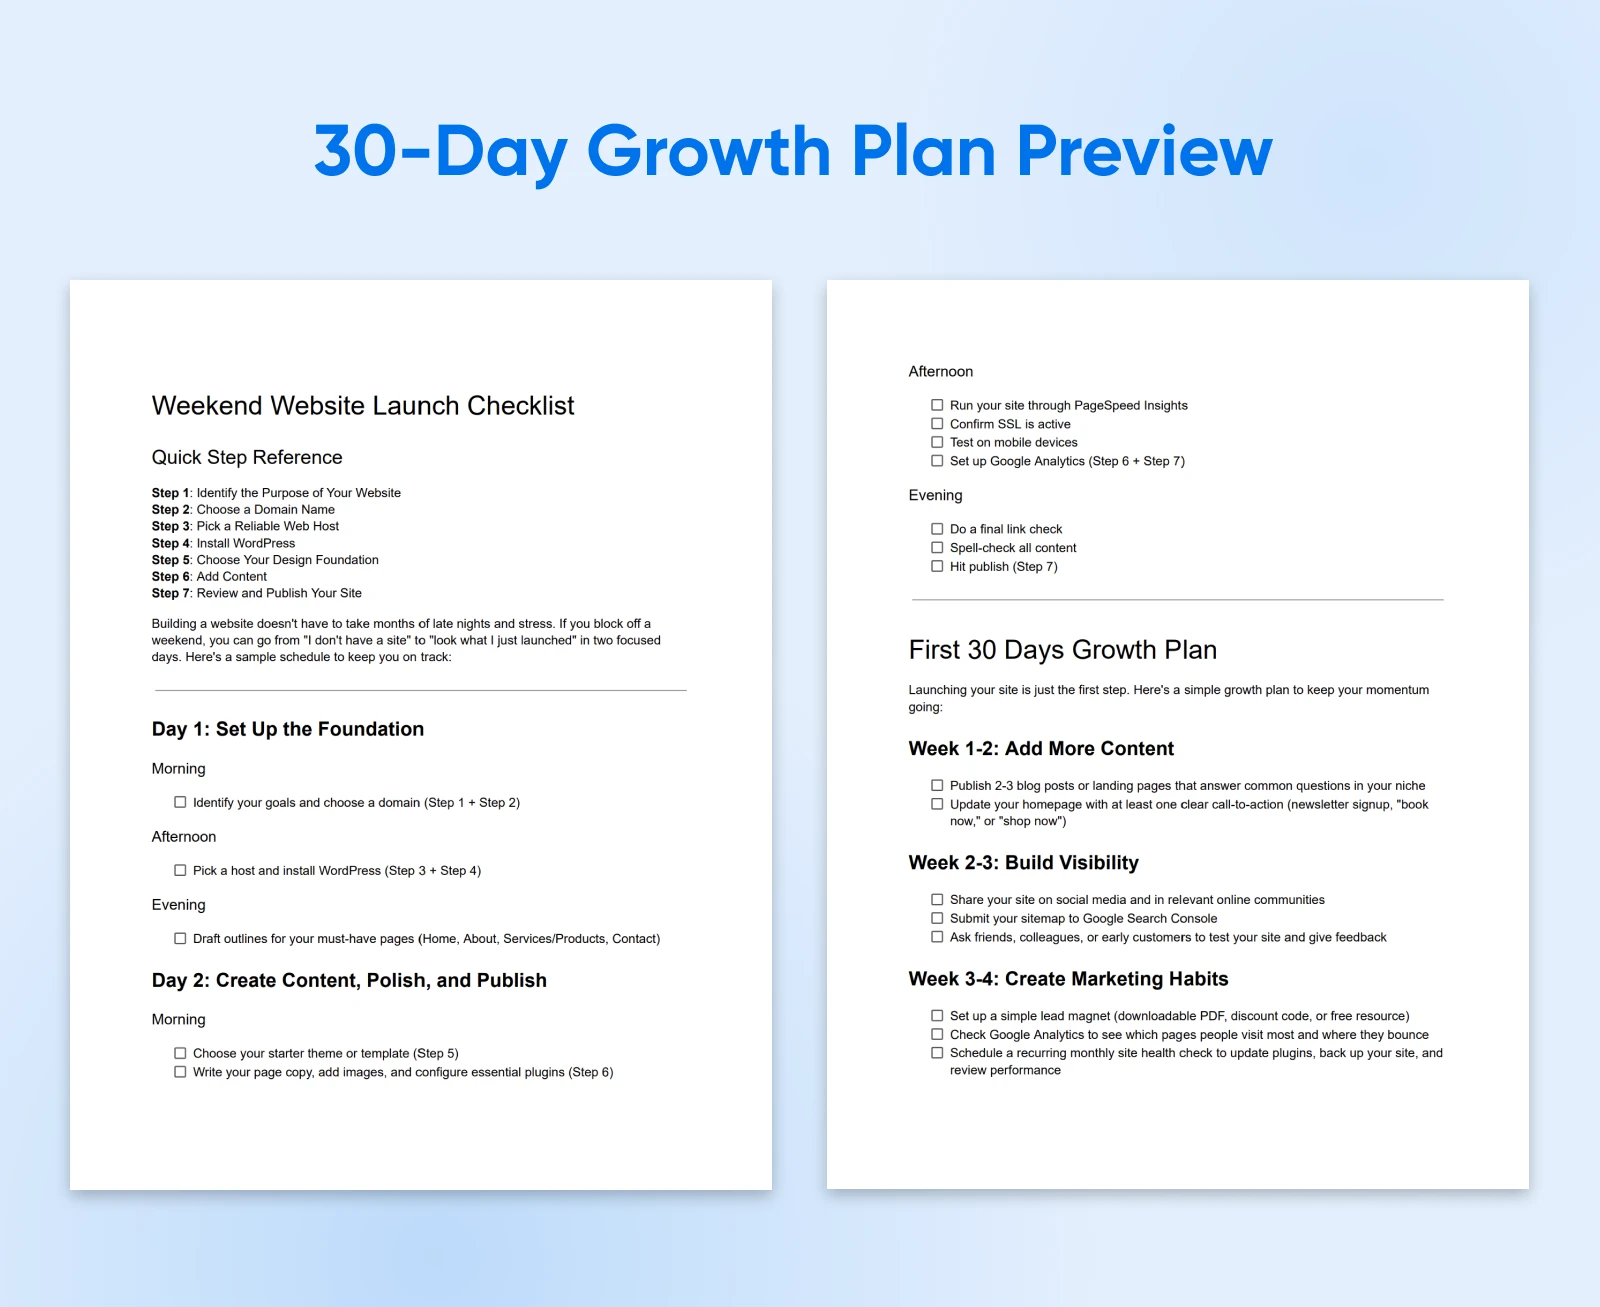
Building a website doesn’t have to take months of late nights and stress. If you block off a weekend, you can go from “I don’t have a site” to “look what I just launched” in two focused days. Here’s a sample schedule to keep you on track.
Day 1: Set Up the Foundation
- Morning: Identify your goals and choose a domain (Step 1 + Step 2).
- Afternoon: Pick a host and install WordPress (Step 3 + Step 4).
- Evening: Draft outlines for your must-have pages (Home, About, Services/Products, Contact).
Day 2: Create Content, Polish, and Publish
- Morning: Choose your starter theme or template (Step 5) and write your page copy, add images, and configure essential plugins (Step 6).
- Afternoon: Run your site through PageSpeed Insights, confirm SSL, test on mobile, and set up analytics (Step 6 + Step 7).
- Evening: Do a final link-and-spell check, then hit publish (Step 7).
By Sunday night, you’ll have a live, professional-looking website that’s fast, secure, and ready to share with the world.
Will it be perfect? Nope.
Will it be good enough to start attracting visitors and feedback? Absolutely. And that’s what matters.
After Launch: Your First 30 Days Growth Plan
Launching your site is just the first step. The real progress comes when you nurture it. Here’s a simple growth plan to keep your momentum going after your site goes live:
- Week 1-2: Add more content
- Publish two to three blog posts or landing pages that answer common questions in your niche.
- Update your homepage with at least one clear call-to-action (newsletter signup, “book now,” or “shop now”).
- Week 2-3: Build visibility
- Share your site on social media and in relevant online communities.
- Submit your sitemap to Google Search Console so your pages start showing up in search.
- Ask friends, colleagues, or early customers to test your site and give feedback.
- Week 3-4: Create marketing habits
- Set up a simple lead magnet (like a downloadable PDF, discount code, or free resource) to encourage email signups.
- Check Google Analytics to see which pages people are visiting most and where they’re bouncing.
- Schedule a recurring monthly site health check to update plugins, back up your site, and review performance.
By the end of your first month, you’ll not only have a live website but also a growing audience and a repeatable system for keeping your site fresh and secure.
💡Pro tip: We’ve created a printer-friendly, downloadable checklist that includes both the weekend launch plan and the 30-day growth strategy. Make a copy, print it out, or share it with your team to stay on track from start to finish.
Website Building FAQs
Can AI build a website for me?
Yes. Remixer, DreamHost’s agentic AI website and app builder, generates a complete site from a plain-English description in 2 to 3 minutes on average, and it builds web apps too. Hosting, a global CDN, SSL, and 24/7 support are included, and the free trial runs 30 days, no credit card.
Can I make a website for free?
You can start for free, but plan on two ongoing costs for a site you fully own: a domain name and hosting. Remixer’s 30-day free trial lets you build and preview a complete site on a remixer.ai subdomain with no credit card. And if you sign up for DreamHost web hosting, we’ll build you a custom four-page website at no extra cost.
How much does it cost to build a website?
It depends on who builds the site and what it needs. Common costs include domain registration, hosting or a builder plan, premium tools, and professional design or development. Compare current prices and renewal terms before choosing a path.
How long does it take to make a website?
Timing depends on your site’s scope, content, and level of customization. Remixer generates a complete site in 2 to 3 minutes on average, while WordPress, template-based, and custom-coded sites can take longer depending on the work involved.
Do I need to know how to code?
No. If you can write an email or post on social media, you can learn to use WordPress. Most customization happens through themes and plugins, which install with a couple of clicks. Coding is optional — nice to have if you want advanced tweaks, but not required to get a professional site live.
Should I make my website or hire a professional?
If you have a strong vision and want full control over every aspect of your online presence and user experience, then designing your website can be incredibly rewarding. However, if designing is not your thing, hiring a web designer may be money well spent, allowing you to handle content and promotion. DreamHost’s Pro Services team handles design, development, and marketing if you’d rather hand it off.
What about mobile users?
Mobile devices account for 52.57% of worldwide web traffic, per StatCounter, July 2026. Test your site across various devices to catch any formatting hiccups. Use Google’s free PageSpeed Insights to spot performance issues.
From Idea To Internet
Building a website can feel intimidating at first. But the truth is, anyone can do it. Once you understand your options, pick the path that fits your goals, and follow a clear set of steps, the mystery disappears.
Maybe you let Remixer build the site for you. Maybe you drag and drop it yourself, set up WordPress on managed hosting, or code it by hand. The path matters less than the fact that you’ve taken action.
A website gives your ideas an online home that you can shape as they evolve; how much control and portability you have depends on the platform you choose.
And remember, no first version is perfect. The power of owning your digital presence is that you can keep improving it over time. Launch now, learn as you go, and enjoy the fact that the world can finally see what you’ve been dreaming up.