The main goal of Search Engine Optimization (SEO) is for your content to rank higher in the search results for the keywords that matter most to your brand or business.
However, getting one of the top spots in the rankings may not be enough to differentiate your site from the competition and earn that coveted organic click. You might need that extra edge to get the most clicks (and actual traffic) — that’s where schema markup comes in.
Schema markup is a form of structured data that provides search engines additional information about your content. The cool thing about schema is that it creates the ability for your content’s appearance in organic search results to be visually enhanced so it stands out.
For example, you can use schema to tell Google if a page represents a recipe, a blog post, or a product page, and your search listing might include some of that extra information. Moreover, you can choose what data to include using markup, such as star ratings, prices, and even cooking time.
In this article, we’re going to explain what schema markup is and break down its benefits. Then we’ll show you how to add schema markup to your website.
Let’s get to it!
What Is Schema?
Every page you create should contain a fair amount of metadata. Some of the most important elements for SEO include page titles, meta descriptions, alt text, and heading tags. That metadata significantly affects how your site appears in the Search Engine Results Pages (SERPs).
What is Schema?
Schema refers to a collaborative markup strategy used by the major search engines. It enables webmasters to include helpful information about their web page content that can be used by search engines to enhance search appearance.
Read MoreThink about schema markup as the “next level” of metadata for pages. Instead of simply telling search engines what a page’s title and description are, the schema provides context.
You can use schema to indicate each page’s content, such as locations, recipes, products, and hundreds of other options. To give you an example, here’s what the search result for a recipe looks like without schema:

It looks good and could definitely get some clicks. Let’s compare it with a rich snippet search result that uses schema markup, including ratings, numbers of upvotes, and cooking time. The rich results are possible because of schema markup:

If you’re looking for a recipe, which of those two results would you click on? For many people, the answer would be the latter, as it provides more information right off the bat.
There are a lot of schema “categories” for different types of content. Besides recipes, you also have options for a person. This could be perfect if you want the search result snippets to contain information such as date of birth, parent and sibling names:

One of the most common approaches for adding Schema to a web page utilizes JavaScript Object Notation for Linked Data (JSON-LD).
Here’s what an example of schema markup using JSON-LD would look like if you were working on, say, a banana bread recipe:
<script type="application/ld+json">
{
  "@context": "https://schema.org",
  "@type": "Recipe",
  "author": "John Smith",
  "cookTime": "PT1H",
  "datePublished": "2009-05-08",
  "description": "This classic banana bread recipe comes from my mom -- the walnuts add a nice texture and flavor to the banana bread.",
  "image": "bananabread.jpg",
  "recipeIngredient": [
    "3 or 4 ripe bananas, smashed",
    "1 egg",
    "3/4 cup of sugar"
  ],
  "interactionStatistic": {
    "@type": "InteractionCounter",
    "interactionType": "https://schema.org/Comment",
    "userInteractionCount": "140"
  },
  "name": "Mom's World Famous Banana Bread",
  "nutrition": {
    "@type": "NutritionInformation",
    "calories": "240 calories",
    "fatContent": "9 grams fat"
  },
  "prepTime": "PT15M",
  "recipeInstructions": "Preheat the oven to 350 degrees. Mix in the ingredients in a bowl. Add the flour last. Pour the mixture into a loaf pan and bake for one hour.",
  "recipeYield": "1 loaf",
  "suitableForDiet": "https://schema.org/LowFatDiet"
}
</script>
That script would go into the page’s HTML, and you have full control over the schema elements. Some tools let you add schema markup without using code by selecting what kind of content you’re working on and filling out a few fields.
(Don’t worry, we’ll share some of our favorite schema generator tools down below.)
To recap, schema is markup you add to website pages to provide search engines with additional information about your content. Now let’s talk about how that process can benefit your website.
Why Using Schema Markup Can Improve Your SEO
To be clear, the mere existence of structured data on a web page doesn’t provide a blanket rankings boost.
For example, let’s say you have two websites, one that uses schema markup and one that doesn’t. If they’re competing for the same keywords with a similar domain authority and content quality, they will probably get similar rankings.
However, schema markup does help with organic click-through rates. By making your search results look more appealing, you increase the chance that users will click on your results versus your competitors.
Research from Google backs this up. In a study, Google found that Rotten Tomatoes added schema markup to over 100,000 of its web pages and saw a 25% increase in click-through rates compared to pages that didn’t use it:

The Food Network saw similar results. Adding schema markup translated to a 35% increase in organic traffic visits:

On top of helping you get more clicks, schema markup can make your website appear in local searches, depending on the metadata you add to your website.
For example, if you add location metadata to a page for a venue or an event, it may appear when users look for nearby options:

Likewise, Google pulls schema information from pages to fill knowledge panels in search results. These panels might not link directly to your website, but they offer a better experience for search users.
Although schema markup doesn’t affect search engine rankings, implementing it is still a smart move from an SEO perspective. Adding markup can increase clicks to your pages that are already ranking well, and that’s definitely worth the (small) effort it takes to set it up.
How to Add Schema Markup to Your Website (2 Methods)
Depending on whether you’re using WordPress or a different website builder, there are two ways to add schema markup to a website. With a WordPress site, you can access schema markup plugins that simplify the process.
Otherwise, you’ll need to add the markup manually (which is not that complicated). Let’s go over both methods!
1. Use a Schema Markup WordPress Plugin
Unsurprisingly, there are multiple schema plugins you can use in WordPress. In fact, some of the most popular SEO plugins, including Yoast SEO and Rank Math, enable you to add schema markup to posts and pages out of the box.
The only downside of using SEO plugins for adding schema code is that you don’t have much control over the metadata. Yoast SEO, for example, only lets you choose which type of page or article you’re working on:
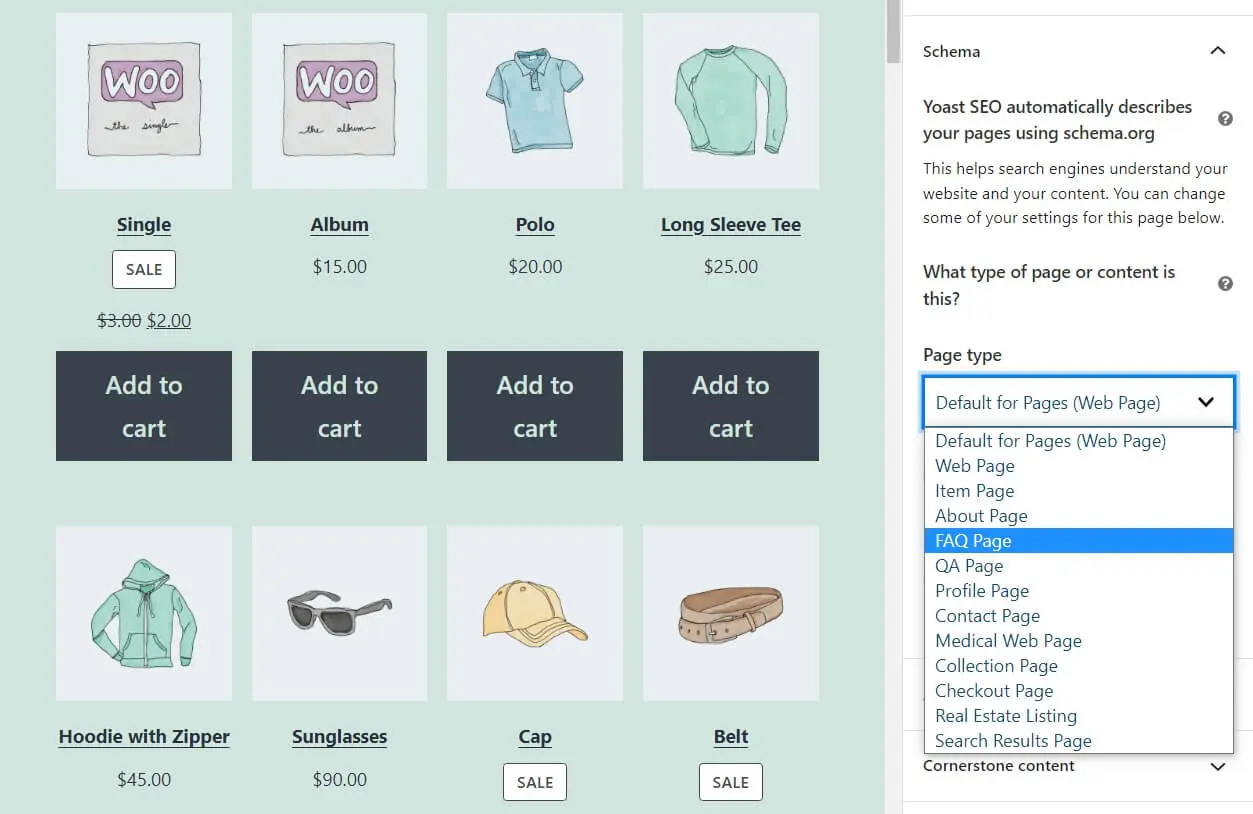
You’ll need to use a specialized plugin if you want more control over the schema data you add to your WordPress content. One of our favorite tools for the job is Schema & Structured Data for WP & AMP:

This plugin enables you to add custom JSON-LD markup to any post or page. You can also set up pre-configured types of schema markup and decide which fields to include depending on the content you’re working on.
After enabling the plugin, go to Structured Data > Schema Types in the WordPress dashboard and select the Add Schema Type option:

The plugin will ask you what schema you want to set up. You can choose from a list that includes all the schemas available on Schema.org. Some of the most common options include markup for articles, products, news articles, and FAQs:
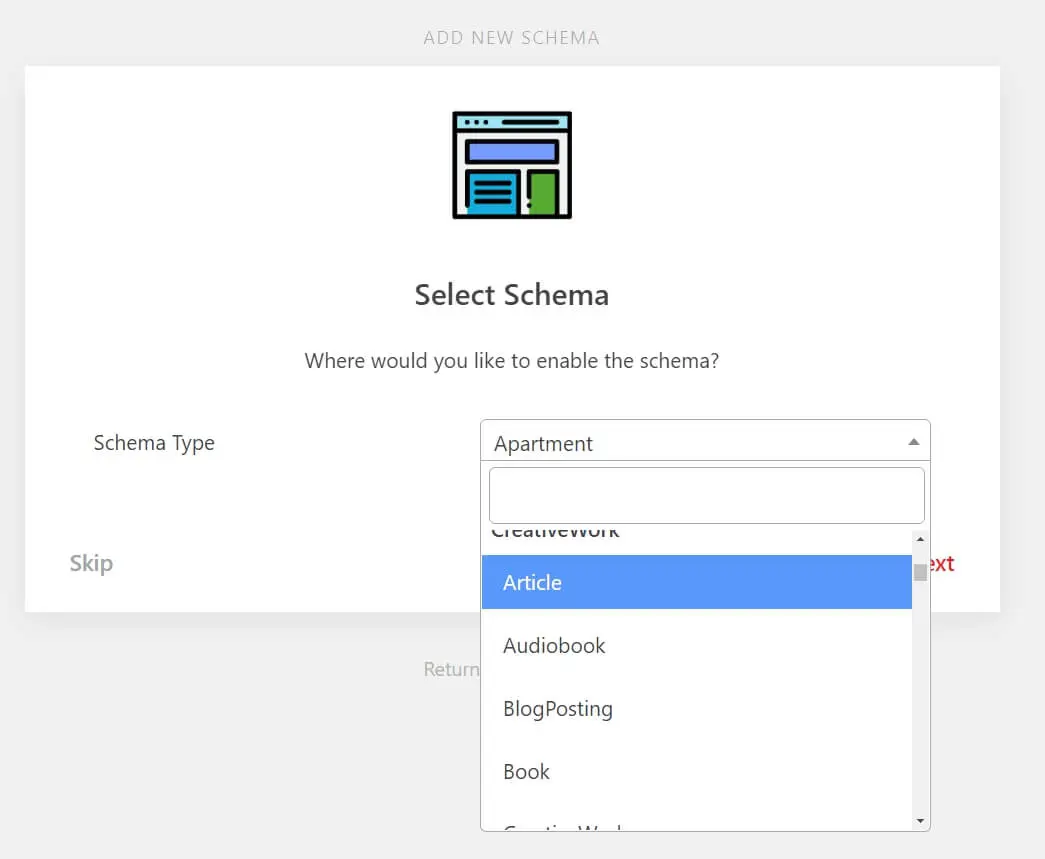
The markup elements you’ll have access to will depend on the schema you choose. Afterward, you can decide for which types of content to enable this schema.
In this example, we configured the markup for the “post” content type:
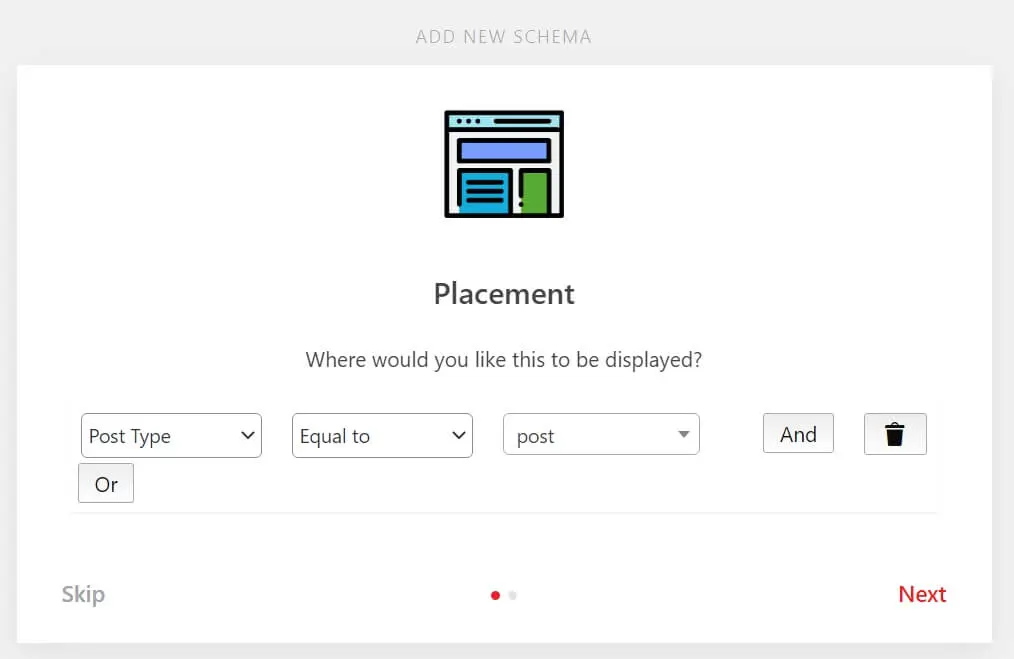
After adding a type of schema, you’ll be able to edit it immediately. The schema editing page will show the default fields it includes.
For the Article schema, you can select whether you’re dealing with a list-based article and whether it’s speakable. You can also add other properties by clicking on Add Property:
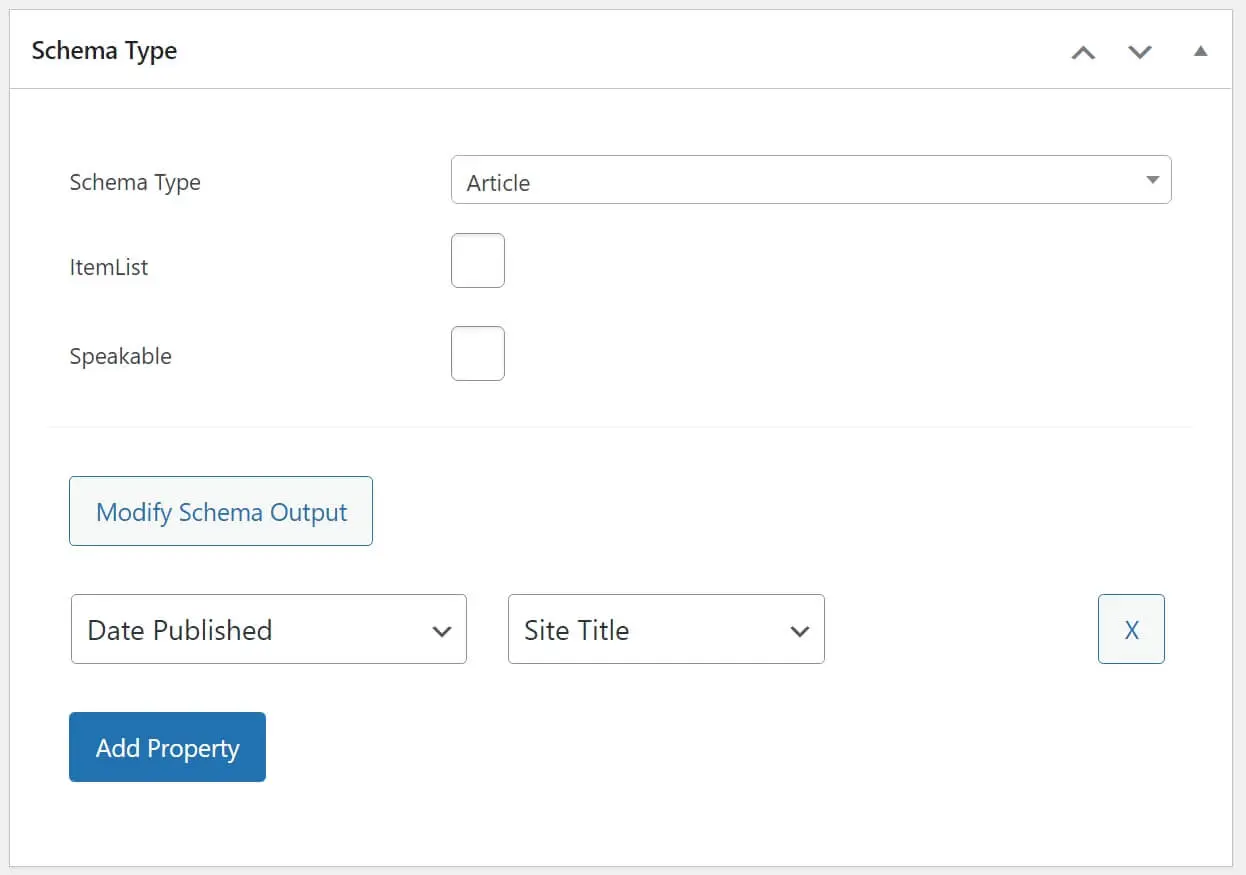
We recommend taking the time to customize each type of schema by adding the properties you want to appear in the search results for each page. However, keep in mind that if you add too many schema properties, not all of them will show up in the results. On average, Google displays between three and four schema elements for each result.
Since the plugin lets you configure which types of content will use different kinds of schema, you don’t need to enable the markup on a page-by-page basis.
However, if you’re editing a page or a post and you want to add custom schema, you can do so by going to the Schema & Structured Data on this post widget and selecting the Custom Schema option:
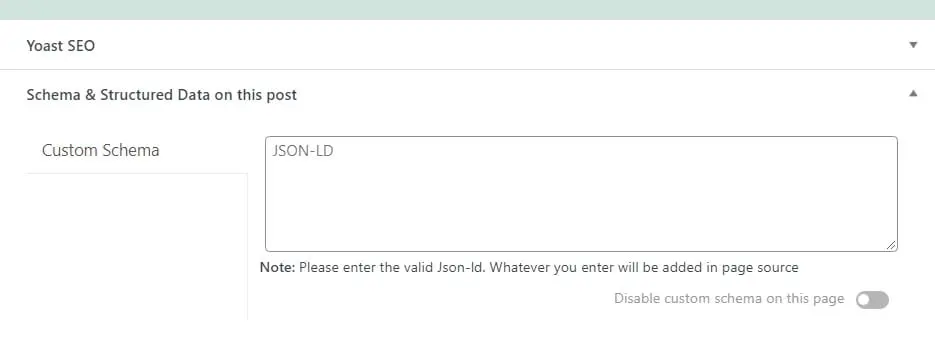
If you’re unsure how to structure schema markup using JSON-LD, we recommend checking out Schema.org. Schema markup can be very manageable, even if you’re unfamiliar with code, since it follows a very straightforward set of rules and properties.
2. Add Schema Markup Manually
The steps for adding schema markup manually to a website will depend on which format you’re using. So far, we’ve focused solely on JSON-LD because it’s the most popular option for schema markup data (and it’s recommended by Google).
JSON-LD
Adding JSON-LD markup to a page is relatively simple. You need to put together the markup script using the properties you want to include and structure it in the correct format.
Let’s revisit the earlier example of a JSON-LD schema markup snippet:
<script type=”application/ld+json”>
{
“@context”: “https://schema.org”,
“@type”: “Recipe”,
“author”: “John Smith”,
“cookTime”: “PT1H”,
“datePublished”: “2009-05-08”,
“description”: “This classic banana bread recipe comes from my mom — the walnuts add a nice texture and flavor to the banana bread.”,
“image”: “bananabread.jpg”,
“recipeIngredient”: [
“3 or 4 ripe bananas, smashed”,
“1 egg”,
“3/4 cup of sugar”
],
“interactionStatistic”: {
“@type”: “InteractionCounter”,
“interactionType”: “https://schema.org/Comment”,
“userInteractionCount”: “140”
},
“name”: “Mom’s World Famous Banana Bread”,
“nutrition”: {
“@type”: “NutritionInformation”,
“calories”: “240 calories”,
“fatContent”: “9 grams fat”
},
“prepTime”: “PT15M”,
“recipeInstructions”: “Preheat the oven to 350 degrees. Mix in the ingredients in a bowl. Add the flour last. Pour the mixture into a loaf pan and bake for one hour.”,
“recipeYield”: “1 loaf”,
“suitableForDiet”: “https://schema.org/LowFatDiet”
}
</script>
Any JSON-LD script you add must go within the <body> tags of the HTML file you’re working on. The code should vary depending on the type of content you’re creating, but all you need to add it is a text editor.
If you’re unfamiliar with schema properties, you’ll also want to keep the Schema.org website open. The site shows you the properties you can use with schema markup and examples of how to add them.
Our Favorite JSON-LD Schema Markup Generators
RDFa and Microdata Formats
Aside from JSON-LD, you might also use the RDFa and microdata formats. Both of these formats are less popular because they rely on inline code.
Here’s what the schema markup snippet for a movie might look like, indicating its director, genre, and linking to a trailer:
<div itemscope itemtype ="https://schema.org/Movie">
  <h1 itemprop="name">Apocalypse Now</h1>
  <span>Director: <span itemprop="director">Francis Ford Coppola</span>
  <span itemprop="genre">Action</span>
  <a href="../movies/apocalypsenow-theatrical-trailer.html" itemprop="trailer">Trailer</a>
</div>
Microdata requires adding properties directly within the <div> tags for each item, and the same applies to RDFa. In practice, this approach is too time-consuming, and you can’t automate it, unlike working with JSON-LD markup.
How to Validate Your Schema Markup
Why spend all of that time understanding and creating all of that Schema markup if it’s not valid? Remember to use the Schema.org Markup Validator to check your work. To use it, simply insert your URL and hit ‘Run Test.’
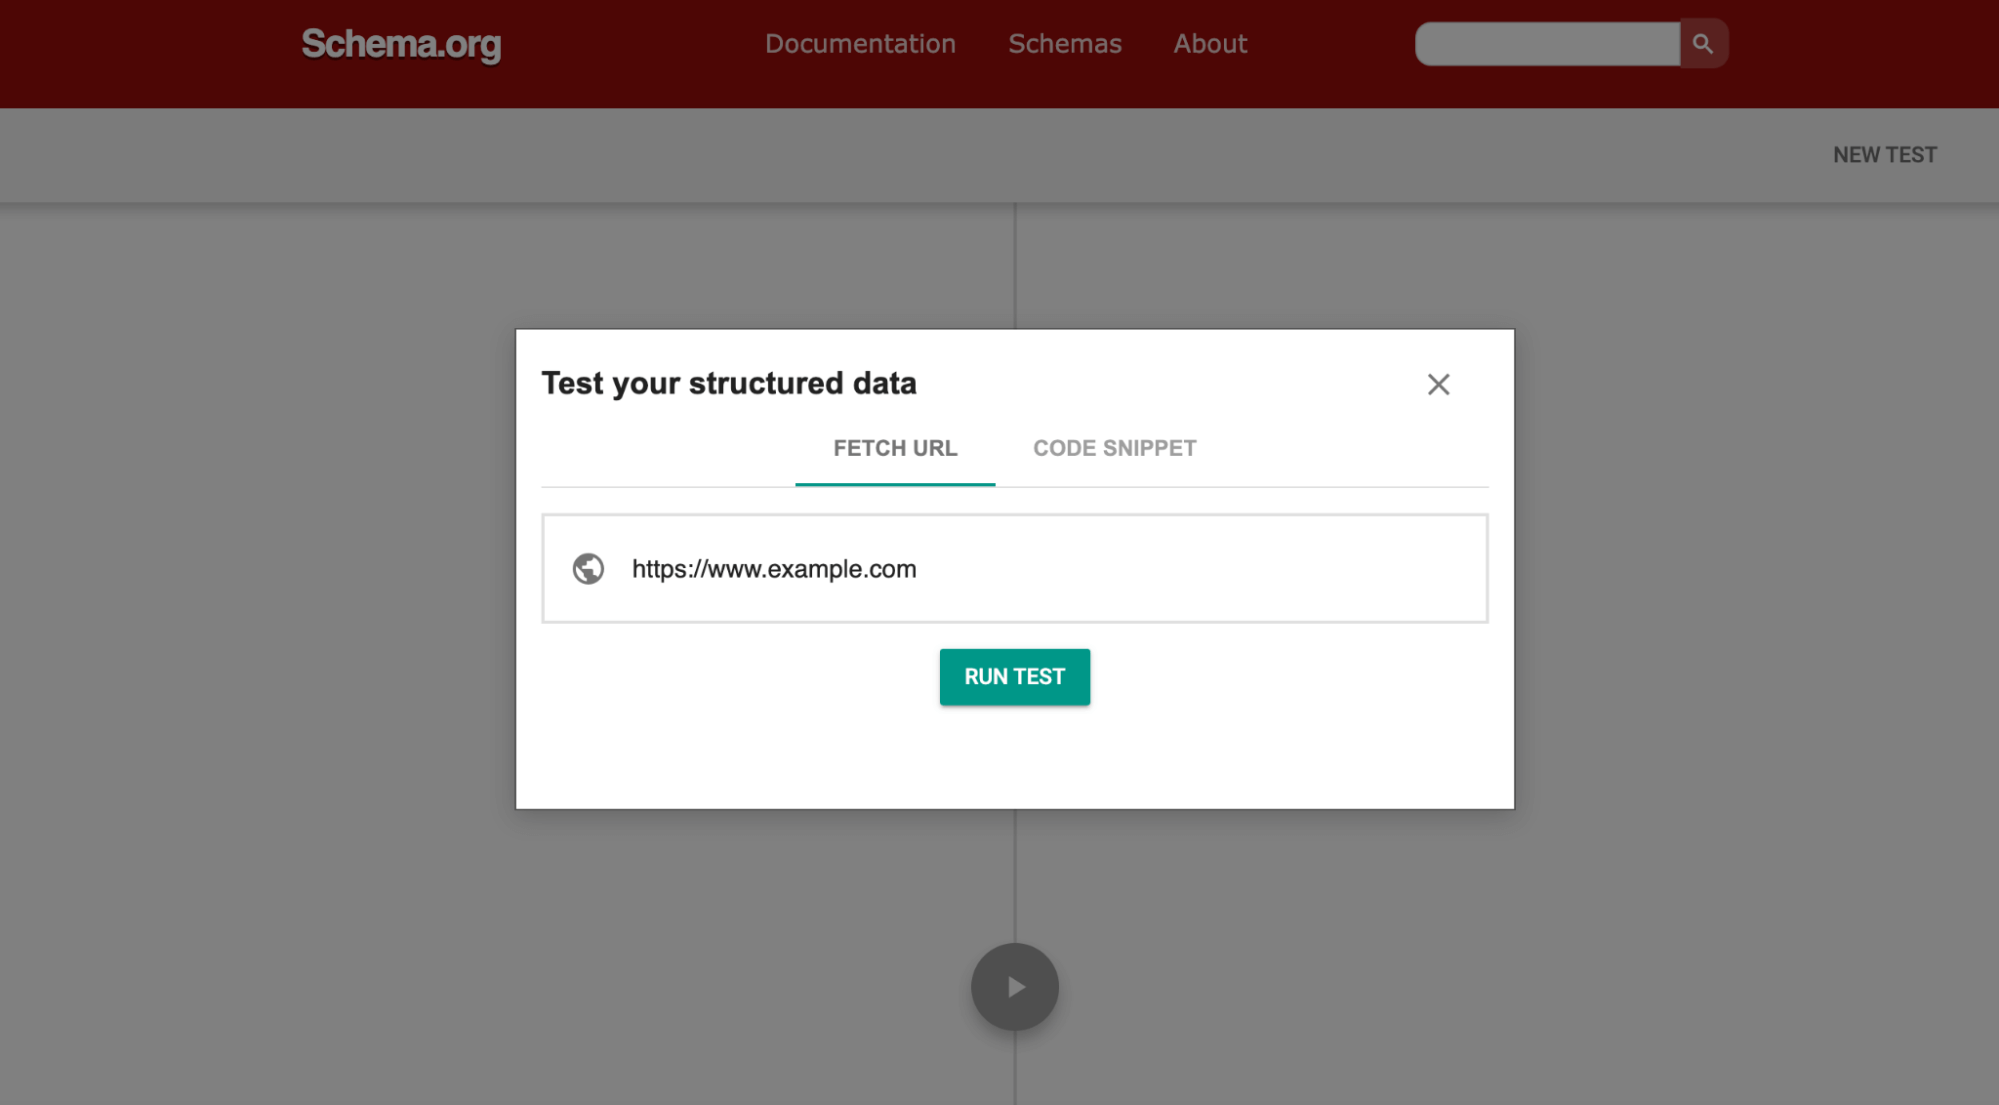
Alternatively, you may add a raw code snippet to the tester and see if everything validates properly. In the right half of the screen, pay special attention to the “errors” and “warnings” notices, which will help you troubleshoot your schema if there are any issues.
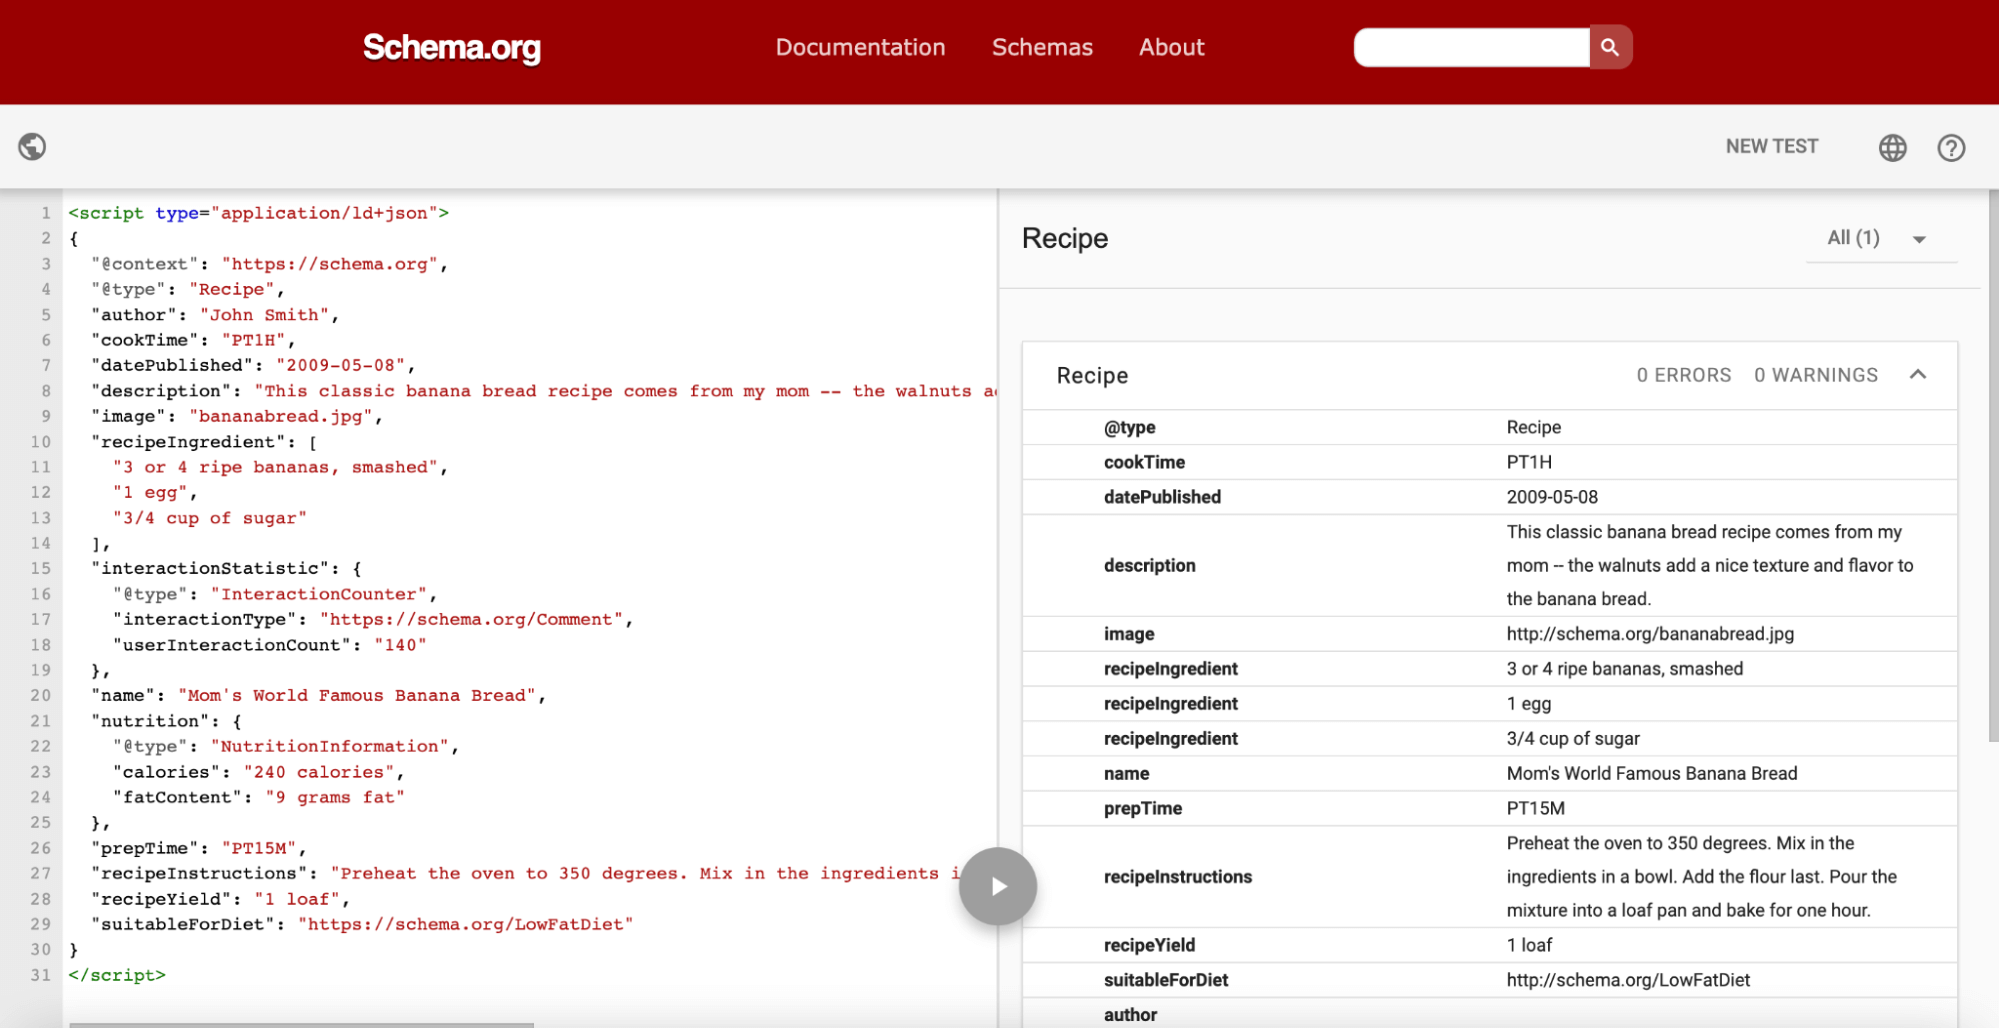
Either way you test it, this important step will ensure search engines recognizes the additional structured data you’ve added to your content and it is displayed appropriately in search results.
Add Schema Markup to Improve Your SEO and Boost Your Organic Traffic
If you want your website to get as much traffic as possible, you’ll need to improve its search engine rankings and its click-through rate. Schema markup can help you with the latter goal, and if you’re not using it, you could be missing out on a significant number of visitors.
Adding schema markup to your website isn’t difficult. However, the process varies depending on whether you’re using WordPress or not:
- Use a schema markup WordPress plugin.
- Add schema markup manually.
To ensure your website is ready for the additional traffic you can receive from using schema markup, you should look into our DreamPress plans. Thanks to managed WordPress hosting, you’ll never have to worry about a slow website or security issues again. Check out our plans today!

Do More with DreamPress
DreamPress Plus and Pro users get access to Jetpack Professional (and 200+ premium themes) at no added cost!
Check Out Plans
