
Think about a bin of Legos. Every castle, spaceship, and questionable duck starts from the same pile of snap-together pieces. Modern WordPress works exactly the same way.
WordPress blocks are the individual pieces of content — paragraphs, images, buttons, videos — that you stack, rearrange, and style to build every page and post in the WordPress editor. Each element you add is its own block, and every block can be moved, customized, or deleted on its own.
Blocks arrived with WordPress 5.0 back in December 2018, but they’re still one of the most misunderstood and underused features in the CMS. If you started out on the classic editor, you may still think of blocks as “new” WordPress.
This guide covers how blocks work, which ones ship with WordPress, and two ways to build your own custom blocks: with a plugin (the easy way) and from scratch (developer mode). Once you understand them, you can customize your site in ways that used to mean hiring a designer or developer.
What are WordPress blocks?
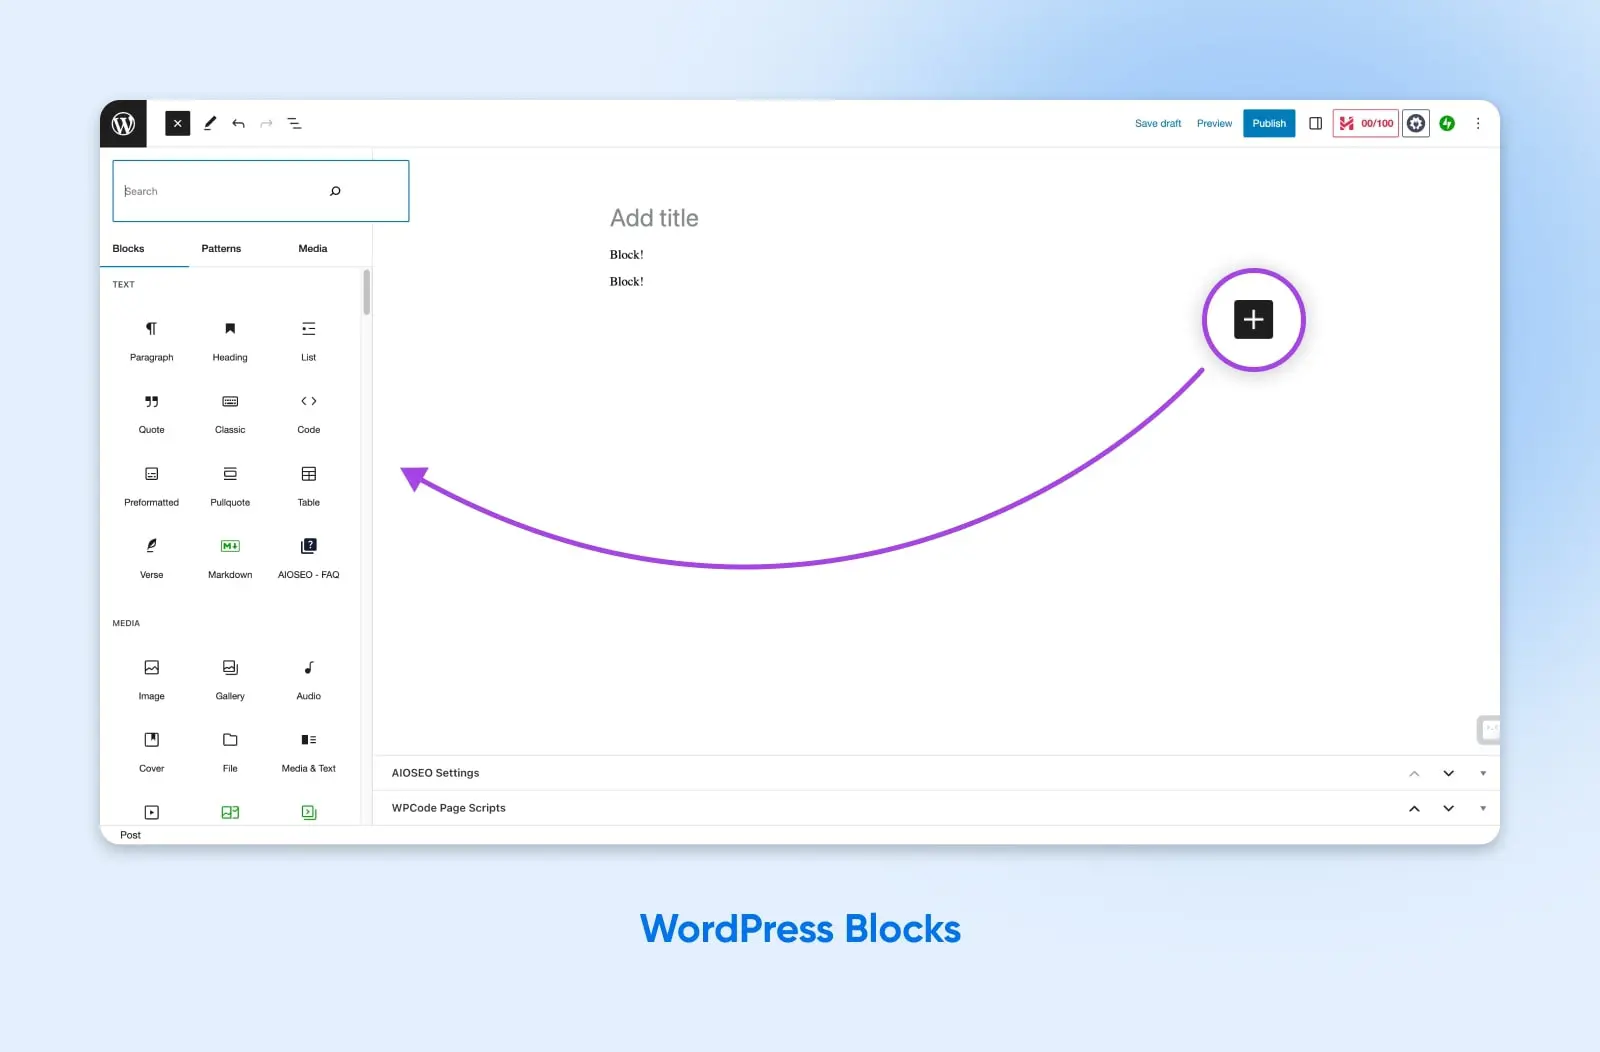
WordPress blocks are, as the name suggests, stackable building blocks: self-contained content elements that you add to the pages and posts on your WordPress site.
They were introduced in WordPress 5.0, released on December 6, 2018, alongside the new block editor. Blocks are now the standard way to build content in WordPress. And since full site editing shipped with WordPress 5.9 in early 2022, block themes let you use blocks for your entire site, including headers, footers, and templates, not just posts.
Gutenberg
Gutenberg is the name for the Block Editor project in WordPress. A lot of WordPress developers and enthusiasts use the terms Gutenberg Editor and Block Editor interchangeably.
Think of the editor as a built-in page builder. Click the “+” button (or type “/” in an empty paragraph) and pick a block. WordPress’s own Core Blocks Reference lists more than 100 blocks in the core library, though that count includes child blocks (each Column inside a Columns block gets its own entry) plus a few deprecated and experimental ones. In practice, the block inserter sorts what you’ll actually use into six categories: Text, Media, Design, Widgets, Theme, and Embeds.
Each block works like a small widget. Blocks can embed content from another site or service, add functionality like a calendar to a page, or hold a specific piece of content with predefined formatting. Most blocks also have settings that control how they look or behave on your site.
The block editor is a massive upgrade from the classic editor, which was essentially one big text box. The classic editor supported more than text and images, but complex layouts often depended on shortcodes, plugins, or custom code.
Nerd note: If for some reason you don’t see blocks in your editor, there are two likely reasons. One is that your WordPress installation is horribly outdated (like years and years old). The other is that the Classic Editor plugin is active and has reverted you to the old editing experience. Check your plugins page from wp-admin to figure out if that’s the case for you.
What blocks does WordPress already have?
By default, the block editor gives you a huge menu of available blocks. You can use them to customize your WordPress theme, let writers and bloggers add rich content to their posts, pull in social media content, and so much more.
Let’s look at some of the most popular and helpful default blocks.
Most common blocks
Everything you add in the block editor is a block, including plain text and images. That means the most common blocks are the different types of text and image elements you might add to a page.
Things like:
- Paragraph block — Every paragraph you write lives in its own block. Write a little or write a lot.
- Image block — For when you want to show as well as tell, throw an image in the mix for some added flair.
- List block — Ordered or unordered, outlines or checklists. (This list is one.)
- Gallery block — Vacation photos and product shots, arranged in a grid without any fiddling.
- Table block — Build a pricing table or share spreadsheet data without touching HTML.
- Pullquote block — Call attention to the one line you want readers to remember.
Each of these is an element you can add to your website with the block editor, then position and style within the content section of the page.
Embedded content blocks
Blocks make it extremely easy to pull outside content into your WordPress website without installing anything extra. The core Embed block has variations for more than 30 services: paste a link, and WordPress handles the rest.
A few of the most useful embed variations:
- YouTube
- X (renamed from the Twitter block)
- Spotify
- Vimeo
- TikTok
One catch worth knowing: the Facebook and Instagram embed blocks were removed in WordPress 5.6, so those two need a plugin or manual embed code.
Blocks for things like contact forms, testimonials, FAQs, WooCommerce products, and scheduling tools exist too, but those are added by plugins rather than shipping with WordPress core. Install the plugin, and its blocks show up in the same “+” inserter as everything else.
Specialty blocks
Here’s where things get really spicy.
Beyond the basics and embedded content, there’s a set of advanced blocks for special cases. Like maybe you want to improve your site’s navigation and UX, or use WordPress as a full-blown site builder.
Navigation
On the web, the term ‘navigation’ represents moving from one website or page to another. Navigation is also a common term in web development and design. There’s an emphasis on making it easy for users to find the pages they need.
Here are a few to check out:
- Buttons block
- Columns block
- Group block
- Details block (collapsible content)
- Navigation block
- Query Loop block (displays posts based on criteria you set)
- Pattern block (WordPress 6.3 renamed reusable blocks to patterns; a synced pattern updates everywhere it’s used when you edit it once)
- Shortcode block
- Table of Contents block
With these blocks, you can pull in custom content directly from the WordPress database or fully control the layout, spacing, and flow of each page or post on your website. And if you want ready-made layouts built from groups of blocks, our guide to WordPress block patterns picks up where this list leaves off.
That’s all great and dandy.
But what if you need a block that doesn’t come with WordPress by default?
Luckily, blocks are also customizable. Just like widgets, you can install new blocks and even create your own to fit the needs of your website design and template.
Widget
WordPress widgets can add features to your website’s sidebars, footers, or other areas. Some default WordPress widgets are Categories, Tag Cloud, Search, Navigation Menu, Calendar, and Recent Posts.
How to create custom blocks with a WordPress plugin
By far, the easiest way to create a custom block is to use a block builder plugin. You define the fields your block needs, write a bit of markup, and the plugin handles the registration work that would otherwise require JavaScript.
Our pick is Custom Block Builder – Lazy Blocks, a free plugin that lets you build blocks visually: add controls with drag and drop, then write the block’s output in HTML or PHP. You’ll want a basic understanding of HTML and CSS to structure and style the block to fit your needs.
One trade-off to accept up front: blocks you build this way depend on the block builder, so plan on keeping the plugin installed and active for as long as the blocks are in use.
Step 1: Install and activate the plugin
First things first: From wp-admin, go to Plugins > Add New and search for “Lazy Blocks.” Install it.
(Don’t forget to click Activate.)
Step 2: Add a new block
Once installed and activated, you’ll see a new option in the left-hand navigation of the WP admin panel.
Add a new block and configure the basics: give it a name, an icon, and a category so you can find it in the inserter later.
Step 3: Add controls (the block’s editable fields)
Now, we’re ready to start building the custom block.
Controls are the fields an editor fills in when they use your block. Lazy Blocks ships with a large set of predefined ones, including text, textarea, image, gallery, URL, select, toggle, and repeater controls, and you can show each control in the block content or in the settings sidebar.
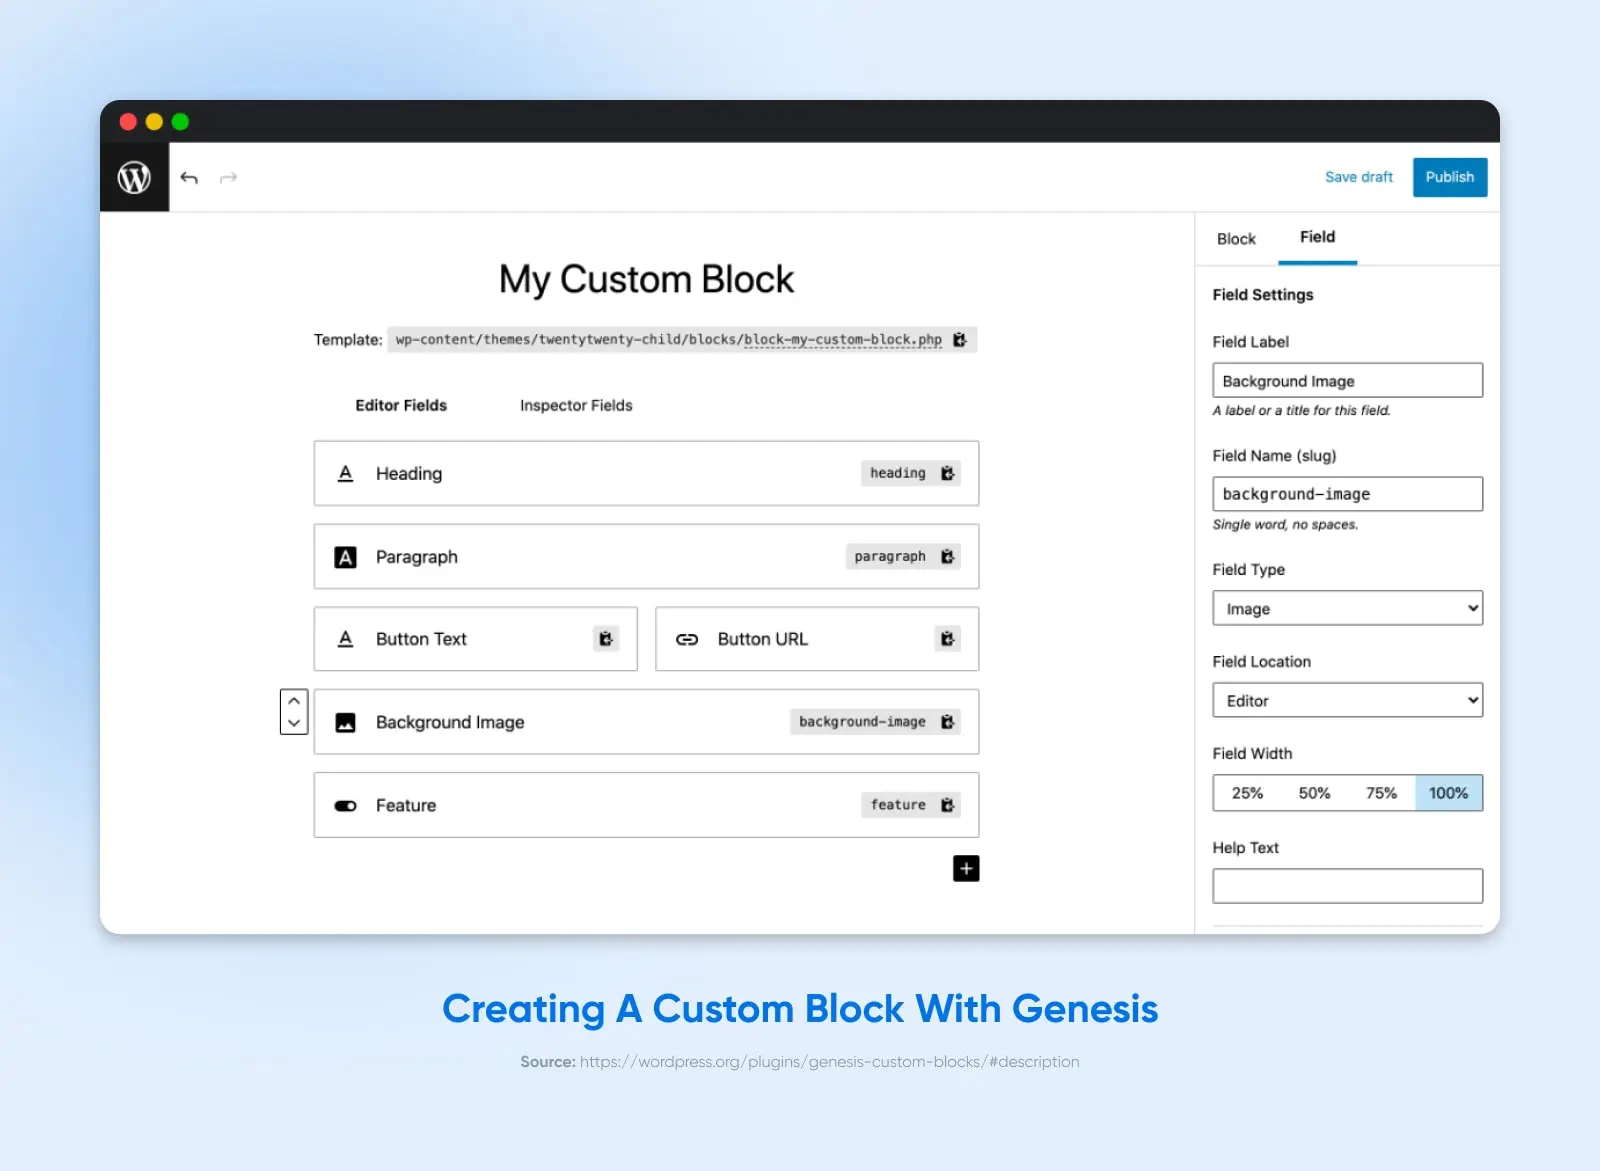
Every block builder has some version of this screen. You can think of it sort of like a mini version of the block editor itself: whatever fields you define here become the inputs a writer or editor fills in when adding the block to a page or post.
For example, if you’re building a custom call-to-action (CTA) block, you might add fields like:
- Headline text
- Subhead text
- Button text
- CTA button URL
Each control gets a label and a name (slug) that you’ll reference in the next step.
Step 4: Write the output code
Now that we’ve set up the back end of the block, we need to tell WordPress how to actually display the content that’s being added.
Here’s where any prior HTML or CSS knowledge that you may have will come in handy.
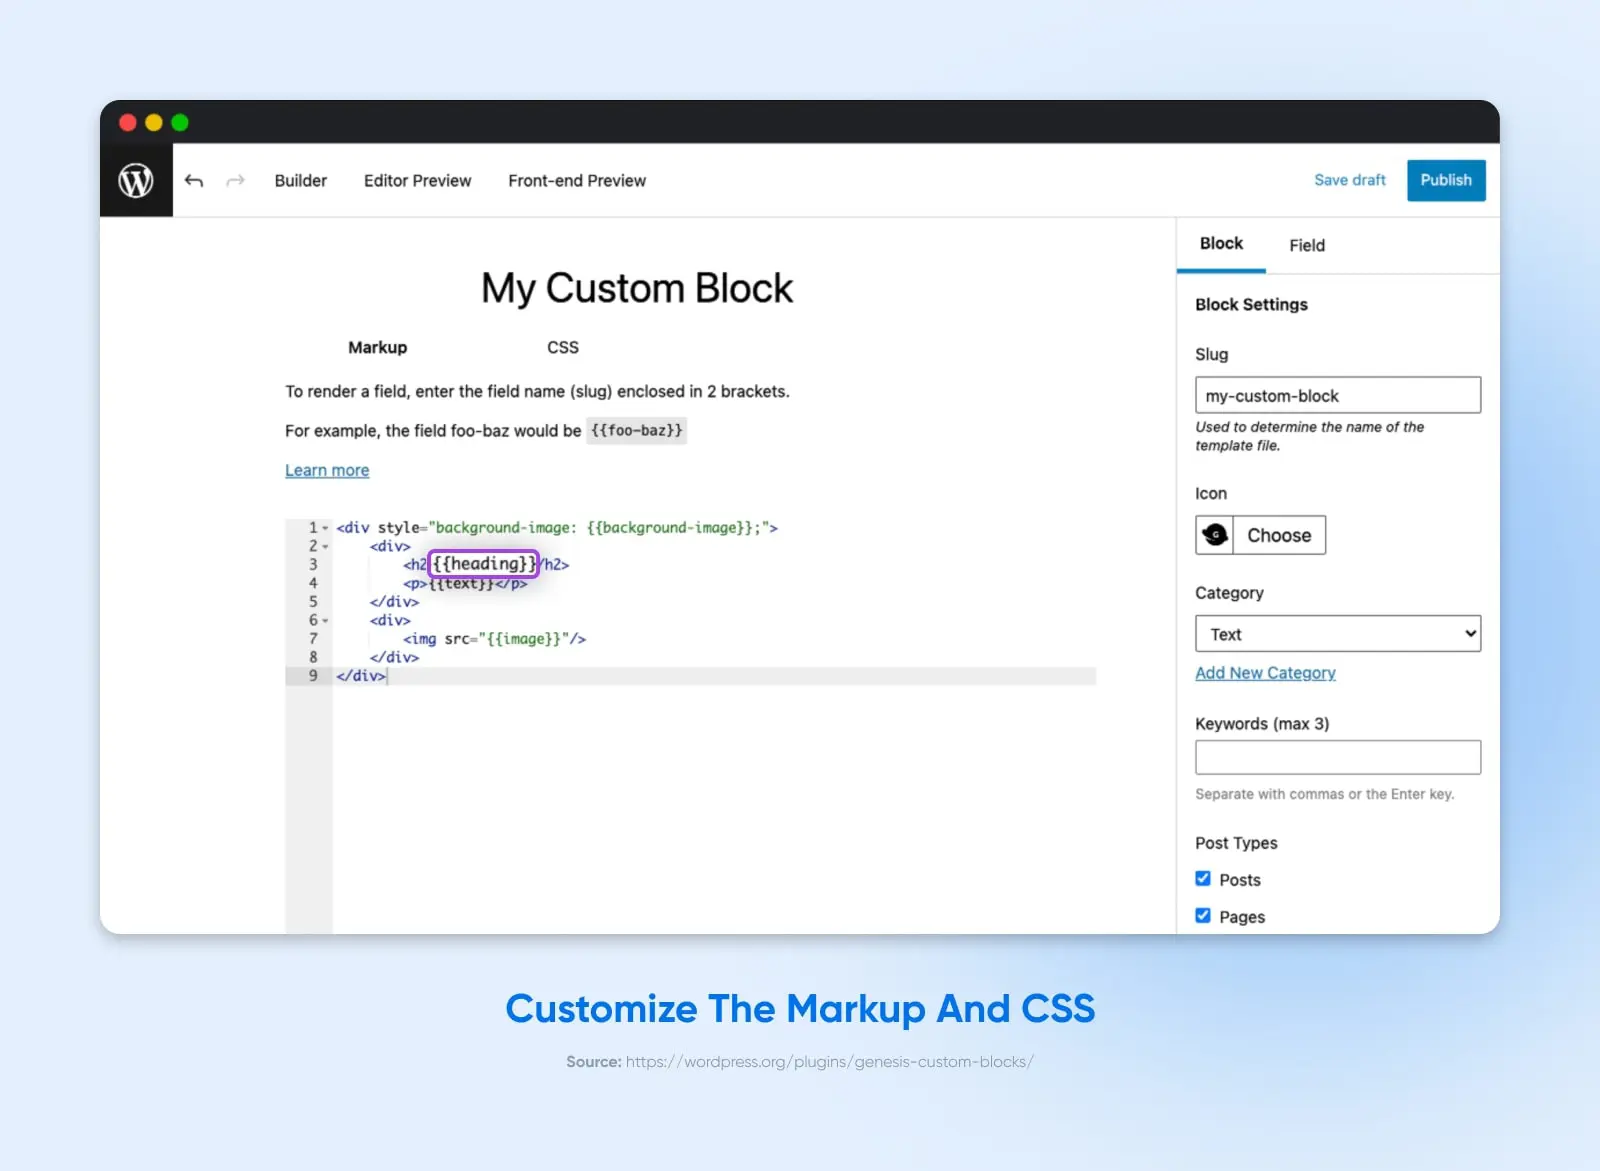
In this step, you’ll write the markup that WordPress renders wherever the block is used. Lazy Blocks lets you write it in plain HTML or in PHP.
To pull in what an editor typed into your controls, use the plugin’s Handlebars-style output: reference each control by its name (slug) in double curly braces. (E.g., “{{button-text}}”)
Step 5: Add the block
Once you’ve saved the block, it should appear in the list of available blocks in the WordPress editor, right alongside the defaults.
Simply click the “+” and then find the new block by its name.
Once added, you should see the fields and options you configured, ready to fill in.
That’s it!
You can now use your custom block, adding it to pages, posts, or wherever you need it.
How to create custom WordPress blocks from scratch
If you want to dive in deeper and really learn how blocks work under the hood, you can build one from scratch with the create-block tool, the officially supported scaffolding tool from the WordPress project. It generates the PHP, JavaScript, and CSS for a working block, plus a modern build setup with no configuration.
Fair warning: This is an advanced workflow. It will require you to dig into the command line.
You’ll need to understand PHP, JavaScript, HTML, and CSS.
Don’t say we didn’t warn ya!
Step #1: Set up Node.js, npm, and a local WordPress installation
Before we can use create-block, we’ll need to have the right setup and access.
Here are the prerequisites:
- A local WordPress development environment
- Terminal or command line setup
- Node.js and npm — create-block requires Node.js version 20.10.0 or above and npm version 10.2.3 or above
You may also want to use nvm (Node Version Manager) to install or update a compatible version of Node.js.
With this setup, we will use npm’s command “npx” to execute the create-block package directly from the npm registry, with nothing to install permanently.
Step #2: Run the create-block package
Now, the easy step.
From the terminal, navigate to the /wp-content/plugins directory of your website on your local machine.
Then run the create-block package using npx:
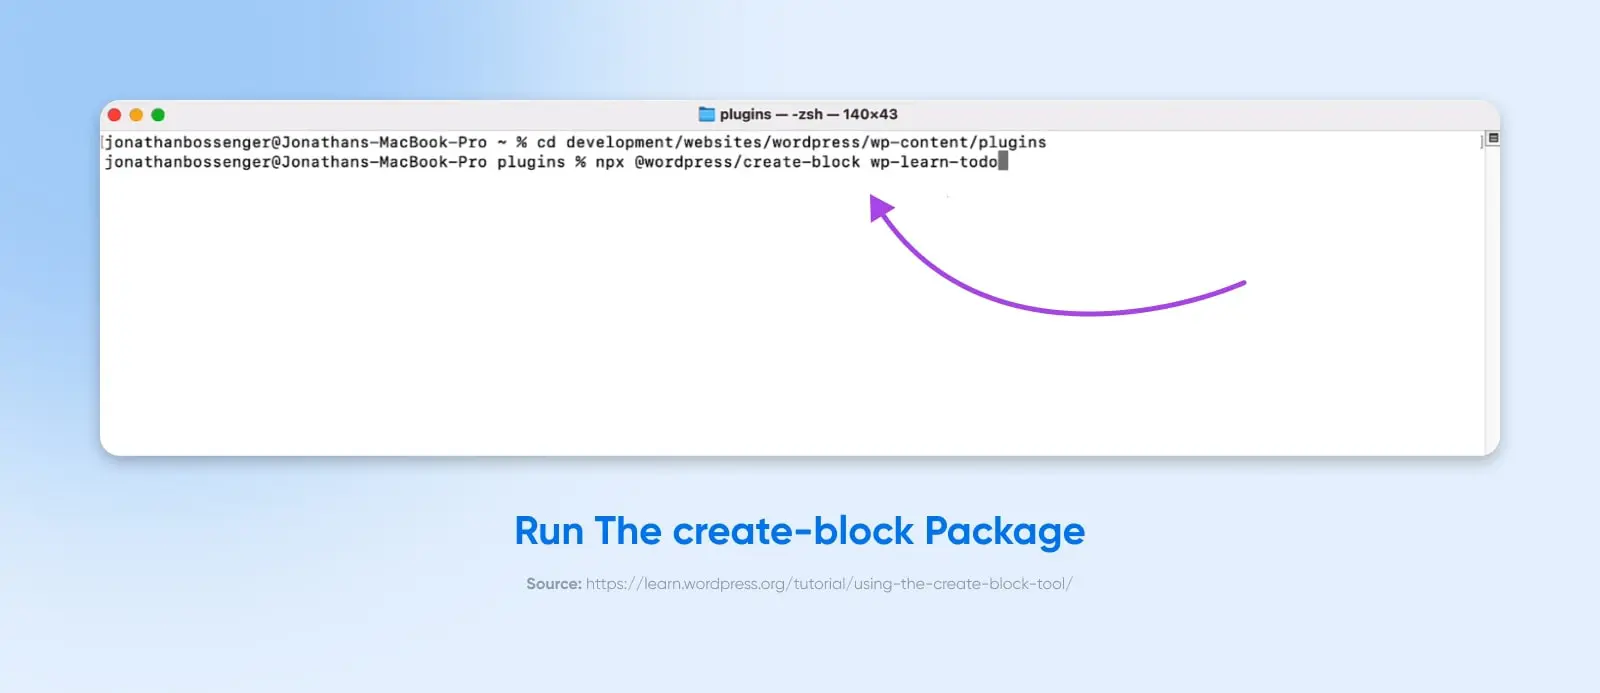
npx @wordpress/create-block@latest my-custom-block
The slug you provide sets the folder name and the block’s internal name. The package will then run through the process of setting up what’s known as the “block scaffolding”: it registers all of the relevant elements, spins up the correct file and directory structure, and generates default code for the entire block to be both editable and usable.
Step #3: Activate the plugin
The new block itself will take the form of a plugin. That’s the recommended way to package a block, because a block that lives in a plugin keeps working even when you switch themes.
Once the create-block package is complete, you’ll need to pop over to WP admin.
Go to the Plugins page and activate the new plugin that it created, which should have the name of the block that you used in your npx command.
Step #4: Customize the block code
You’ll customize the content and functionality of the block within the /src/ folder inside the plugin directory.
The generated source files separate block registration from the editor and front-end output code:
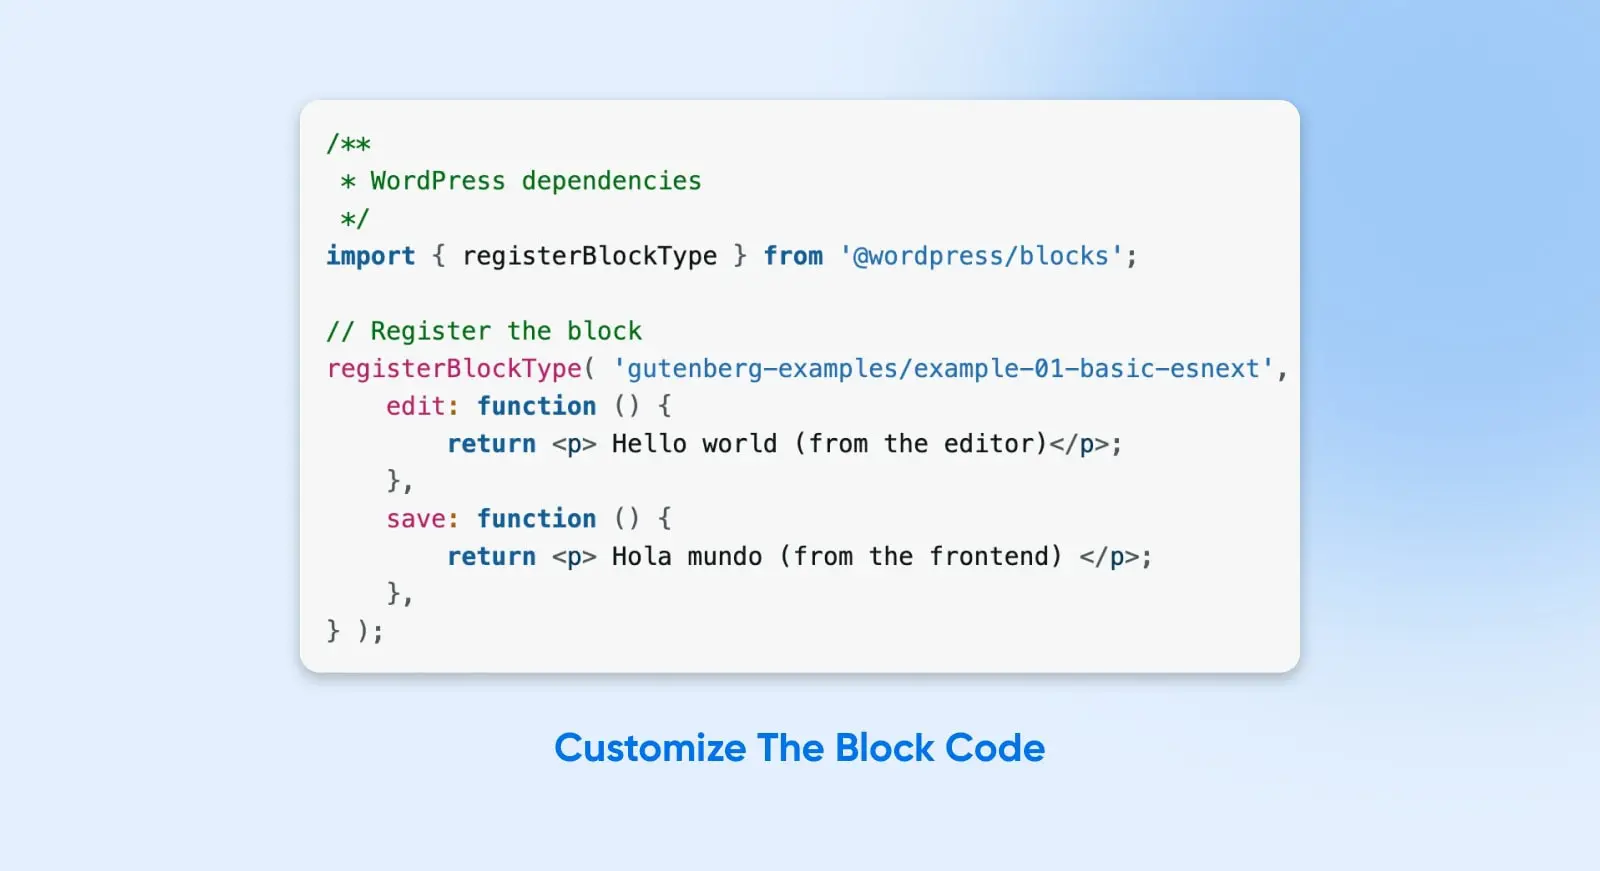
Notice that the registerBlockType function is set to handle both the block editor inputs (“edit”) and the front-end display (“save”).
This is just scratching the surface of building a functional block.
You’ll likely want to dig into the complete documentation for writing functional blocks using the WordPress Block API. Once you have the basics down, you can pull in additional dependencies, tap into outside data sources, and just about anything else your heart desires.
One practical tip: test custom block code somewhere safe before it touches a live site. A local install works, and so does a staging copy. If your site runs on DreamPress, DreamHost’s managed WordPress hosting, every plan includes 1-click staging for exactly this kind of experiment.
Step #5: Add the block from the editor
With the activated plugin, you can add your block to any page or post from the block editor.
Access it by using the “+” button or “/” command, just like any other block.
FAQs about WordPress blocks
How do I add a block in WordPress?
Open a page or post in the editor and click the “+” button, or type “/” followed by the block’s name in an empty paragraph (like “/image”). Once a block is in place, you can drag it anywhere in the content or adjust it from its toolbar.
Where do I find the WordPress block editor?
The block editor is the default WordPress editor: log in to wp-admin and edit any post or page. There’s nothing to install, since every WordPress version from 5.0 (December 2018) onward includes it. If you see one big text box instead of blocks, the Classic Editor plugin is probably active on your site.
Do I need the Gutenberg plugin to use blocks?
No. “Gutenberg” is the codename for the project that builds the block editor, and its stable features ship inside every WordPress release. The separate Gutenberg plugin is a beta channel for early adopters who want to test experimental features before they land in core. Most sites shouldn’t run it.
Can I still use the classic editor?
Yes. The free Classic Editor plugin is an official plugin maintained by the WordPress team, and it’s active on more than 8 million sites as of August 2026. The caveat: it doesn’t work with block themes, which rely on blocks. It’s a solid bridge for workflows that depend on the old editor, but don’t build a new site around it.
Which is better: the block editor or a page builder like Elementor?
For most sites, start with the block editor. It’s built into WordPress, it’s free, and the skills transfer to any WordPress site you ever touch. Elementor is a third-party drag-and-drop website builder plugin with a free version and a paid Pro tier; it offers deeper design control, but it uses its own editor and widget system rather than core blocks, and it’s one more plugin to maintain. Reach for a page builder only when you need design precision the block editor can’t give you.
What’s the difference between a block and a pattern?
A block is a single element: one paragraph, one image, one button. A pattern is a pre-arranged group of blocks you can insert as a ready-made layout. Synced patterns (WordPress 6.3 renamed reusable blocks to patterns) go a step further: edit a synced pattern once, and the change appears everywhere it’s used. Our guide to WordPress block patterns covers them in detail.
The sky’s the limit
Alright, we went from basics to advanced with this one. The recap: blocks are the standard way to build in WordPress, the core library covers most everyday needs, a block builder plugin like Lazy Blocks lets you define fields visually while writing the output in HTML or PHP, and create-block is there when you’re ready to write your own.
Between those options, your WordPress site can grow into just about whatever you want it to be. One block at a time.

WordPress + DreamHost
Our automatic updates and strong security defenses take server management off your hands so you can focus on creating a great website.
Check Out Plans