
If a stranger kept knocking on your front door, time and time again, you’d probably bolt it. Or add three additional locks.
Your online home, too, deserves and needs the same protection.
Limit Login Attempts Security (formerly Limit Login Attempts Reloaded) is a popular security plugin that lets you restrict access to your login page. If someone knocks on your virtual door more than a few times, they’re kicked out. It’s a great security tool, with more than a million active installs, per WordPress.org (August 2026).
If you’re considering using Limit Login Attempts Security or a similar plugin for your website, this guide is a must-read.
In the next few minutes, we’re going to look at why you might need this plugin, how to set it up, and what other options you have for protecting your website.
Jump on board, it’s time for a whistle-stop tour!
What is Limit Login Attempts Security (formerly Limit Login Attempts Reloaded)?
Limit Login Attempts Security, the plugin formerly known as Limit Login Attempts Reloaded, is one of the most widely used WordPress login security plugins, capping the number of times anyone can attempt to log in to your website. Don’t let the new name throw you: it’s the same plugin from the same developer (WPChef), and if you already run it, your settings stay intact. How does it work? By tracking the number of login attempts made from each IP address.
IP Address
An IP address is a unique numerical identifier for devices on a network. It shows where a device is located and facilitates communication between devices using network protocols.
The basic plugin is free, offering solid protection against brute force attacks — that’s when hackers try to guess your password.
The free version also offers:
- Built-in two-factor authentication (2FA).
- A login firewall with bot protection.
- Protection for XML-RPC requests, custom login forms, and multisite installations.
- Full logs of attempted logins.
- Email notifications.
- Protection for WooCommerce stores.
- Compatibility with other security plugins, such as Wordfence.
For additional website security features, you can upgrade to a premium license. There’s a 14-day free trial, and you’ll find current pricing on the developer’s plans page.
Those extra features include:
- Real-time, cloud-based IP intelligence that blocks known malicious IP addresses.
- Blocking login attempts by country.
- Synchronized lockouts and shared safelists and denylists across multiple websites.
Why you should limit WordPress login attempts
The Internet can feel like the Wild West. If you don’t secure your site, there’s always someone ready to break in and wreak havoc. And the tools keep getting sharper: per the plugin’s WordPress.org listing, in the age of AI, attackers “now have access to faster and more sophisticated tools than ever before.”
By setting a limit on the number of failed login attempts, you can prevent people from trying to log in repeatedly. You’re much less likely to get hacked this way.
One honest caveat: per-IP limits stop basic brute force attacks, but a distributed attack that rotates through thousands of botnet IP addresses can stay under any per-IP threshold. (That’s exactly why the plugin’s developer sells cloud-based IP intelligence as a premium upgrade.) Treat login limiting as one layer of defense, and pair it with strong passwords and two-factor authentication rather than relying on it alone.
Just as importantly, those endless login attempts can overload your WordPress website and reduce performance. Restricting login attempts is a simple solution.
The potential downsides of limiting login attempts
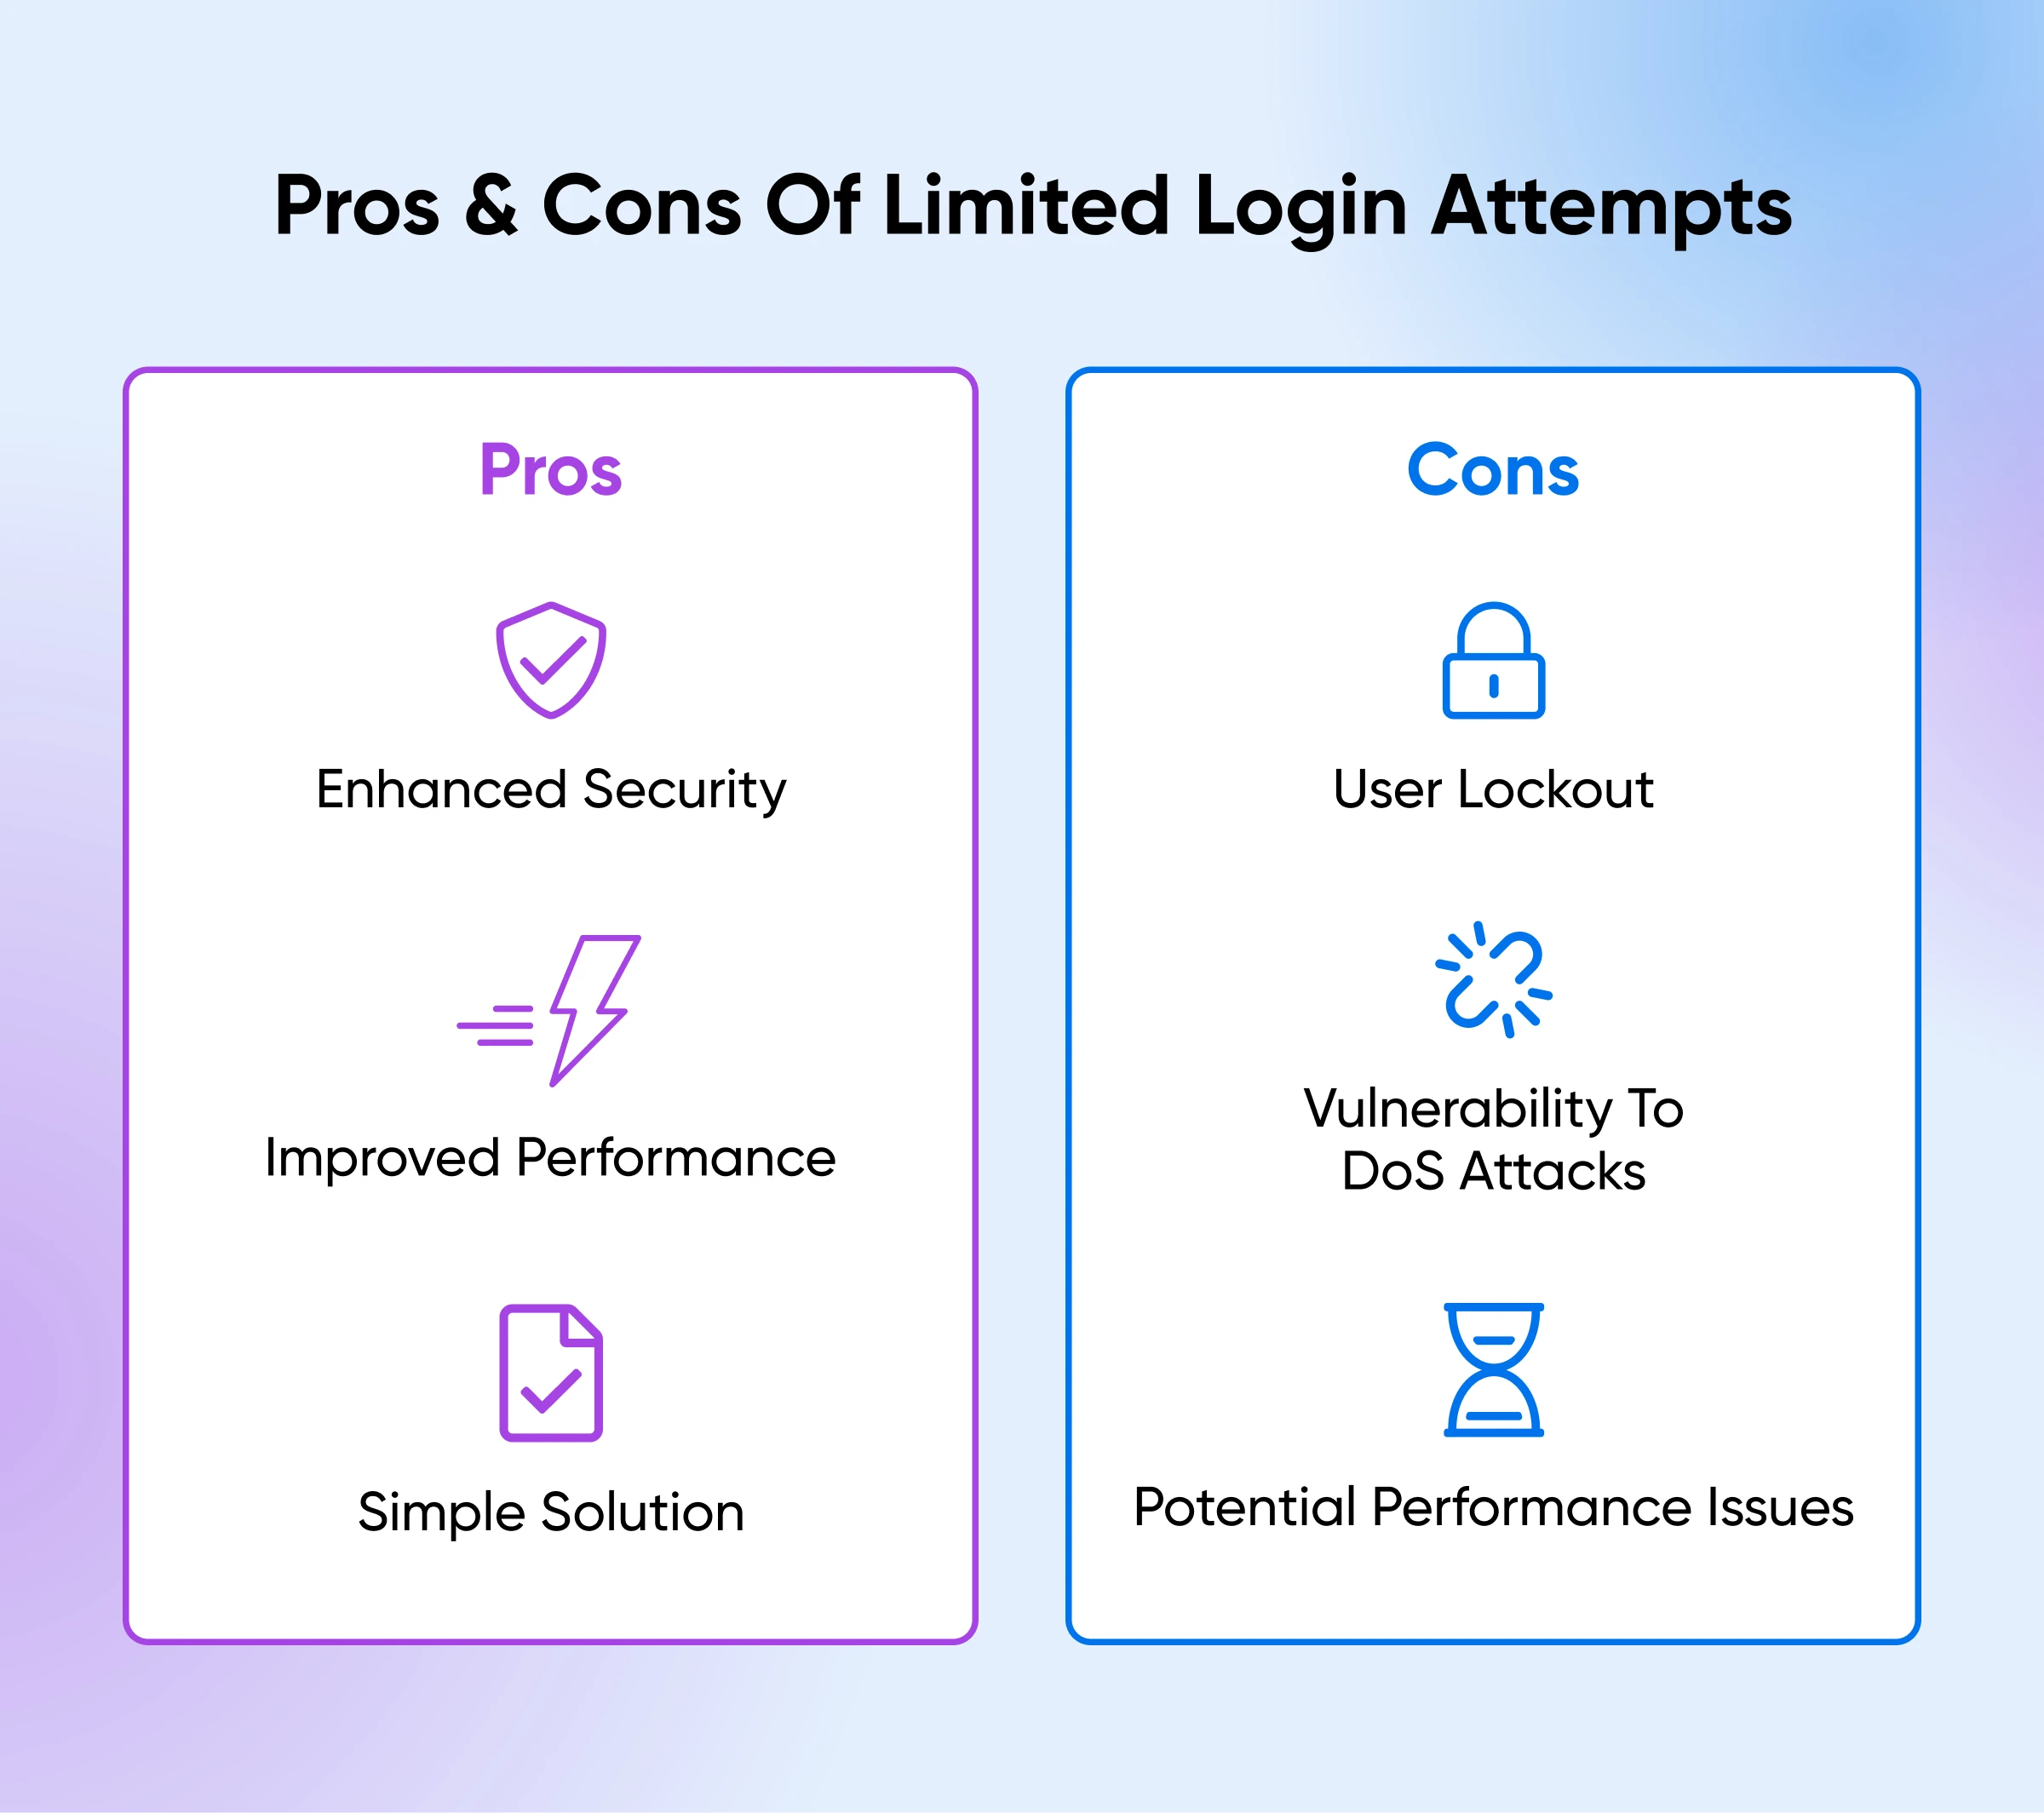
It’s worth noting that limiting login attempts can cause a few headaches. For example, genuine users might find themselves locked out if they make a few typos or forget their password. This can be pretty frustrating on both ends.
Lockouts can also go wrong behind a proxy or CDN. If your site sits behind Cloudflare or another reverse proxy, every visitor can appear to arrive from the same IP address — so a single lockout can block everyone, including you. The plugin’s FAQ names the fix: adjust the Trusted IP Origin setting so it reads each visitor’s real IP address.
Another potential issue is that limiting logins can make you more vulnerable to a Denial of Service (DoS) attack. A malicious hacker could deliberately overload your login limit from multiple IP addresses, and effectively lock out all users, including you. Scary stuff, no?
In rare cases, login limiting can cause performance issues. This usually happens when your lockout settings are too aggressive or you have a high-traffic site, so your web server has to work hard to track and block thousands of IP addresses.
How to limit login attempts in WordPress (step by step)
To limit login attempts in WordPress, install the Limit Login Attempts Security plugin, then set the number of allowed retries and the lockout duration in its settings. Here’s exactly how, step by step.
Setting up the plugin is pretty easy. That’s partly why it’s so popular.
But just in case you find yourself a little stuck, here’s a speedy walkthrough of the process:
Step 1: Install Limit Login Attempts Security
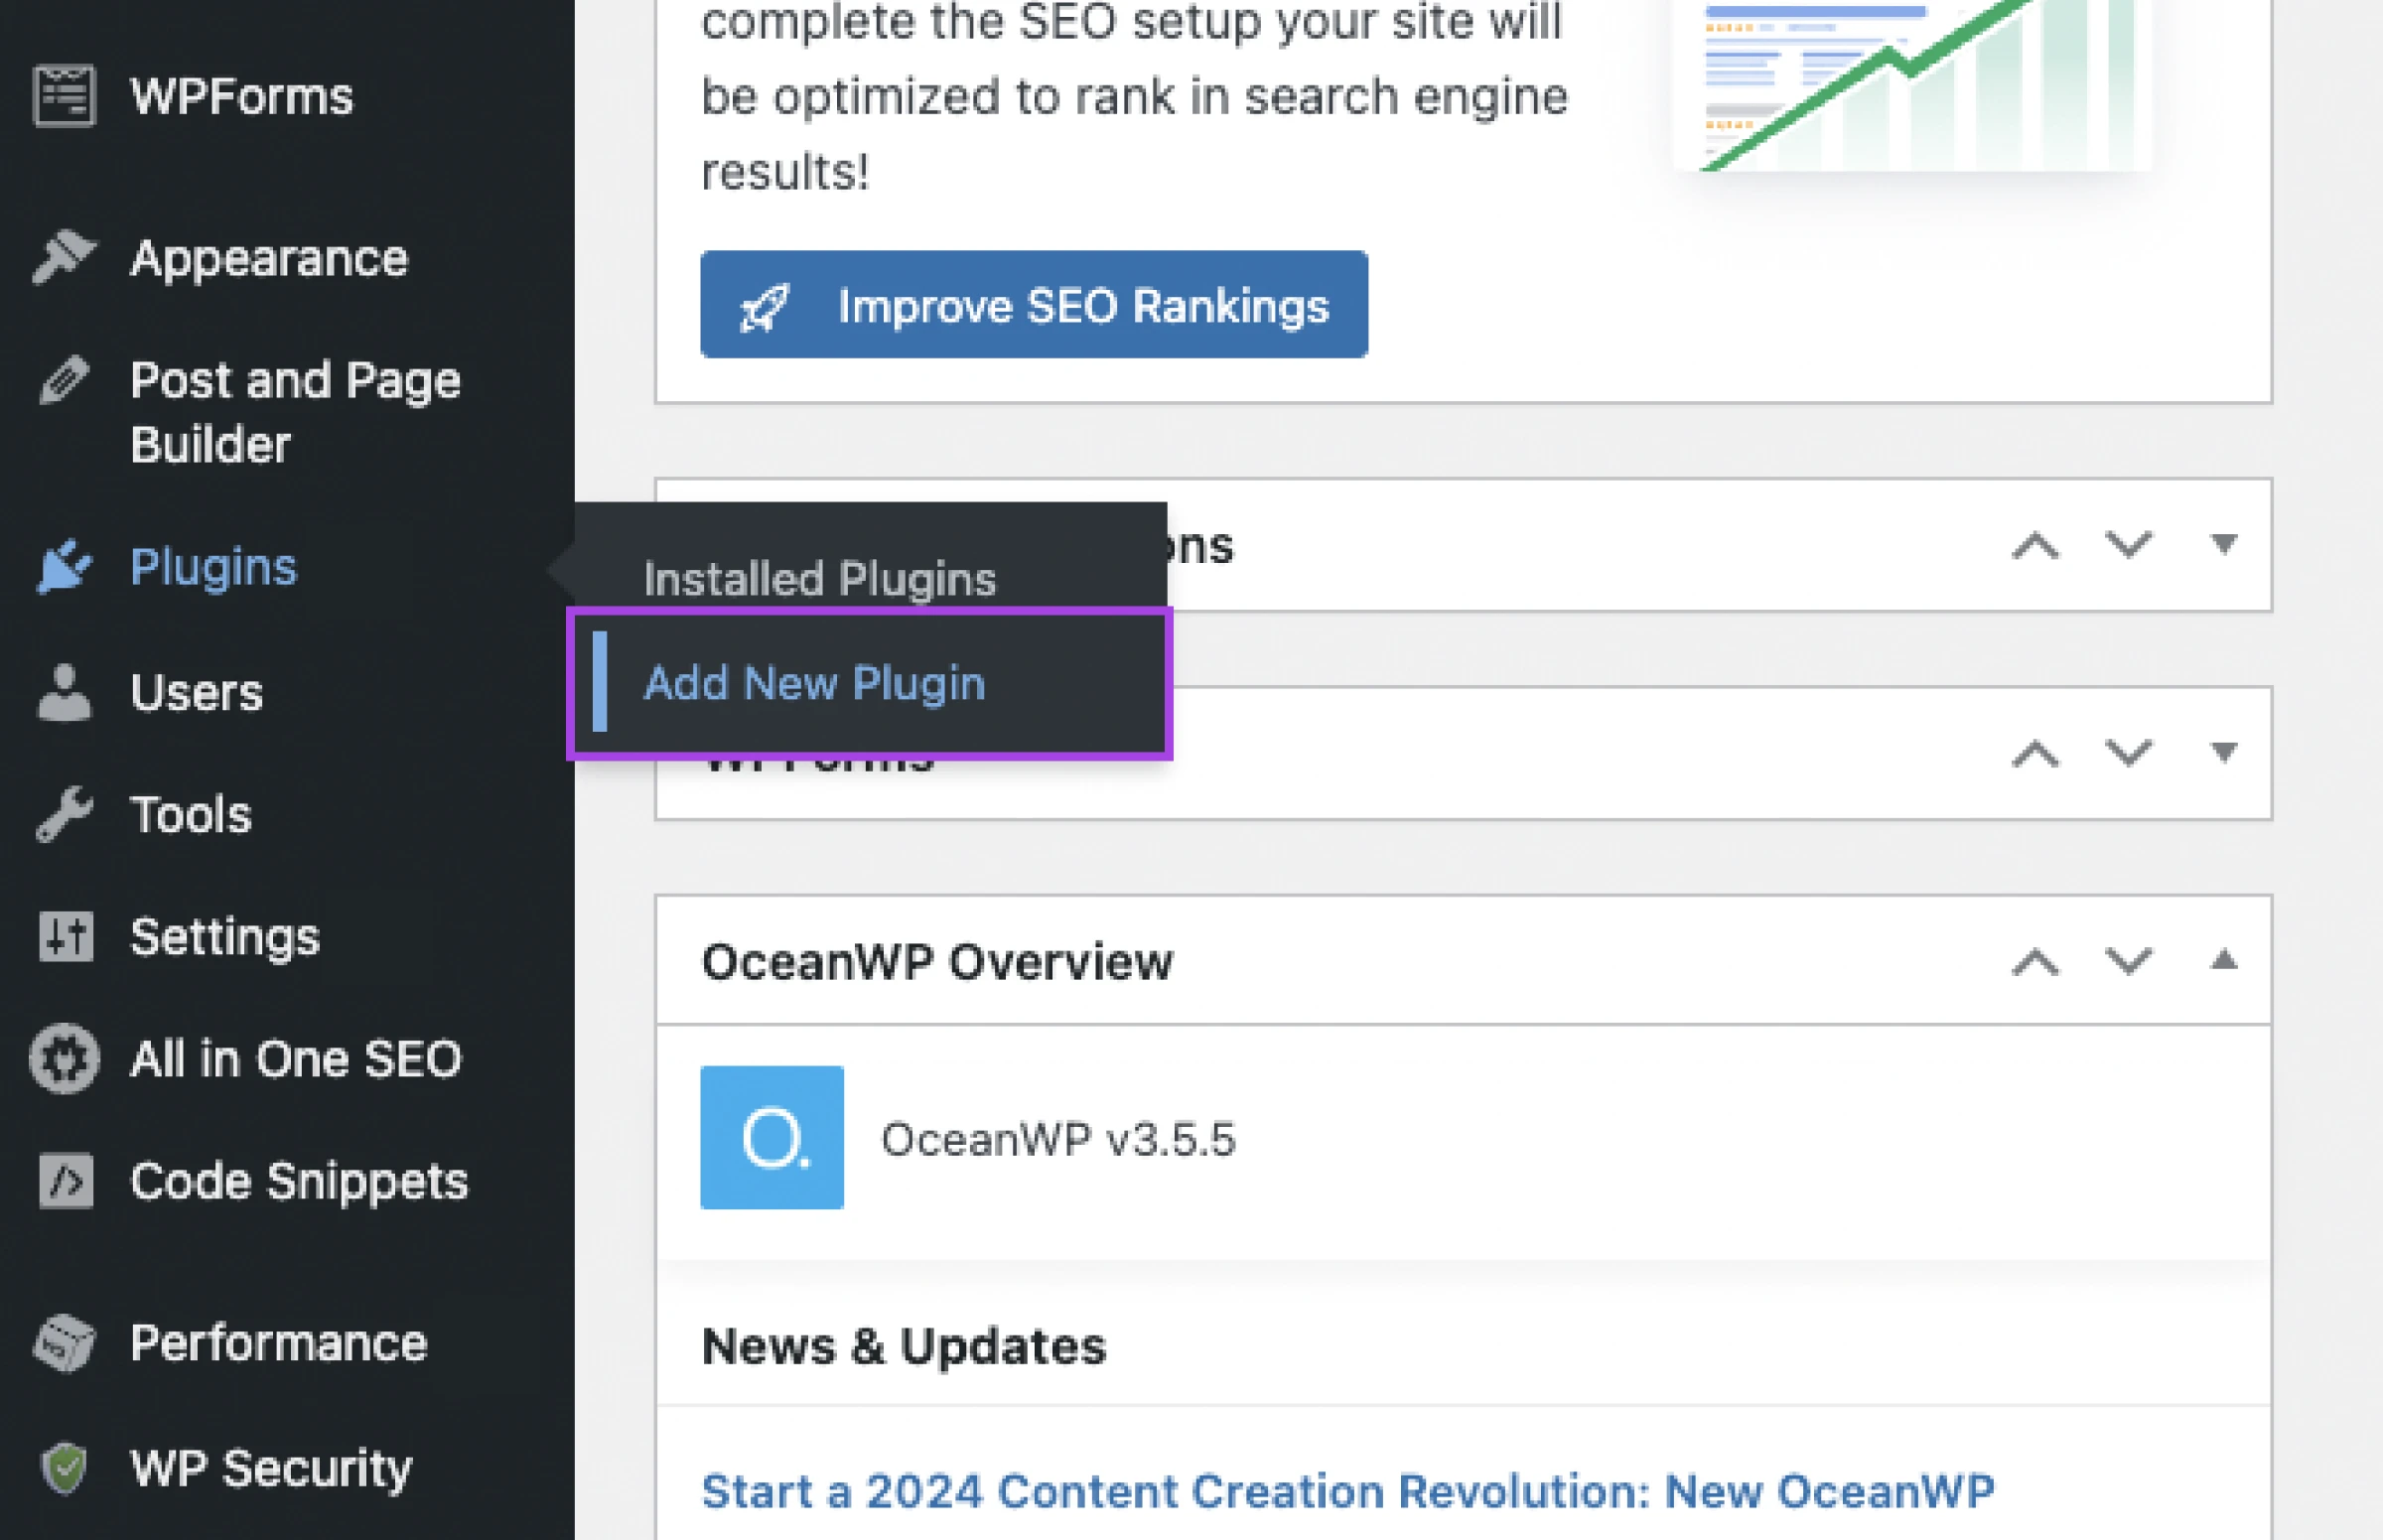
Head over to the dashboard of your WordPress site, and then select Plugins > Add New Plugin.
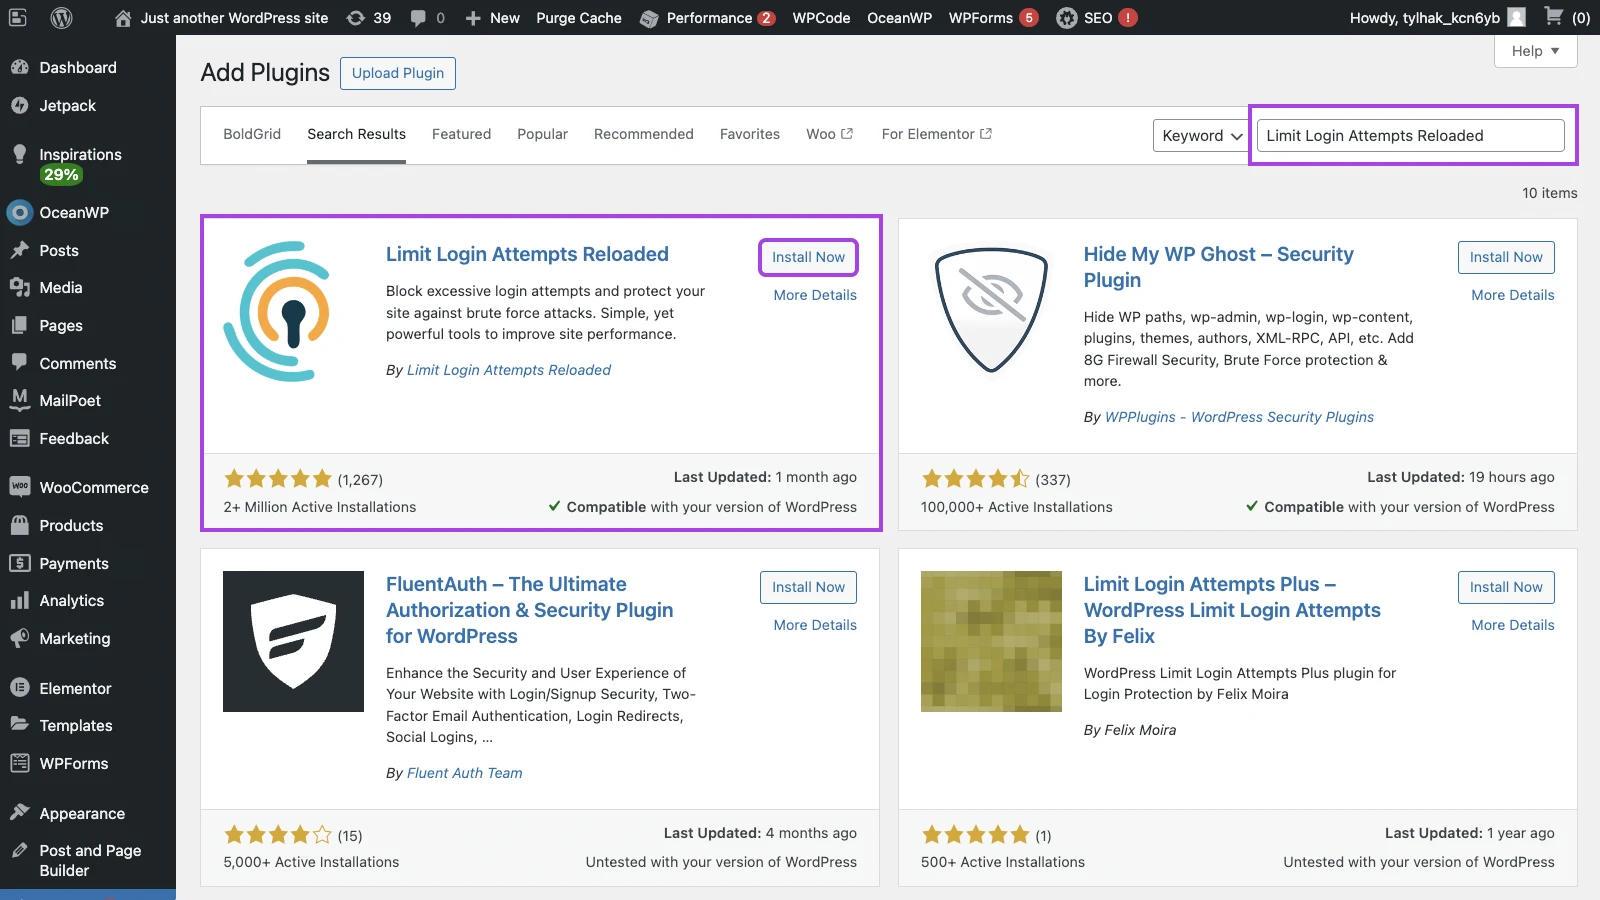
Next, type “Limit Login Attempts” into the search bar in the top-right and hit Enter. Look for Limit Login Attempts Security by WPChef (the plugin formerly listed as Limit Login Attempts Reloaded), so you’re in the right place.
Once you’ve located the plugin, choose Install Now.
When the plugin has been installed, hit Activate. Stay with us — you’re one step away from protecting your site!
Step 2: Choose your login limits and settings
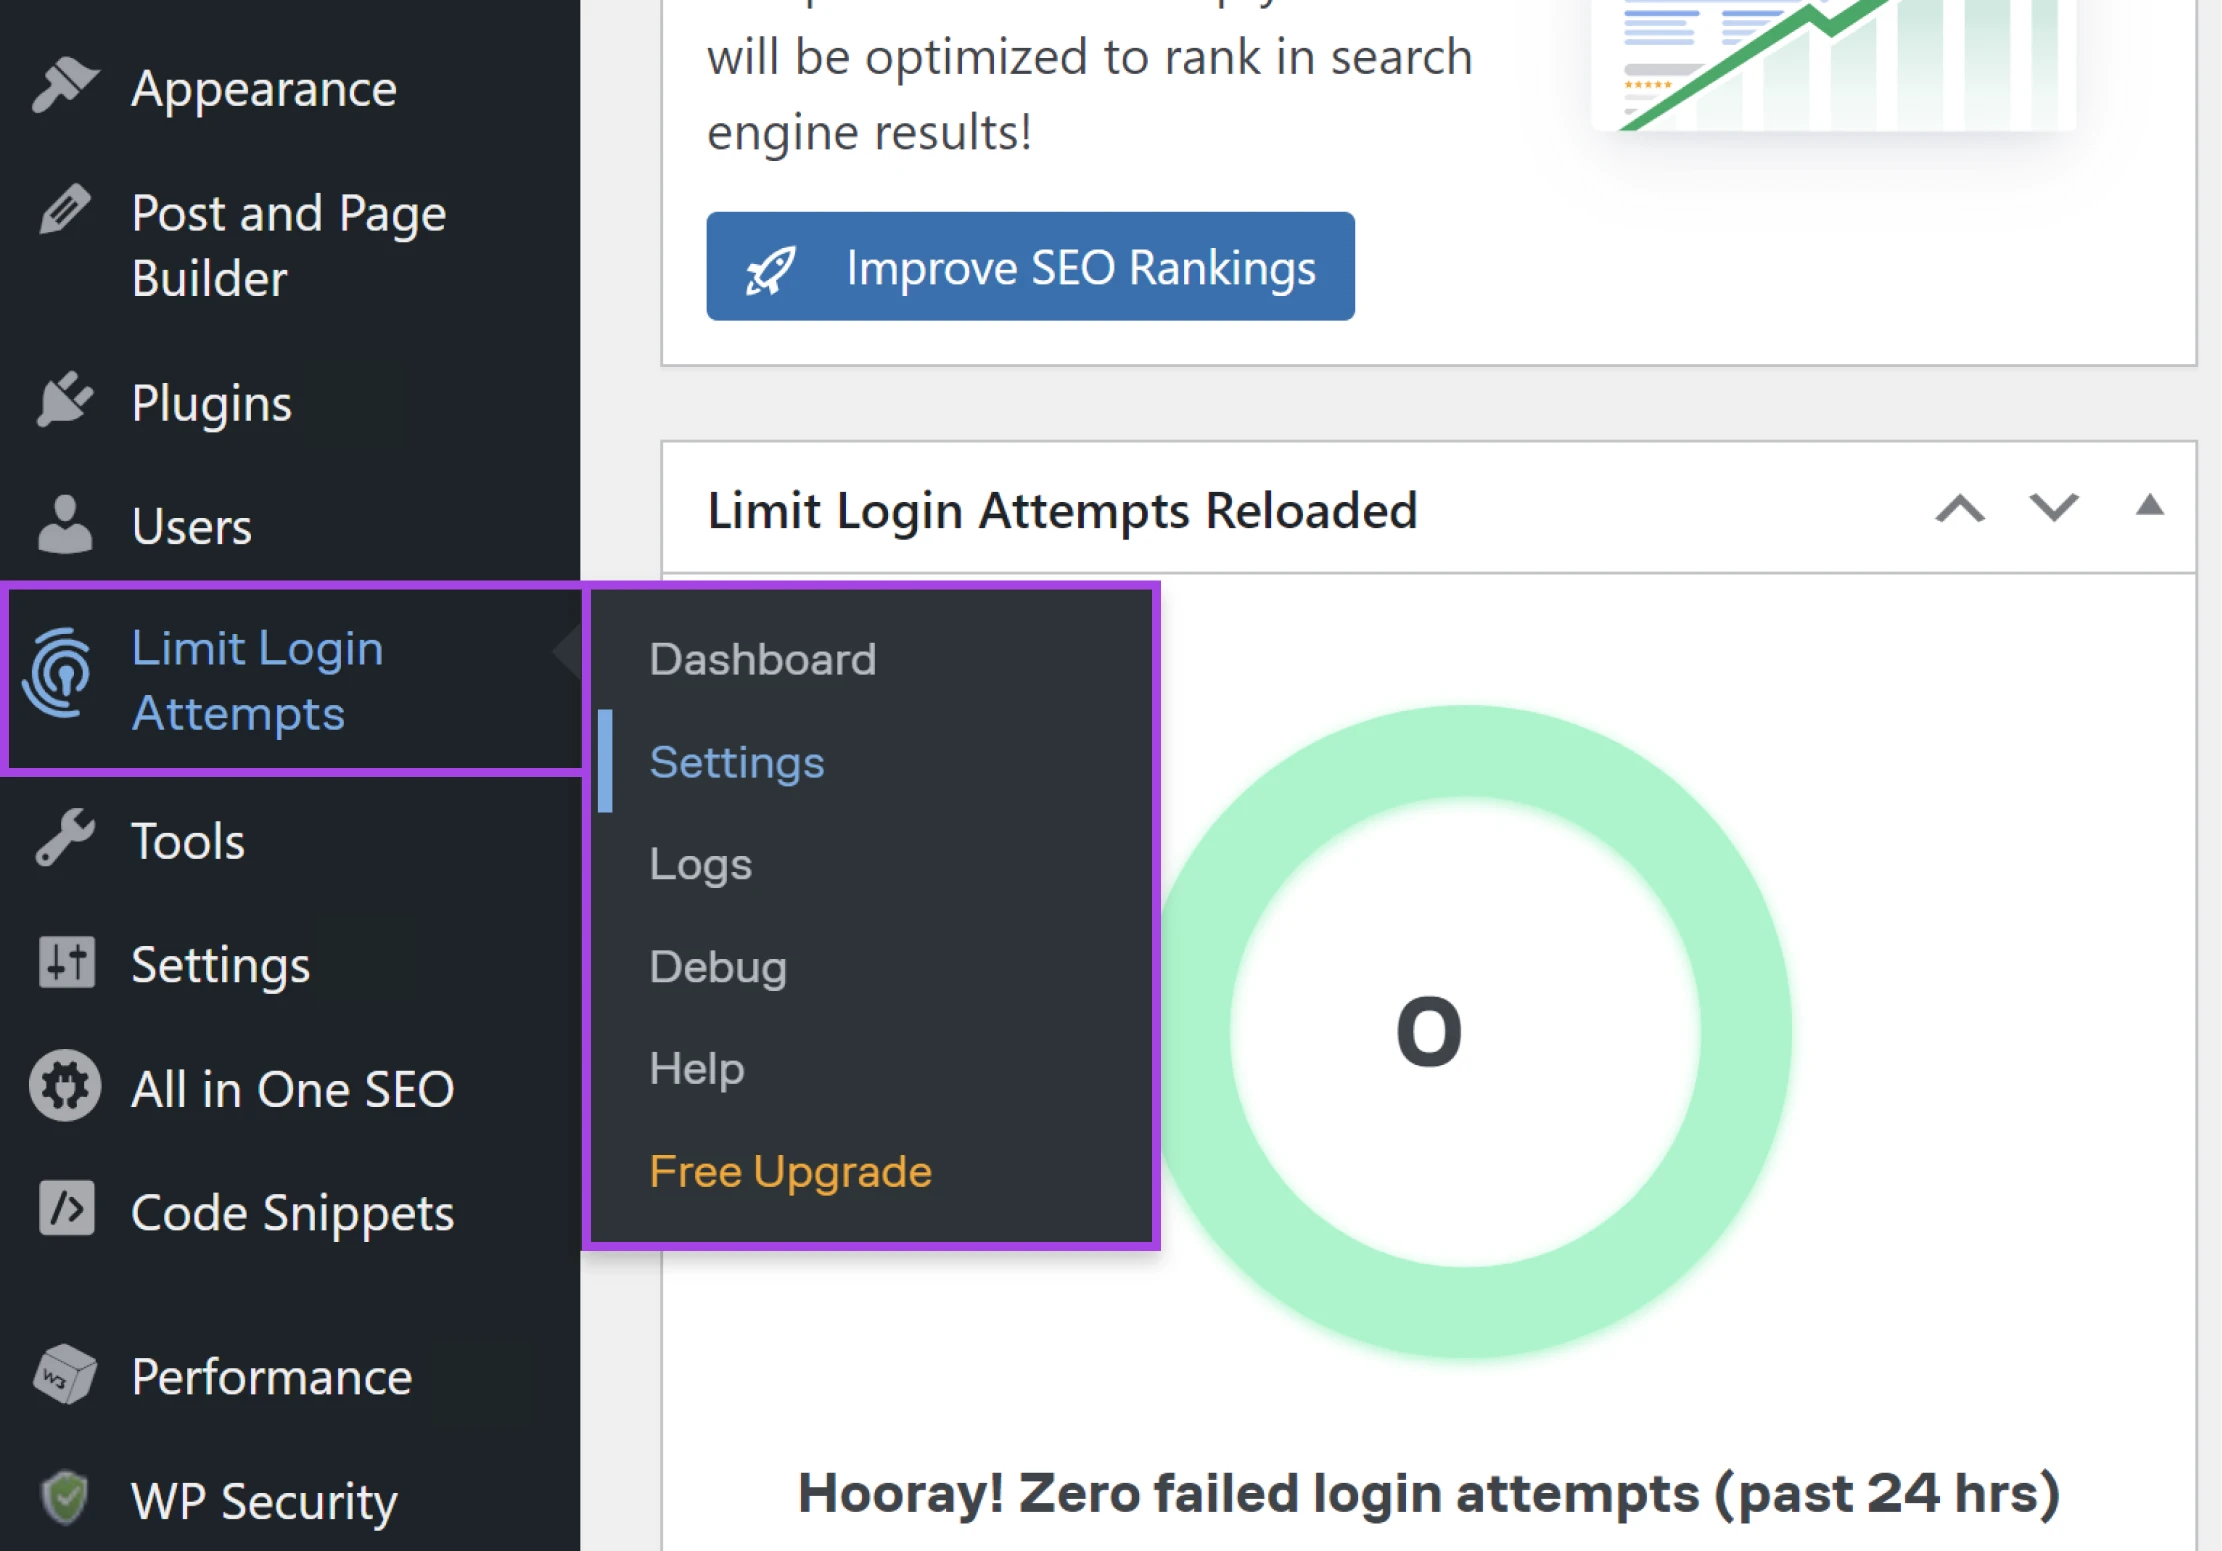
If you check the left sidebar, you’ll notice that a Limit Login Attempts option has appeared.
Click on that, and then select Settings from the drop-down menu.
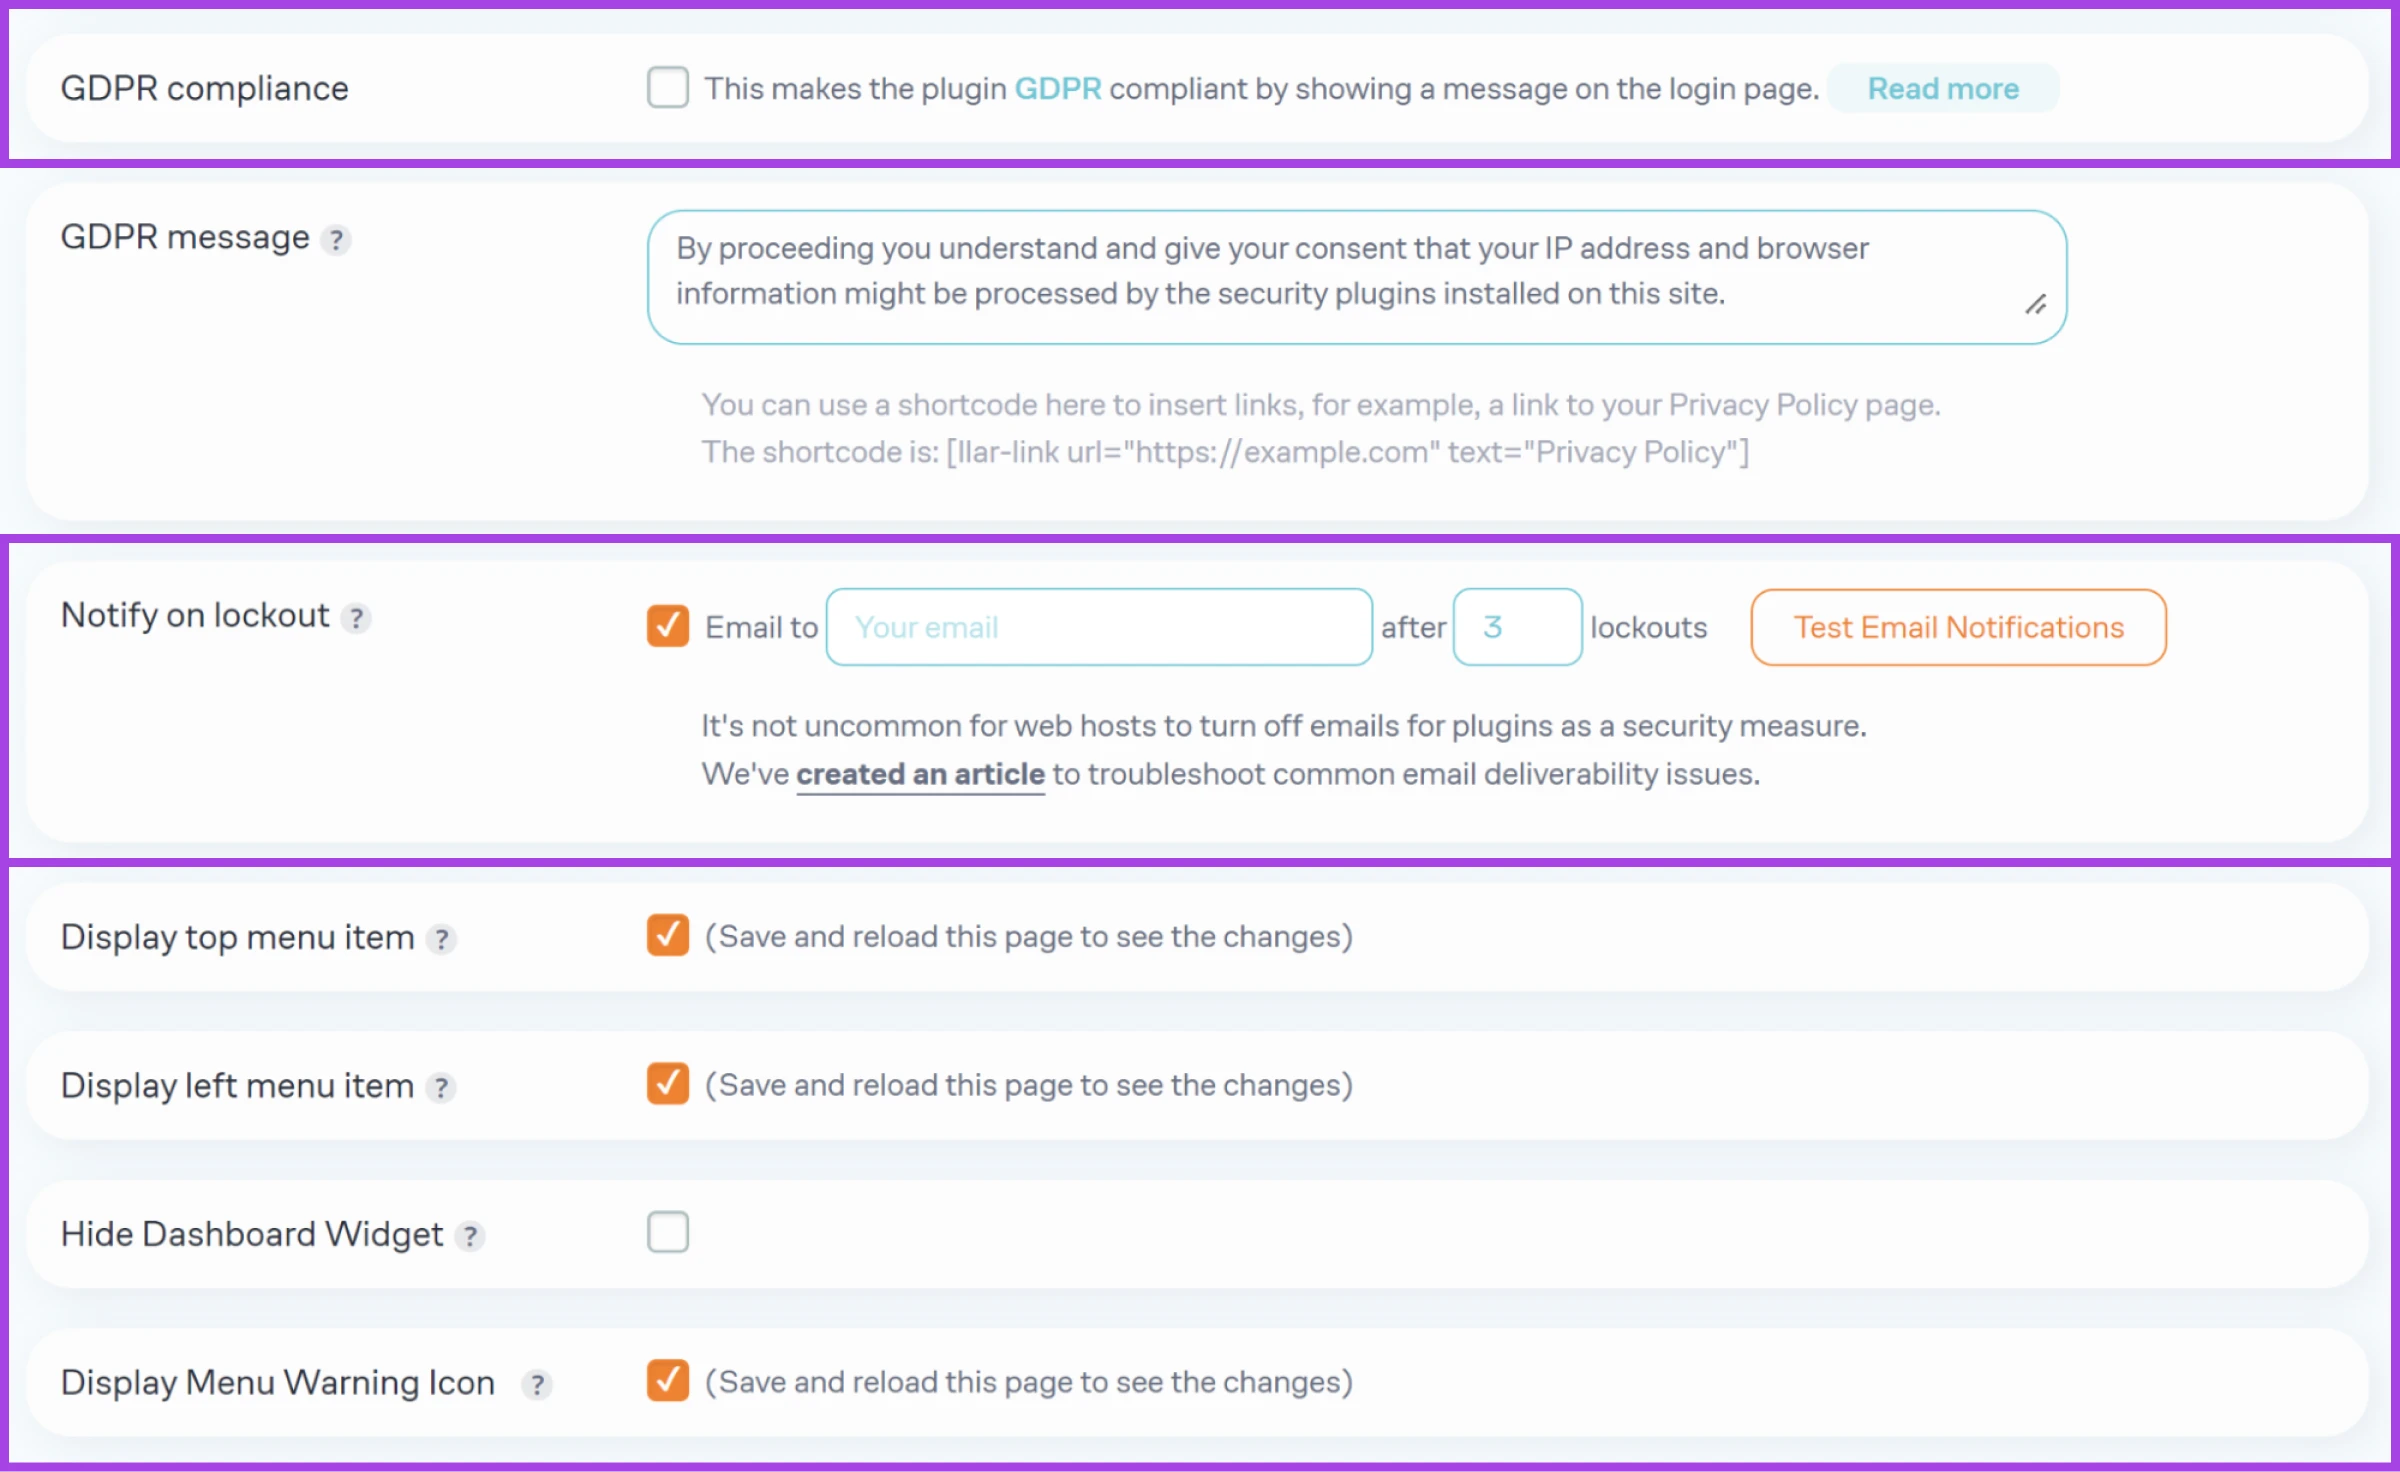
Let’s work our way through the General Settings first:
- GDPR compliance: This option adds a small message on your login screen, informing users that you’re tracking IP addresses (a requirement under GDPR law). You can adjust the message in the box below.
- Notify on lockout: With this feature, you will receive an email alert whenever someone is locked out of your site. You can choose the number of times this has to happen before you receive an email. Make sure to test that this is working.
- Display/Hide options: The next four checkboxes are just about how the plugin will appear in your WordPress Admin area.
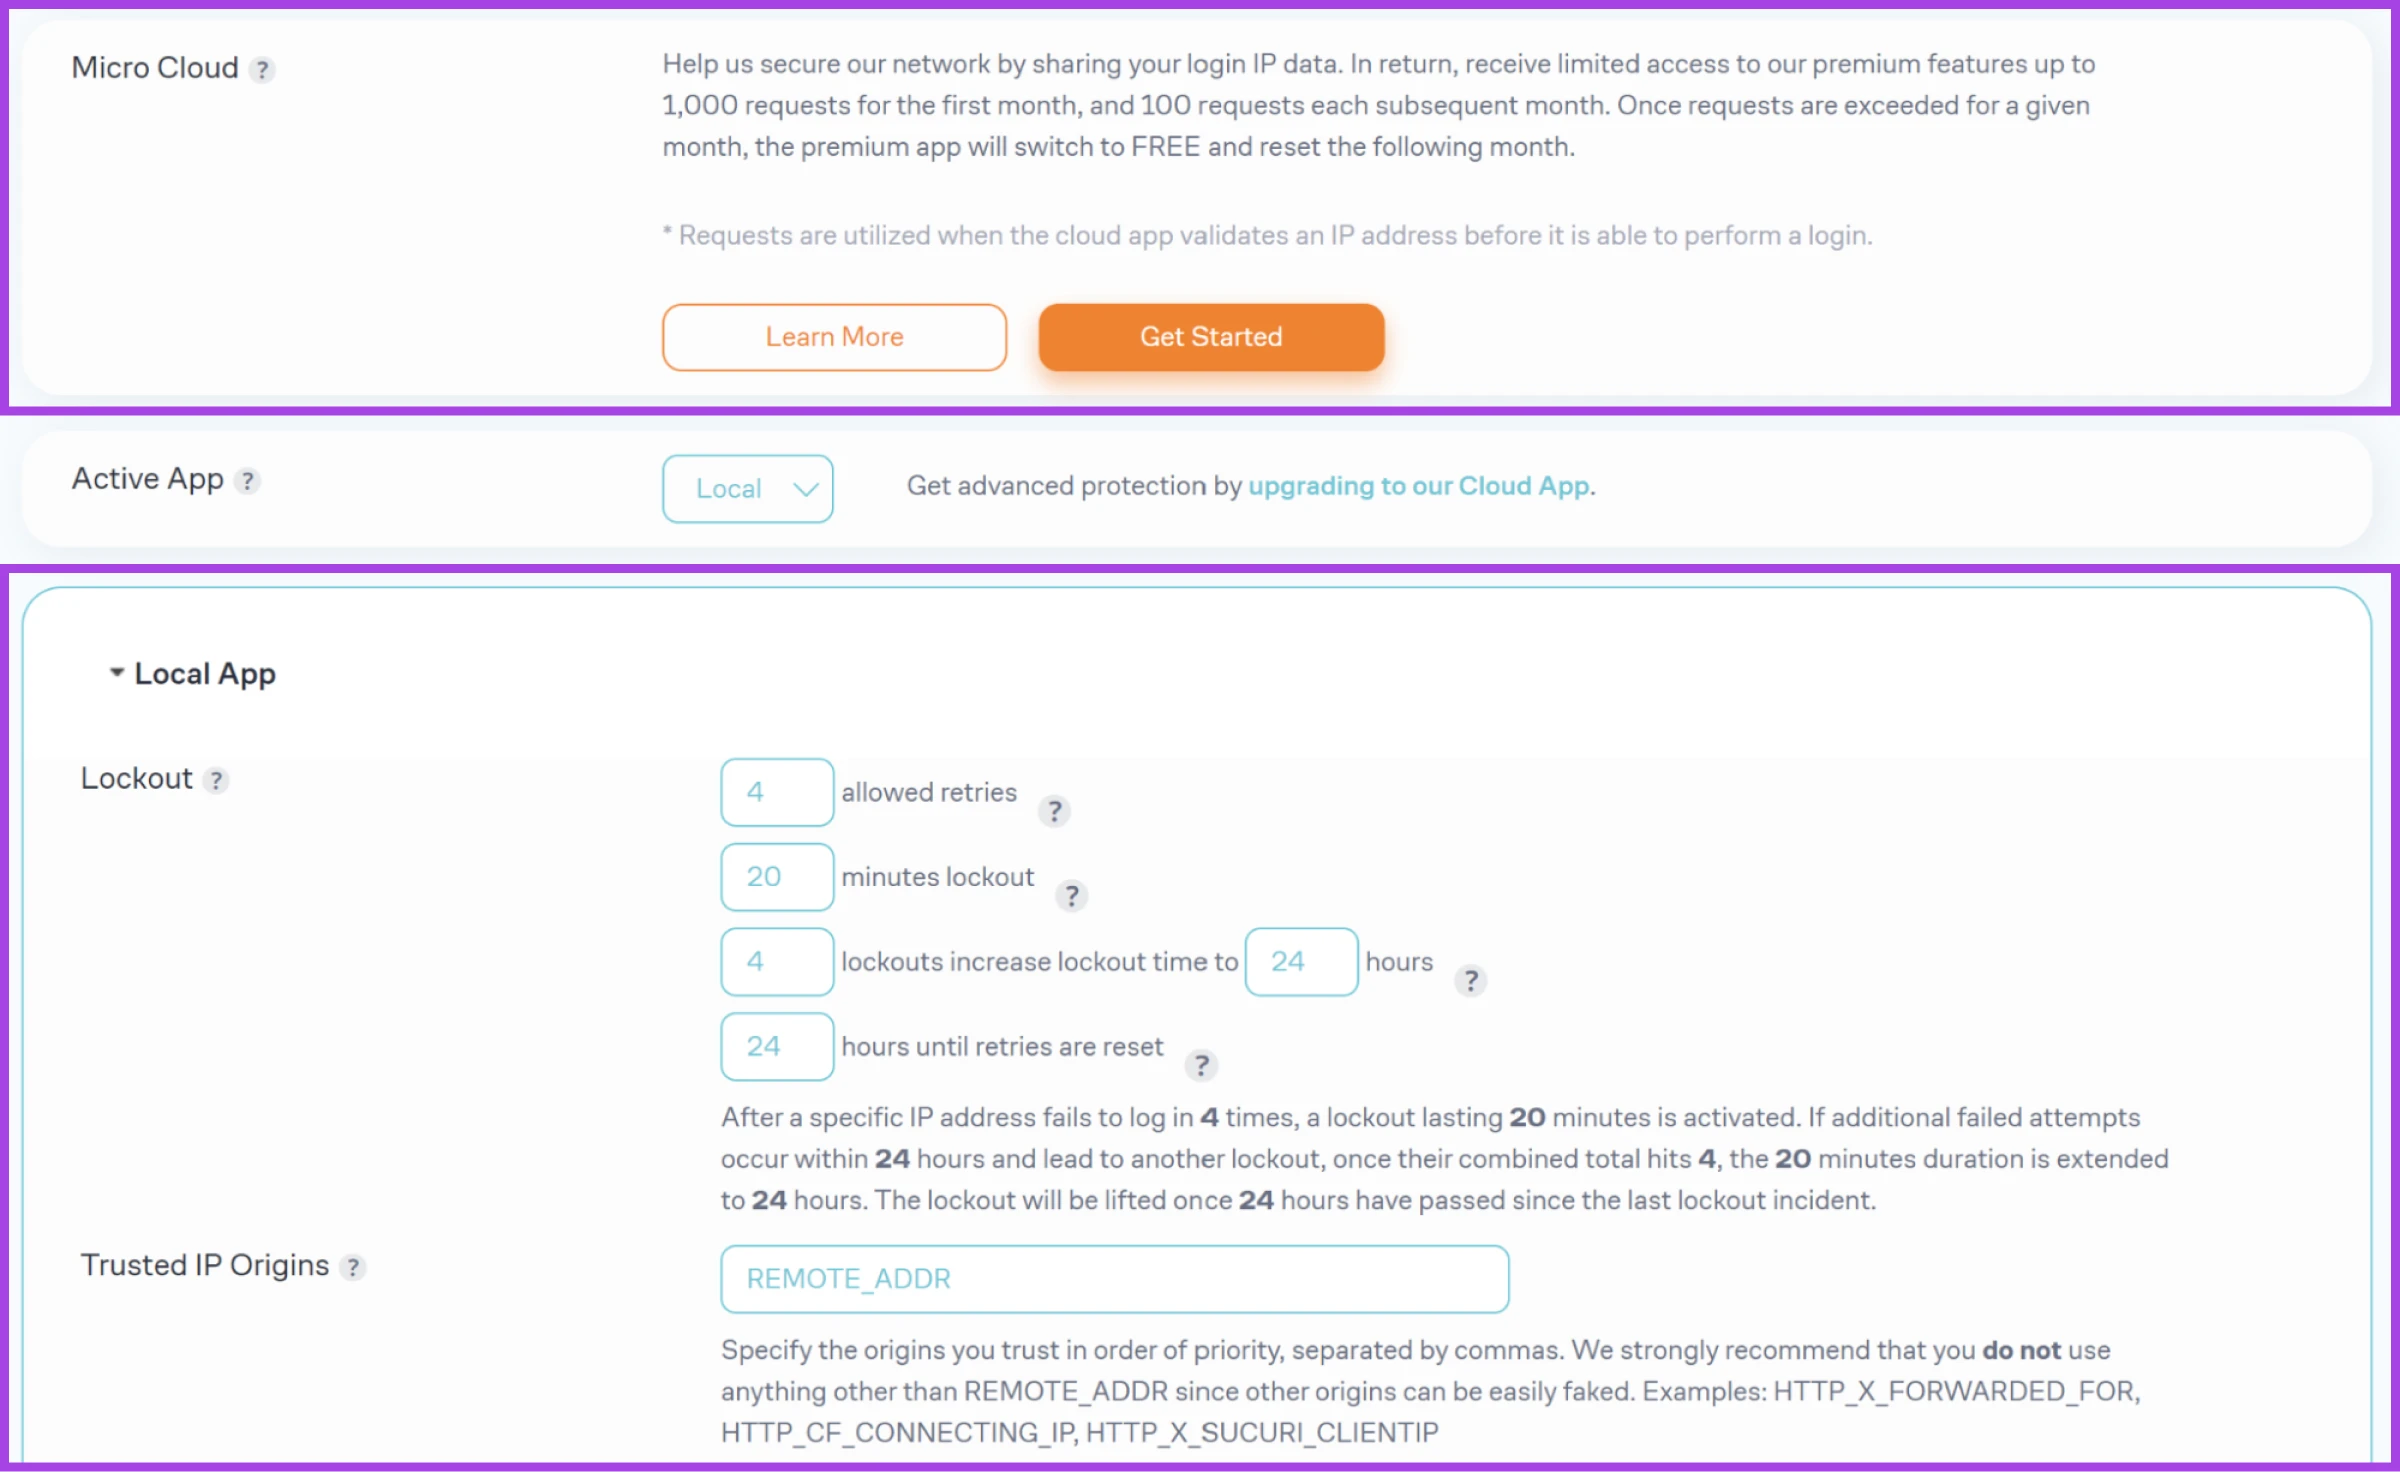
Scroll down a little further, and you will come to the App Settings area:
- Micro Cloud: In return for sharing bad IP addresses with the plugin’s developers, you can get limited access to the plugin’s premium features.
- Local App: The settings here control how the plugin blocks logins. As a starting point, we’d suggest allowing 3–4 retries with a 20–30 minute lockout, escalating to a 24-hour lockout after several repeat offenses. Running a solo-admin blog? Go stricter — 3 retries and longer lockouts, since only you should be logging in. Running a membership or multi-author site with lots of legitimate logins? Stay more forgiving (4–5 retries, shorter lockouts) so a typo-prone user isn’t locked out all afternoon.
A Premium subscription adds cloud-based protection and additional controls. The developer’s knowledge base explains those settings.
Step 3: Monitor login attempts
With your protection set, you can visit Limit Login Attempts > Logs via the sidebar at any time to monitor the lockouts.
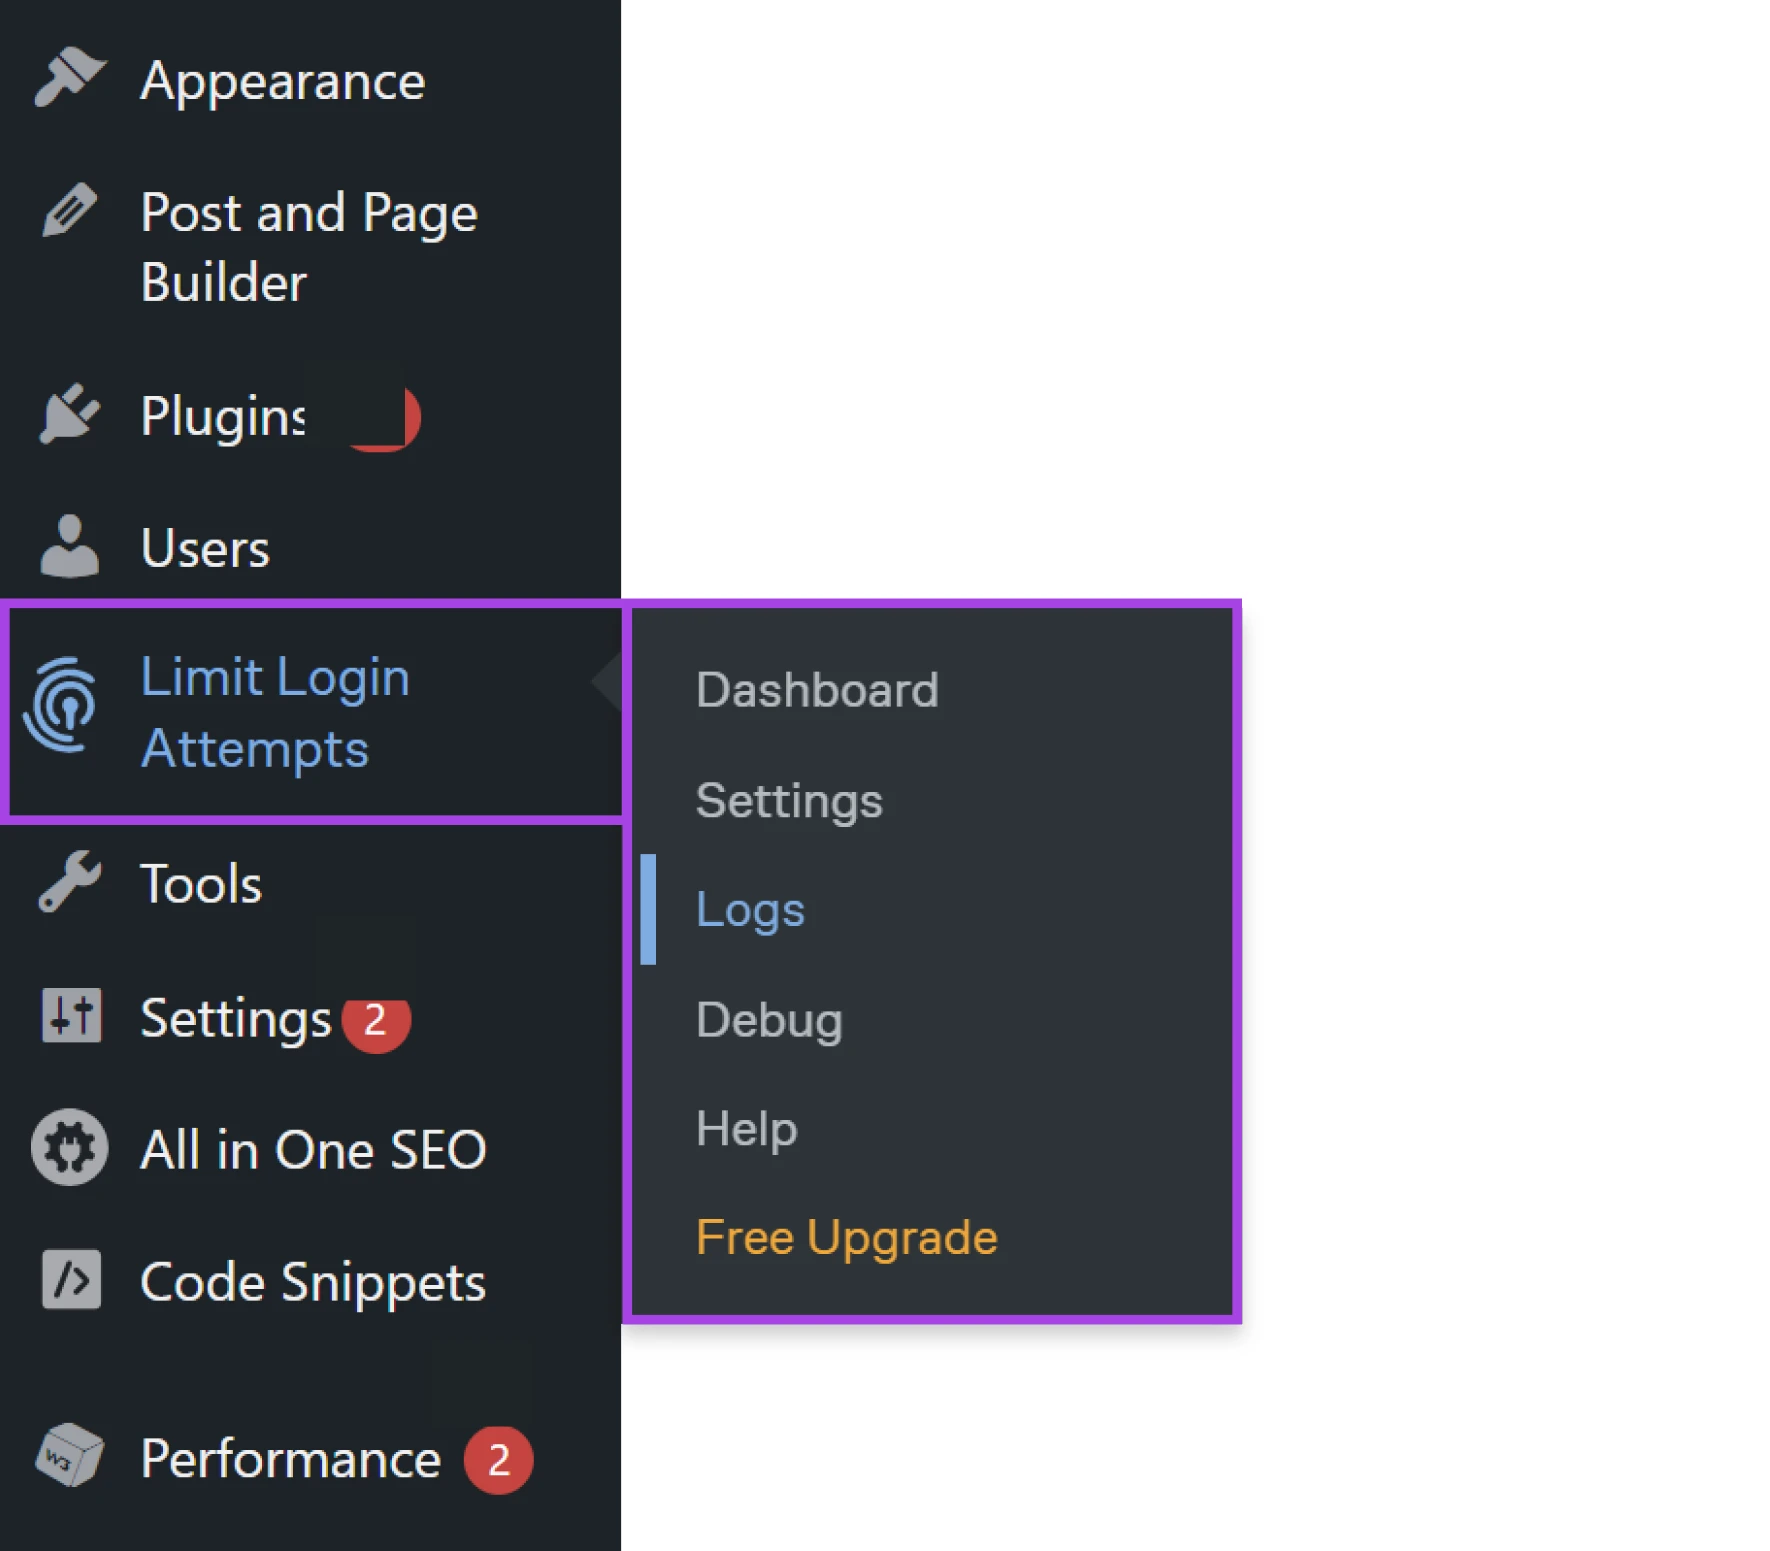
Or click on the Logs tab if you’re already in the plugin settings.
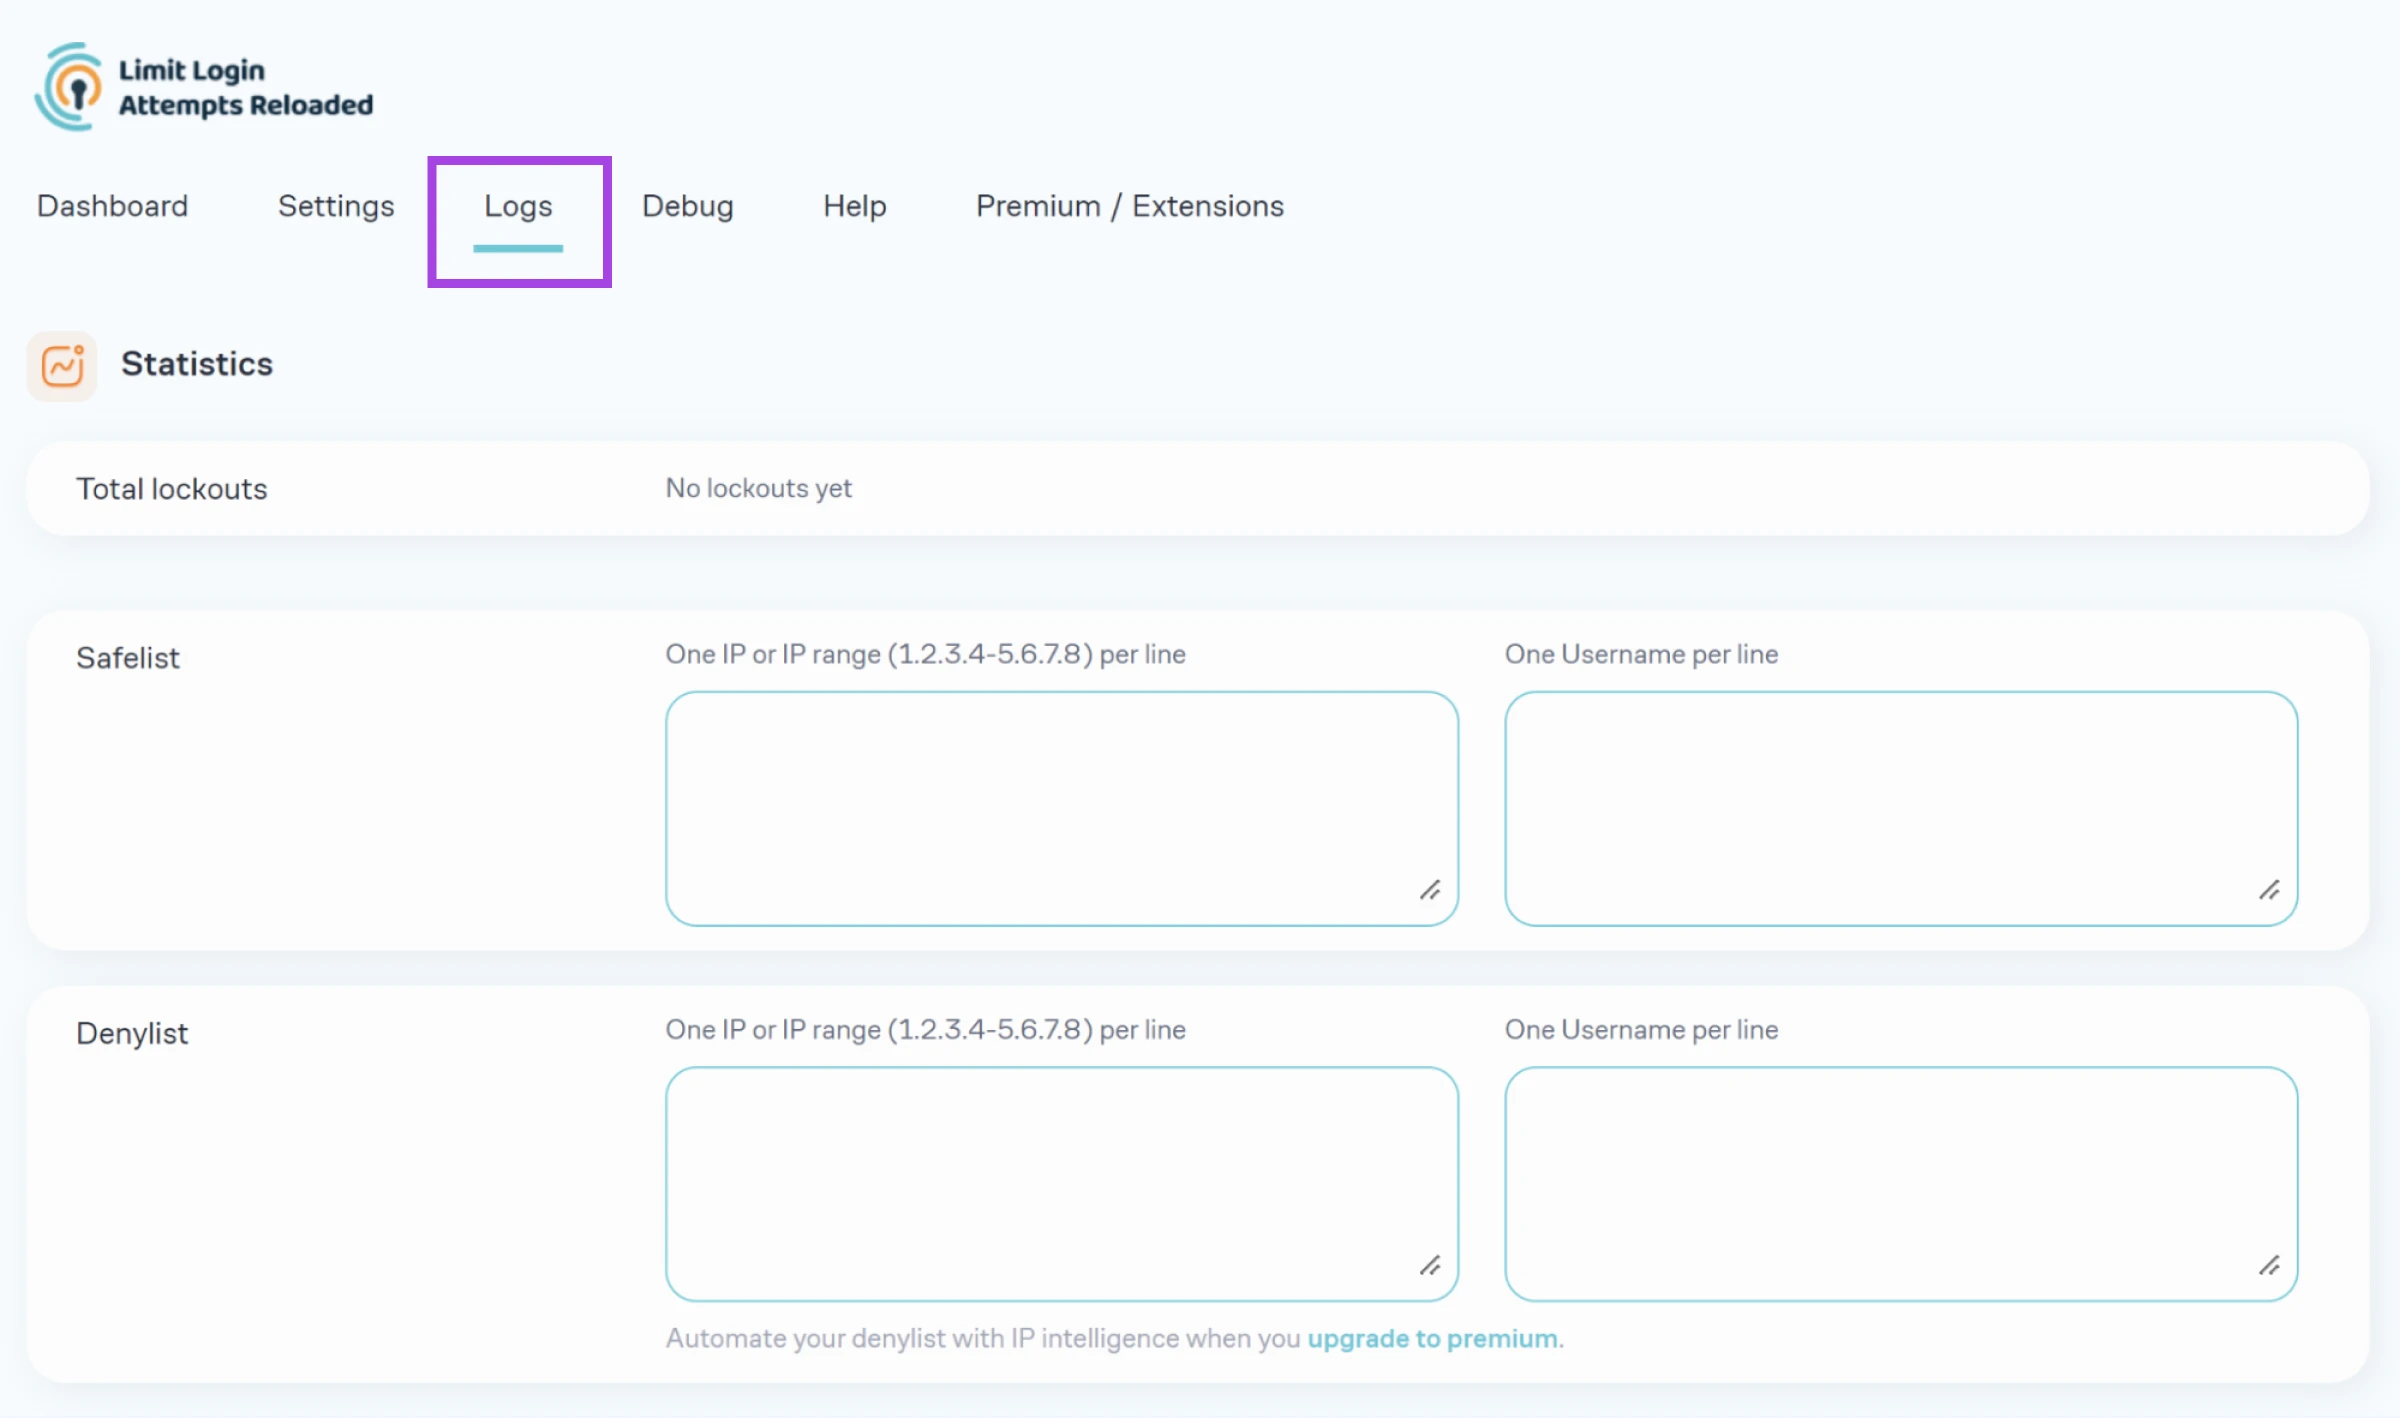
You can also block a suspicious IP address with the denylist, or add a trusted IP address to the safelist, using this area.
A quick note on reading these logs: don’t panic when lockout alerts start rolling in. Even brand-new, low-traffic sites get probed by automated bots around the clock, so a steady trickle of failed attempts is normal. To gauge whether a lockout is a real, targeted attack, look up the blocked IP address’s location. Scattered attempts from random countries are almost always bots; repeated attempts against your actual usernames deserve a closer look.
Alternatives to the Limit Login Attempts plugin
While Limit Login Attempts Security is a great solution, it’s not the only way to protect your site from brute force attacks.
Here are some alternative options to consider:
1. Wordfence Security plugin
Actively used by over five million sites, Wordfence Security is probably the best free all-in-one security plugin for WordPress. It provides much more than login protection, although this makes it a little resource-heavy.
Pros:
- Comprehensive security features, including brute force protection.
- Offers real-time global IP protection and IP intelligence.
Cons:
- May overlap with other security plugins.
- Can be overwhelming for beginners because of its feature-rich nature.
2. Loginizer plugin
This freemium plugin is a like-for-like replacement for Limit Login Attempts Security. It offers many of the same features and has great ratings; however, it is a little resource-intensive.
Pros:
- Specialized in limiting suspicious login attempts.
- Offers IP blocking and password policies.
Cons:
- May slow down the admin panel.
3. Editing your .htaccess file
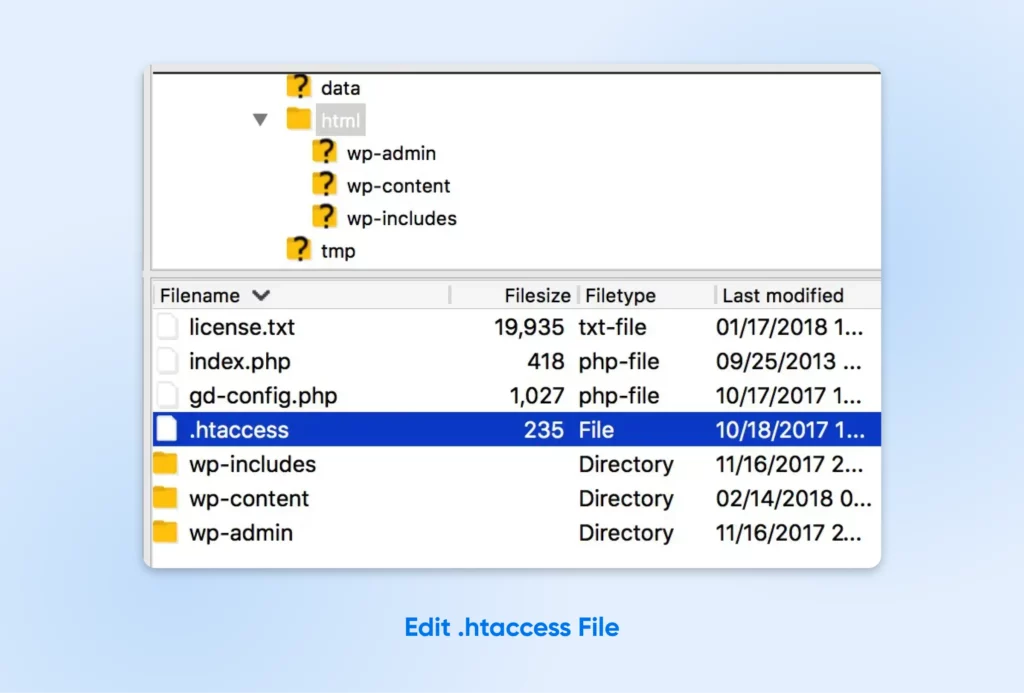
You won’t find a login limit option in the WordPress Admin area. The good news is that, if you’re familiar with code, you can take some control by editing your site’s .htaccess file.
For example, you can drop in the following code to limit login access to specific IP addresses. Simply replace the XXX.XXX.XXX.XXX part with the IP addresses you want to allow:
RewriteEngine on
RewriteCond %{REQUEST_URI} ^(.*)?wp-login.php(.*)$ [OR]
RewriteCond %{REQUEST_URI} ^(.*)?wp-admin$
RewriteCond %{REMOTE_ADDR} !^XXX.XXX.XXX.XXX$
RewriteCond %{REMOTE_ADDR} !^XXX.XXX.XXX.XXX$
RewriteCond %{REMOTE_ADDR} !^XXX.XXX.XXX.XXX$
RewriteRule ^(.*)$ - [R=403,L]
Be really careful with this technique, though. You could easily lock yourself out of your own site!
Additionally, you should keep in mind that .htaccess is not supported for some plans that use NGINX, such as DreamPress, DreamHost’s managed WordPress platform. If this is the case for you, we recommend you contact the support team.
Login limiting FAQs
We didn’t cover everything you wanted to know? Not so fast, there’s more right here!
What are some other ways to secure a login page?
We would recommend taking the following steps for strong login security:
- Make sure your site is secured with HTTPS/SSL.
- Use CAPTCHA to block automated scripts.
- Install firewall protection on your site.
- Turn on two-factor authentication (2FA) — Limit Login Attempts Security now includes it in the free version.
- Protect (or disable) XML-RPC and any custom login forms, such as WooCommerce logins. They’re brute force entry points, too.
- You can also hide your login page.
What does “Maximum Login Retries” mean?
This is the maximum number of failed login attempts in WordPress allowed for each user (IP address) before they’re blocked from trying again.
How do I see failed login attempts in WordPress?
Install Limit Login Attempts Security, then go to Limit Login Attempts > Logs in your WordPress dashboard. You’ll see failed attempts and lockouts, including the IP address and the username targeted. The free version can also email you whenever a lockout happens.
How do I remove limit login attempts?
If you’re talking about the plugin, you can simply deactivate and uninstall it.
Locked yourself out? You have a few options: wait out the lockout window, log in from a different IP address (your phone’s mobile data works), or connect via SFTP or your host’s file manager and temporarily rename the plugin’s folder inside wp-content/plugins to deactivate it. Once you’re back in, add your IP address to the safelist. For more detail, check out this guide by the plugin developer.
How do I enable 2FA in Limit Login Attempts Security?
Multi-factor authentication arrived in version 3.0 of the plugin (March 2026, per the developer’s announcement), and it’s available on both the free and premium versions. Go to Limit Login Attempts in your WordPress dashboard, open the settings, and turn on multi-factor authentication. Confirm you can complete the second verification step before you log out, so you don’t lock yourself out of your own site.
Upgrade your site security
Clamping down on failed login attempts is an important step toward securing your WordPress website. The Limit Login Attempts Security plugin is probably the most efficient solution overall, but the other options are worth considering.
Of course, website security is partly dependent on your hosting provider. DreamHost provides the tools you need to fortify your site — from free SSL certificates to DreamShield, our malware-protection add-on.
If you’re comparing hosts, review DreamHost’s current web hosting plans to see which security features come included.

Unbeatable WordPress Hosting
Reliable, lightning-fast hosting solutions specifically optimized for WordPress.
See More