Most business owners juggle countless tasks every day. Emails, phone calls, social media messages, and more. It’s easy to lose track of who asked what.
A WordPress contact form helps by routing inquiries into one place. Instead of scattered messages showing up from unknown email addresses, visitors simply fill out a short form, and you receive the details by email or in a dashboard, depending on the form tool and plan you choose.
In this step-by-step guide, we’ll see how to add a no-code contact form to your WordPress site and how to optimize it for the best results.
How do you add a contact form in WordPress?
To add a contact form in WordPress, install a form plugin like WPForms, create a form from a template, and embed it in any page or post with the plugin’s block or shortcode. No code required. Prefer to skip a dedicated form plugin? The Jetpack Form block or a hand-coded form works, too — we cover all three routes below.
Why use WordPress contact forms?
A contact form keeps inquiries organized in one place, cuts spam compared with a public email link, and captures the details you need upfront. It also shapes how visitors see your brand.
When people want to reach you, a form sends a message that you value communication. An open email link can add unnecessary obstacles to reaching your team and even lead to spam.
A form is a single channel that keeps requests organized and often filters out junk with CAPTCHA or anti-spam plugins like Akismet.
Also, contact forms capture the required details upfront. For instance, a real estate agent might want prospective clients to share their budget range, home requirements, or preferred areas. Or an online shop might need an order number so they can quickly check the shipment status.
A contact form captures these details quickly, saving time, reducing guesswork, and making your business look more polished.
Best tools to create a contact form (no-code plugins)
Most WordPress users rely on plugins to avoid writing code. You’ll find many form builders, each with a slightly different approach. (Not sold on adding a form plugin? Skip ahead to the Jetpack Form block or the code-it-yourself route below.)
WPForms, Contact Form 7, and Ninja Forms are three options worth comparing. They’re known for user-friendly options and the ability to add a form to any page or post.
- WPForms stands out for its visual drag-and-drop builder and quick setup. It includes built-in templates like a standard contact form, a feedback form, or a newsletter signup. The free Lite version has no usage limits (unlimited forms and submissions), but dashboard entry storage, conditional logic, file uploads, multi-page forms, and most integrations are Pro features, per WPForms’ own Lite vs. Pro comparison (July 2026). For beginners, WPForms is our first pick for its straightforward builder, as long as you don’t need those Pro-only features.
- Contact Form 7 is completely free, with no paid tier, and runs on 10+ million active installations per WordPress.org (August 2026). The trade-offs: it looks dated by default and takes some styling effort, spam protection means pairing it with a separate integration like Akismet or reCAPTCHA, and it doesn’t save submissions to your database out of the box, so those notification emails are your only copy.
- Ninja Forms is another drag-and-drop choice. Its free core includes unlimited forms and submissions, email notifications, and CSV export; premium features like conditional logic, file uploads, multi-step forms, and payments are sold as 40+ separate add-ons (per Ninja Forms on WordPress.org, 2026).
Picking a plugin usually depends on your experience and needs.
If you only want a simple contact form, the free tier of any of these will do the job. The paid walls only show up when you need extras like stored entries, file uploads, or conditional logic.
If you plan to add payment gateways, registration forms, or advanced features, check each plugin’s add-on library before you decide.
How to add a contact form in WordPress (step by step)
Plenty of new WordPress users worry they need coding skills. That’s not the case with a well-built form plugin. (And yes, you can skip form plugins entirely; we cover the Jetpack Form block and the hand-coded route after the walkthrough.)
Here’s a closer look at each phase, using WPForms as an example.
Step 1: Install and activate the plugin
Go to your WordPress dashboard, which should be <yourdomain.com>/wp-admin — unless you’ve changed it to strengthen security.
Click Plugins on the left > Add New Plugin.
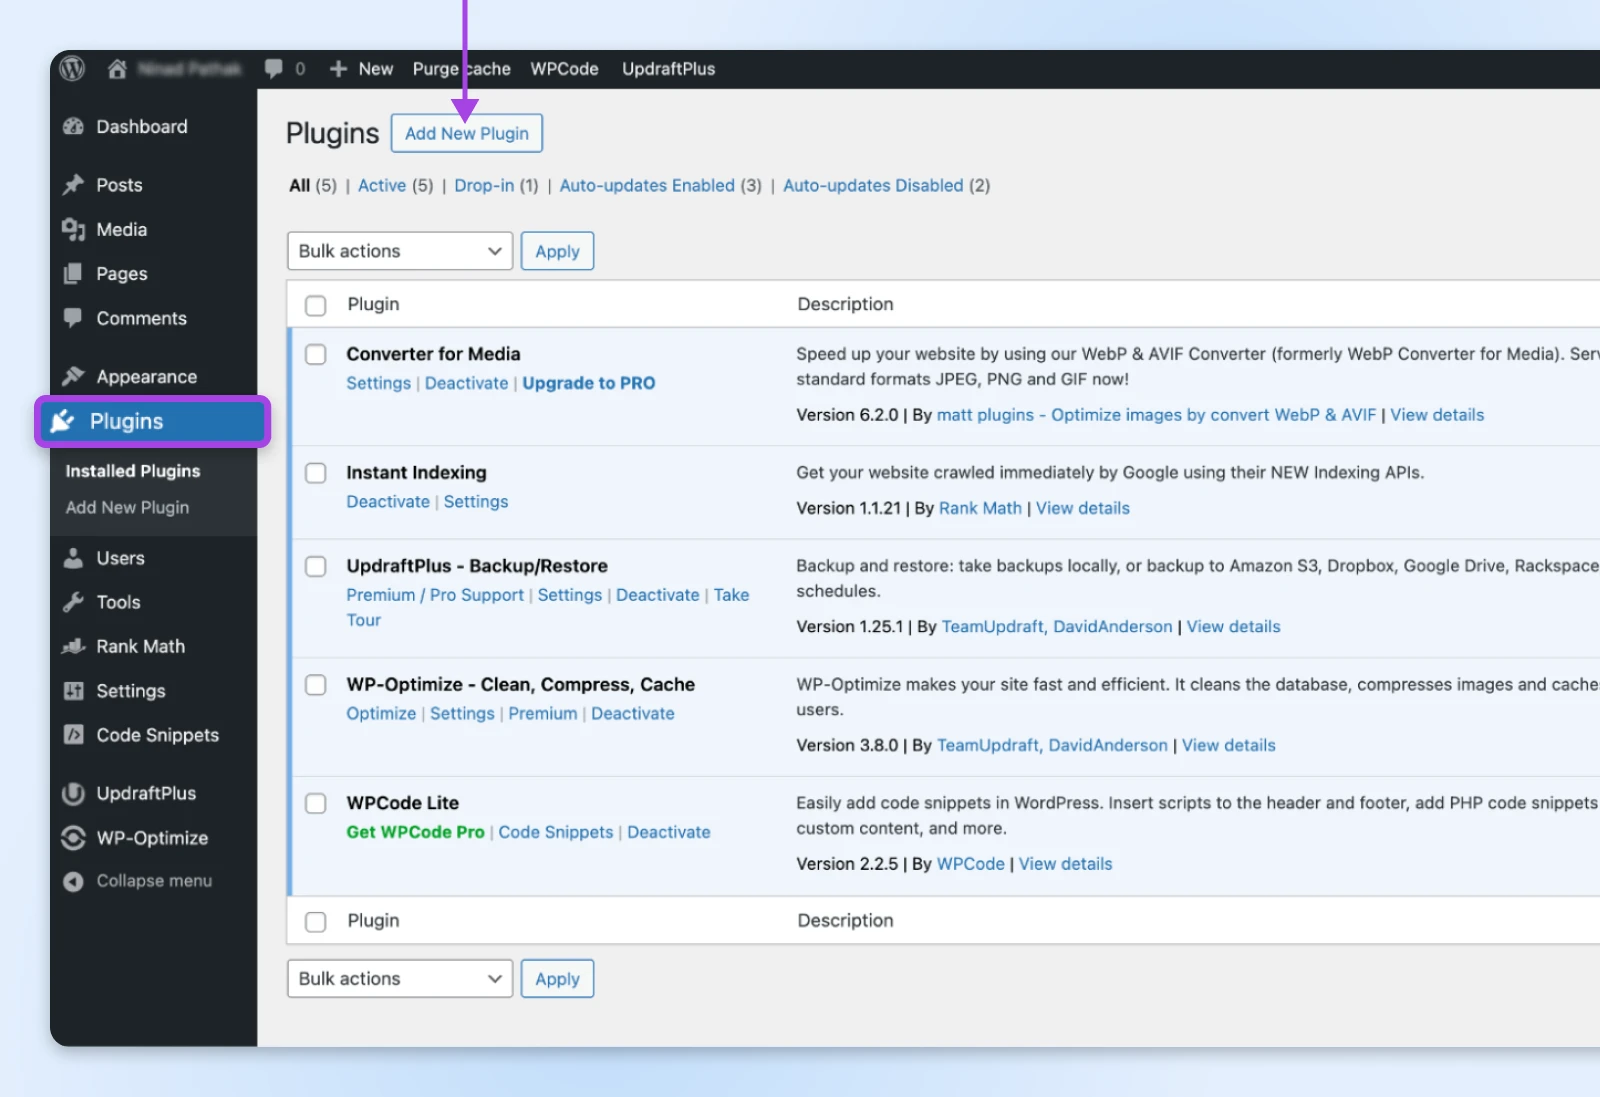
Type “WPForms” in the search bar and hit Install Now.
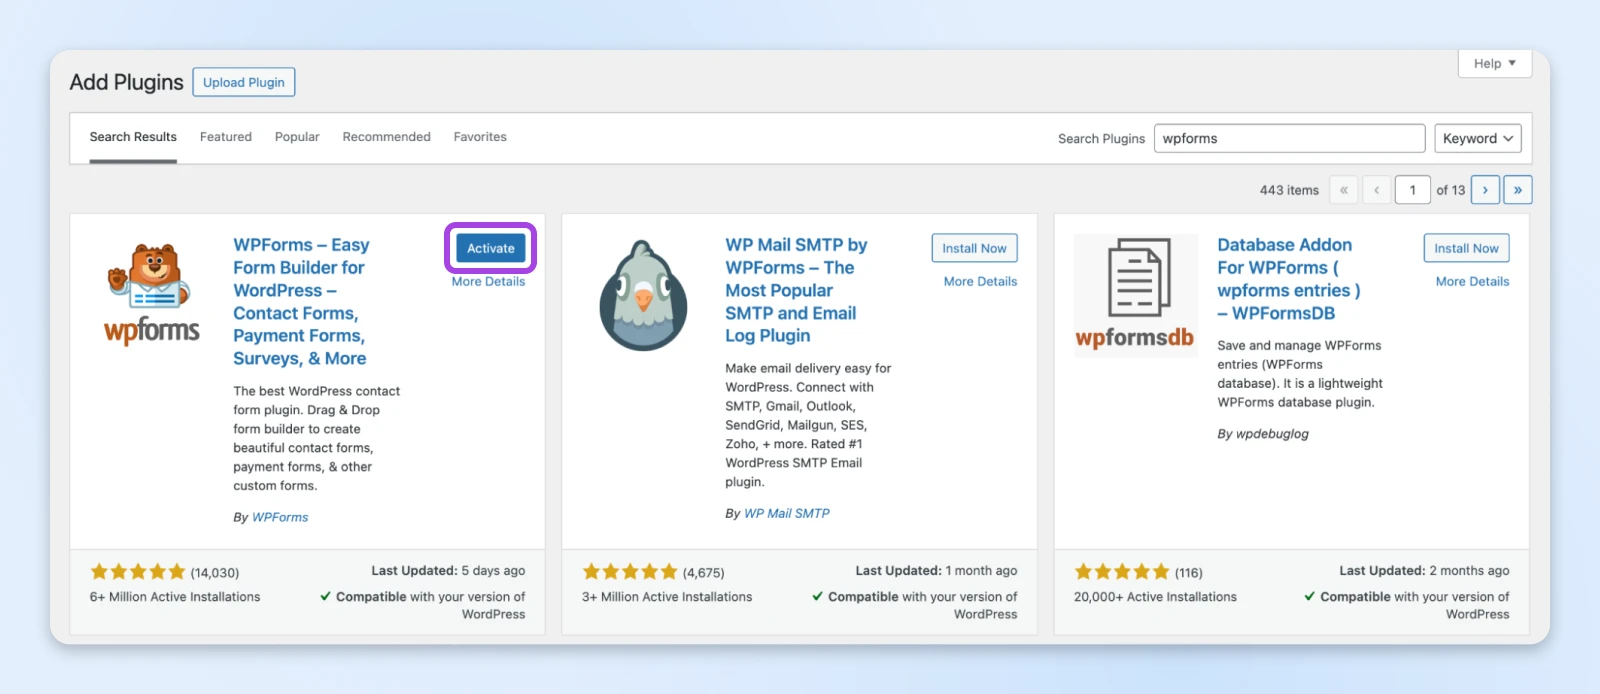
When WordPress is done installing, click Activate. WPForms will now appear in your dashboard menu!
Step 2: Create your first form
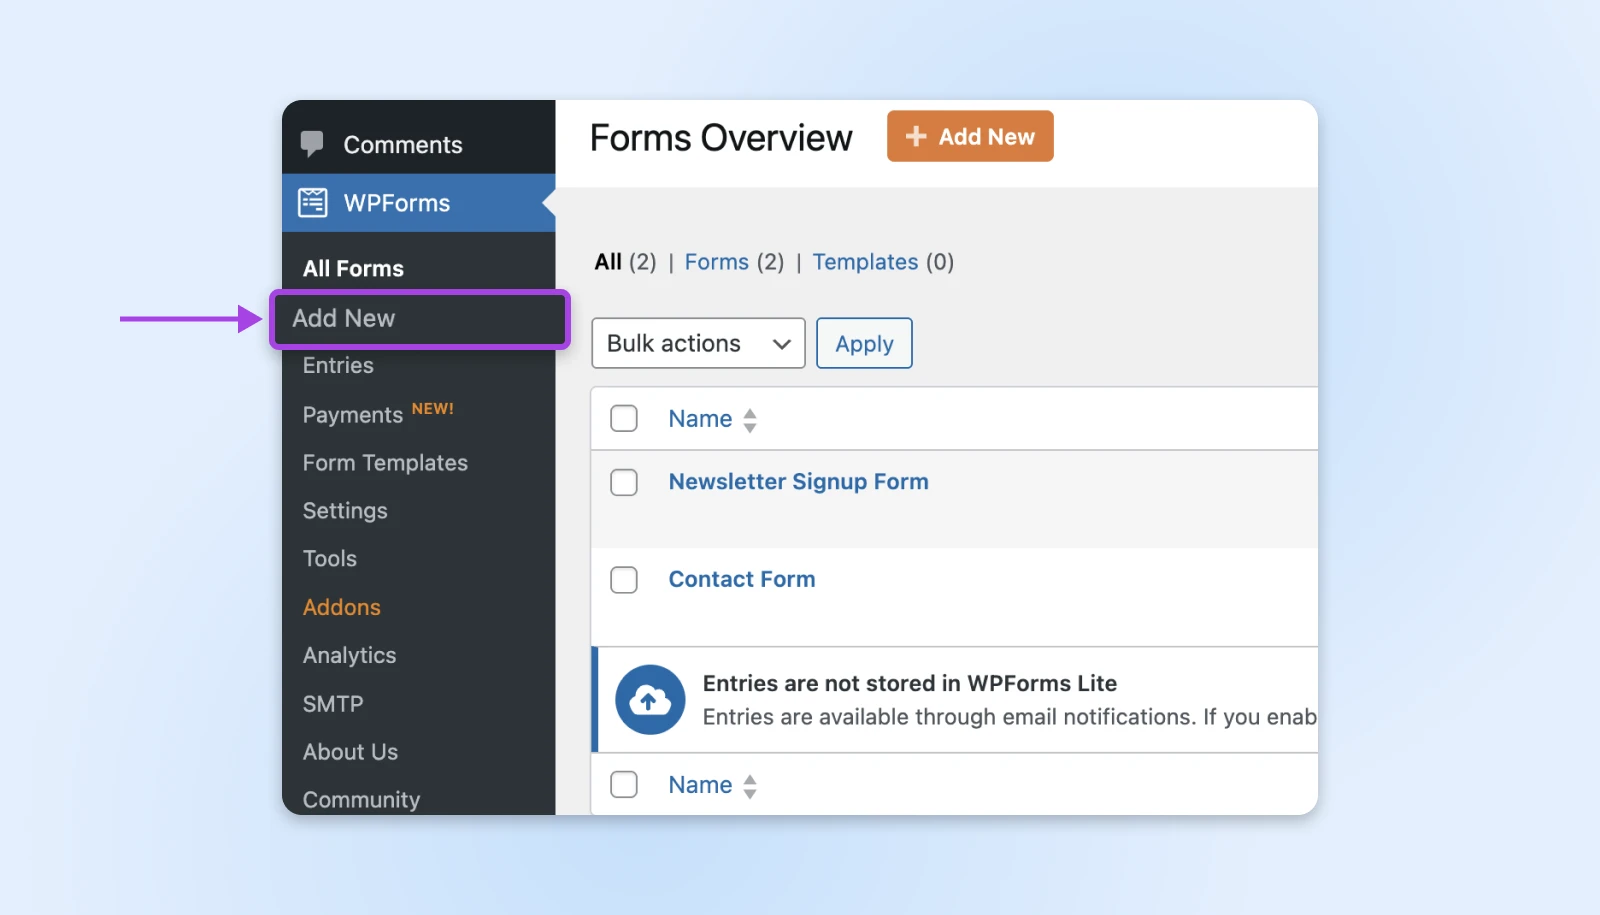
Click the WPForms menu link and then select Add New.
The plugin shows you a few templates, like a simple contact form or a newsletter signup. You can also have WPForms generate a form with AI: describe the fields you want in plain English and refine from there (included in the free version, per WPForms’ Lite vs. Pro comparison, July 2026).
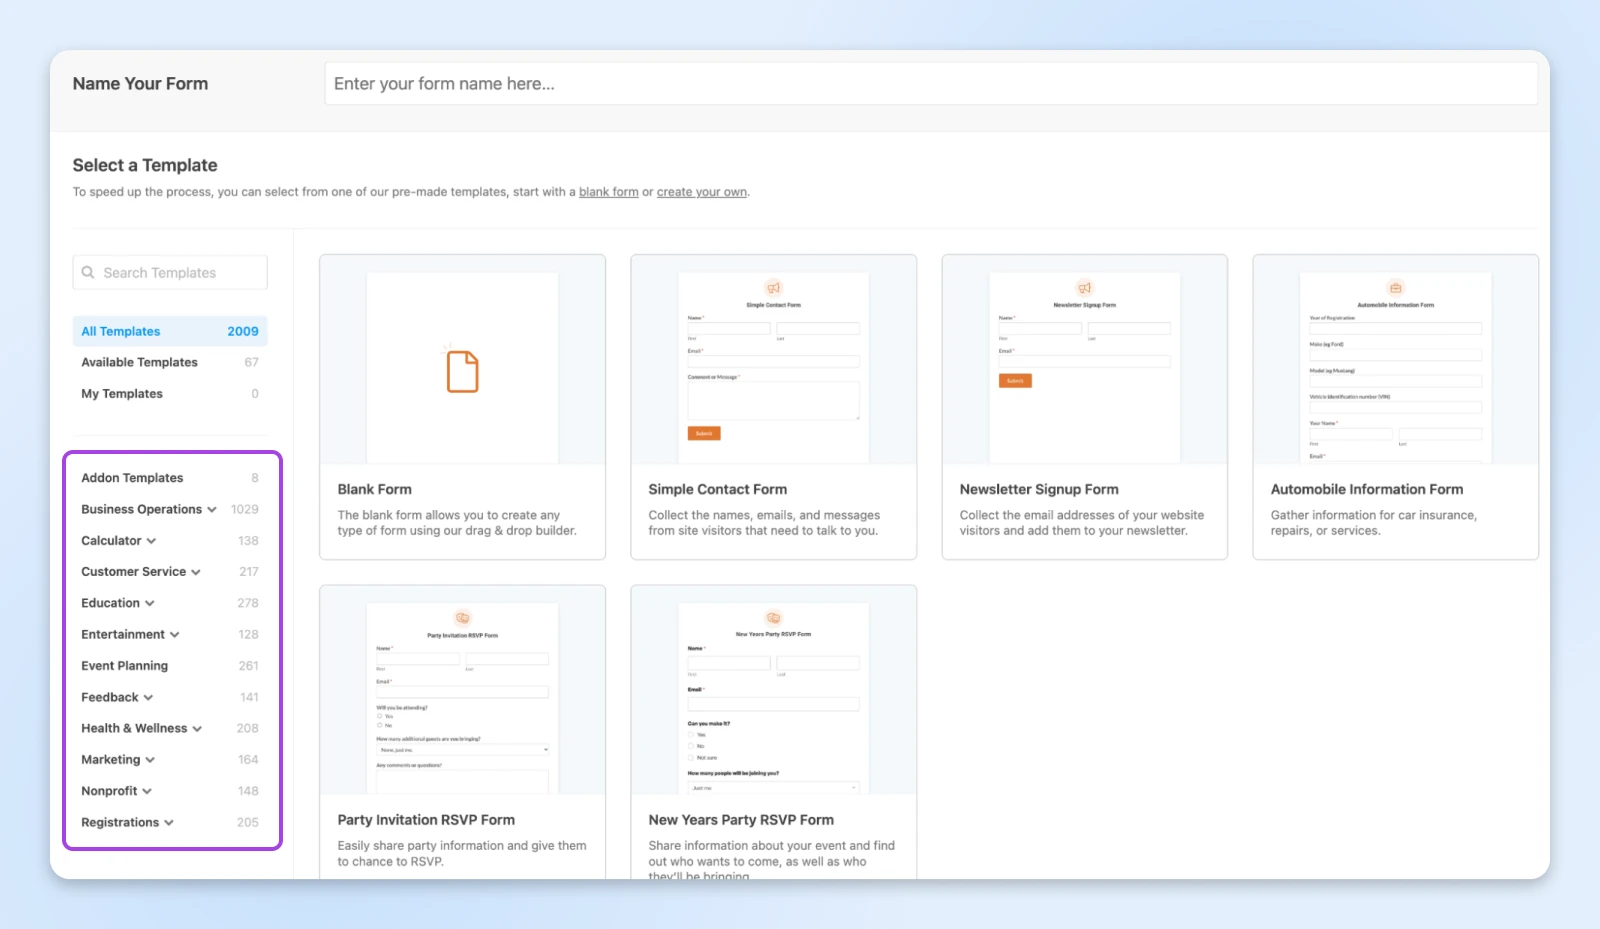
Pick the basic contact form to start. You’ll see fields such as “Name,” “Email,” and a big text box for the message.
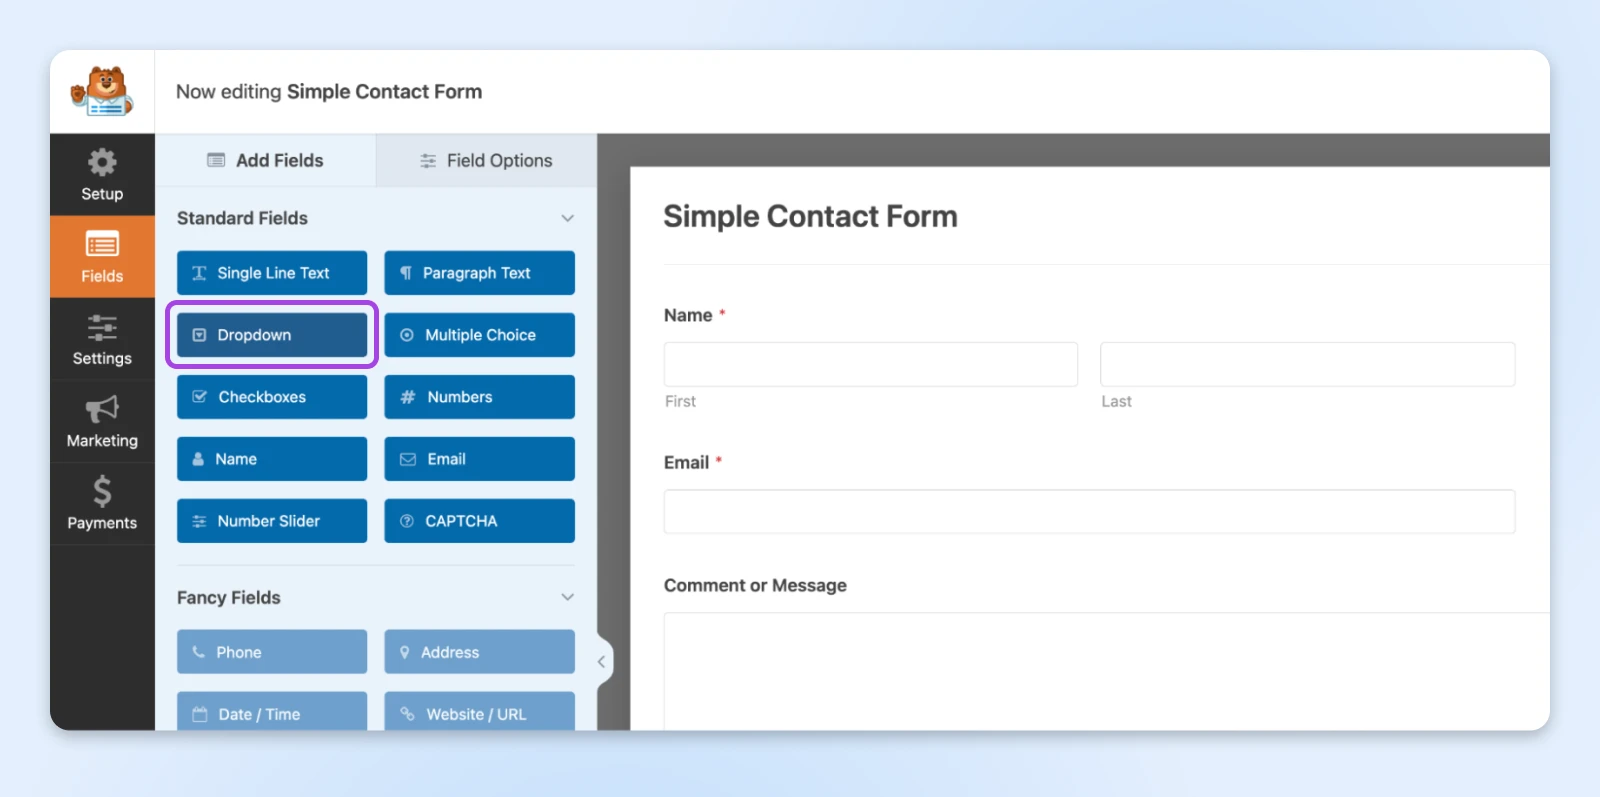
If you need extra fields (maybe a dropdown to let users pick a topic), you can drag and drop them from the left panel.
Step 3: Configure the form settings
Select Settings within the form builder. You’ll see choices for “Notifications” and “Confirmations.”
Click Notifications to set the email address where messages should go.
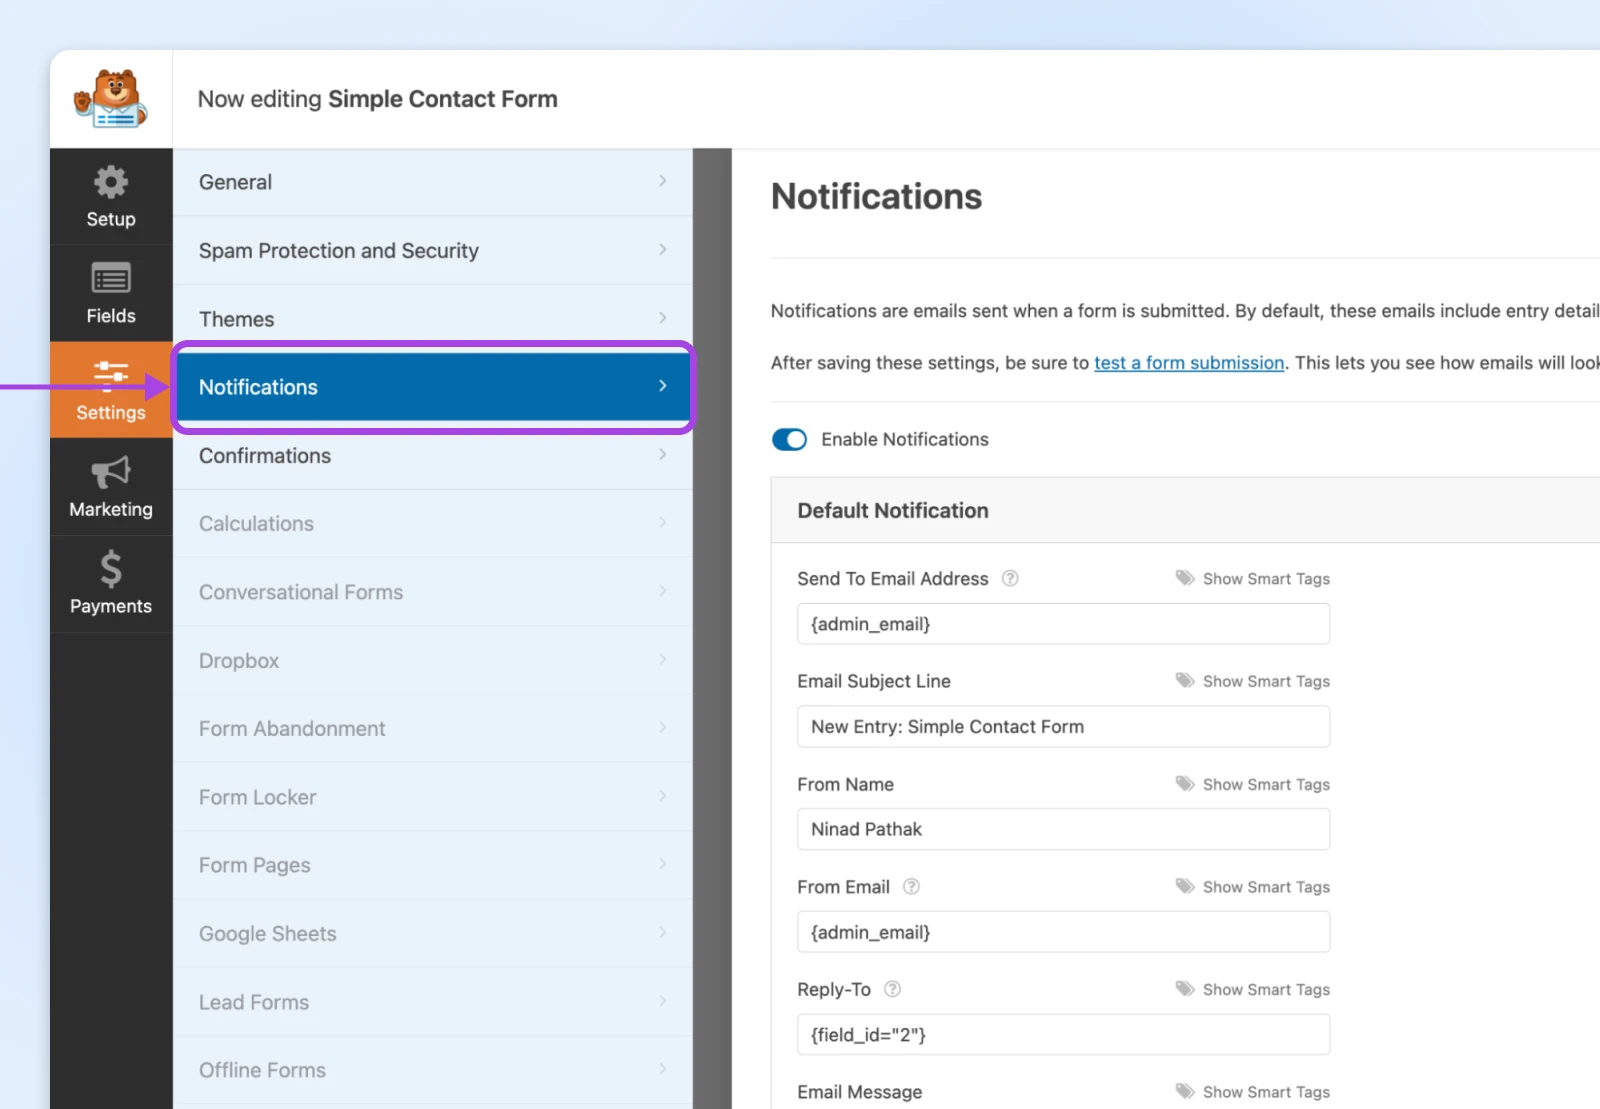
If you want a certain subject line, add that too. You can use something like “New Inquiry from WordPress Form” so you know when a new inquiry drops in your inbox from this contact form.
Then check Confirmations.
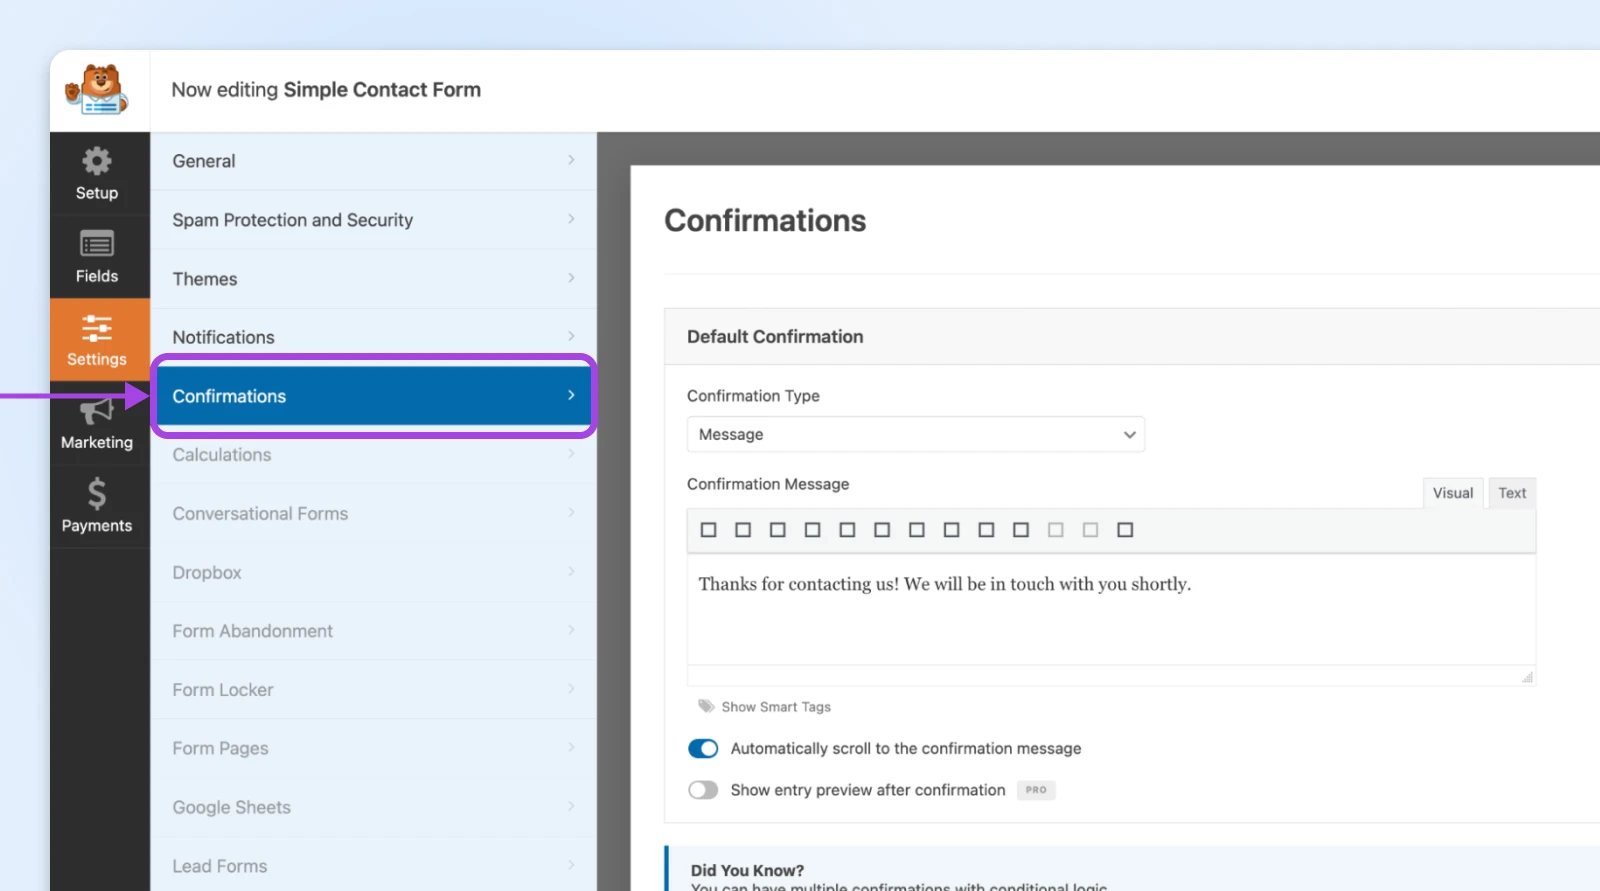
That’s the message visitors see after they submit. You could say, “Thank you for contacting us. We’ll reply soon!” or customize the message according to your brand voice.
Step 4: Embed the form on a page or post
Go to the WordPress editor for any page or post.
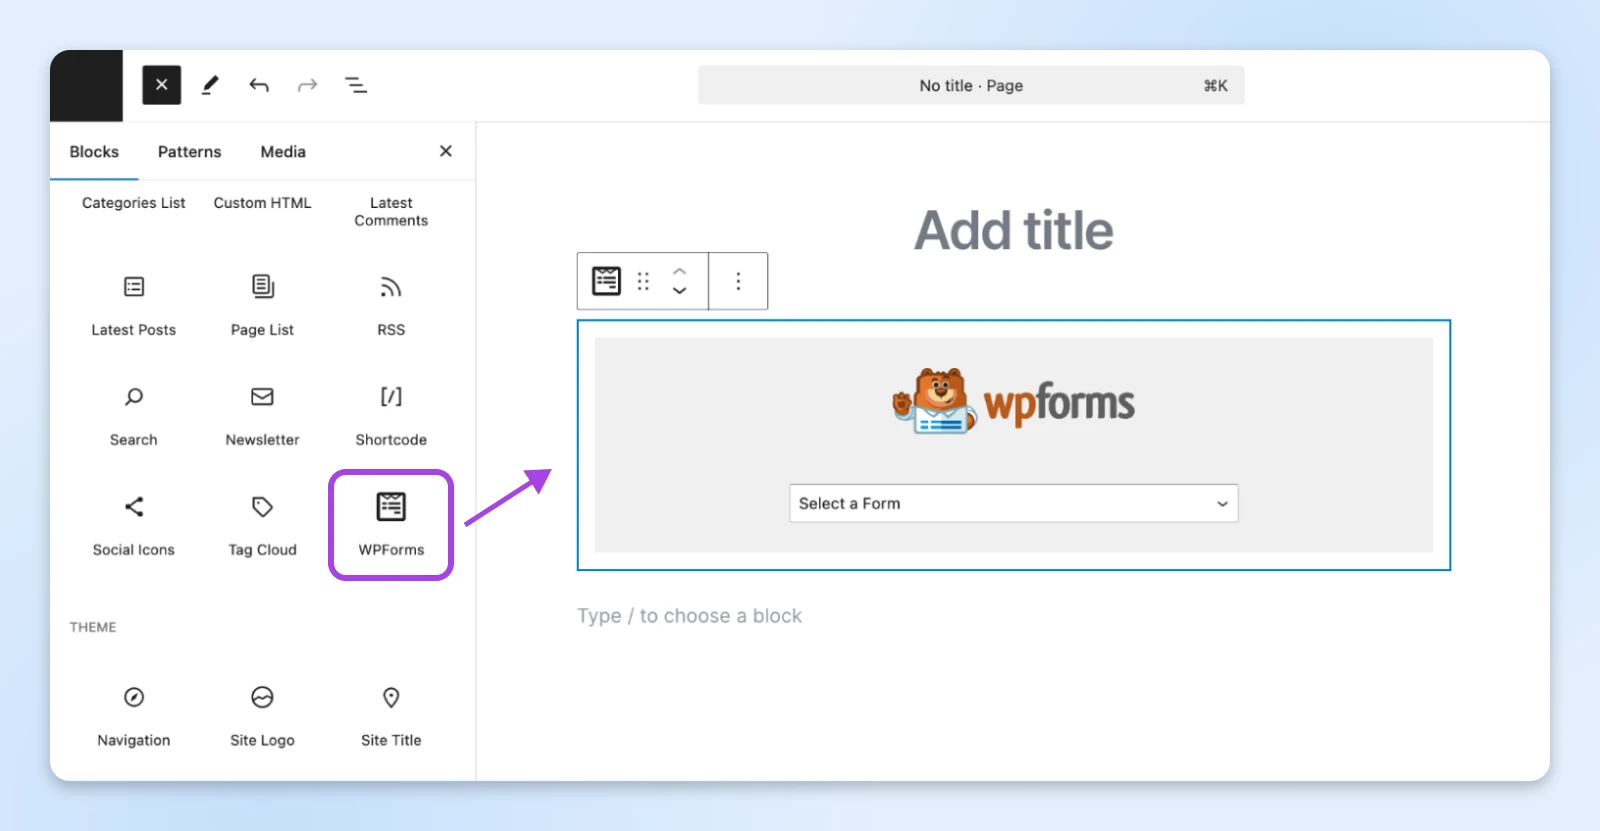
If you’re using the block editor, you’ll see a WPForms block. Insert it, then pick your form from a list.
Here’s another method: copy the shortcode from WPForms and paste it into the editor.
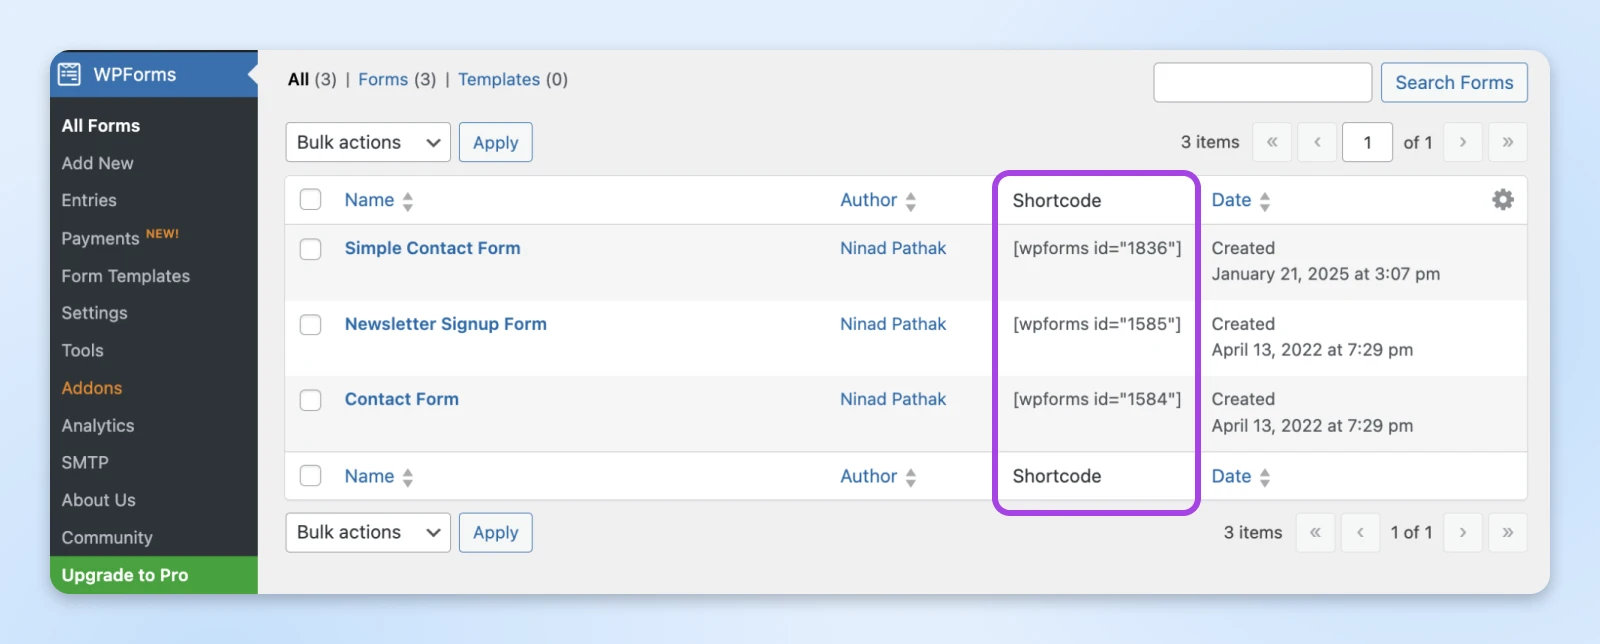
It looks like [wpforms id=”1234″]. Save or publish your changes.
Voilà, your form is live!
Step 5: Test the form
A quick test avoids headaches later. Open the live page and fill out the form with a test name, email, and a short message. Click Submit.
The page should show the confirmation you set up. Then check your email to see if the notification arrived.
If you don’t see it, look in your spam folder or verify that your email address is correct in the plugin settings.
Sometimes hosting providers or email clients filter out automated messages. If that’s an issue, you can add a plugin like WP Mail SMTP to improve email deliverability. We break down why this happens, and the full fix, in the deliverability section below.
Add a contact form with the built-in Form block (Jetpack)
You don’t need a dedicated form plugin to add a contact form in the block editor. With the free Jetpack plugin installed, self-hosted WordPress sites get a Form block: open your page or post, click the + block inserter, search for “form,” and insert it.
Pick a template (contact, RSVP, registration, appointment, or feedback form), or describe the form you want and let AI draft it. Each field is a regular block, and you can adjust the style, colors, fonts, and field widths right in the editor. Responses arrive at the email address you choose and collect in a Forms dashboard under Jetpack → Forms, where you can search, filter, and export them. One honest caveat: Akismet-powered spam filtering for form responses is one of Jetpack’s paid security features (per Jetpack’s WordPress.org listing, 2026).
Choose this route if you already run Jetpack or want everything native to the block editor. Choose a form plugin instead when you need more, like conditional logic, payment gateways, or a deep add-on library.
How to create a contact form without a plugin
Can you skip plugins entirely? Yes, if you’re comfortable writing code. A hand-built contact form means creating the HTML form markup, then writing a PHP handler that processes each submission and sends the message with WordPress’s wp_mail() function.
The form itself is the easy part. The handler is where the real work lives: you need to sanitize and validate every field — WordPress provides functions like sanitize_text_field() and sanitize_email() for exactly this — plus a nonce to block forged submissions, and your own spam protection, since there’s no plugin filtering junk for you.
Who should do this? Developers who want zero plugin overhead and full control. Everyone else will get the same result faster, and more safely, from a form plugin or the Jetpack Form block.
Why your contact form emails don’t arrive (and how to fix it)
The most common contact form failure isn’t the form at all: a visitor submits successfully, and the notification email never reaches your inbox.
Here’s why. By default, WordPress sends every email, including form notifications, through PHP’s mail function via wp_mail(), and many hosting servers aren’t properly configured for it. Those messages also often lack the authentication that providers like Gmail check for, so they land in spam or disappear entirely (per WP Mail SMTP’s documentation on WordPress.org, 2026).
The fix is to stop relying on default PHP mail:
- Install an SMTP plugin. WP Mail SMTP, used by 4+ million websites per WordPress.org, reconfigures wp_mail() to send through a proper SMTP provider or its direct API.
- Authenticate your domain. Set up SPF, DKIM, and DMARC records so providers can verify your messages. Our email authentication guide walks through each one.
- Send from your own domain. Use a from-address that matches your site’s domain rather than a free mailbox, so your messages line up with those authentication records.
Once SMTP and authentication are in place, resend your test submission and confirm the notification lands in your inbox.
Contact Us templates that work
The perfect Contact Us page gives visitors the sense that you’re approachable. It doesn’t need to be fancy.
Here’s a Contact Us page from Swab the World. See how it reminds the visitor to share a note and says they’ll be reading it all?

That’s pretty much all you need. A line or two to help the reader know there’s someone who will read their message.
Here are a few ideas you can adapt:
- Friendly: “We’re here to help. Send us your questions, and we’ll get back to you as soon as we can.”
- Business-like: “Have questions about our services? Please fill out the form below, and we’ll respond promptly.”
- Warm and personal: “Drop us a line if you need anything at all. We love hearing from you and will do our best to assist.”
If you have a dedicated support team, you can even mention their usual response time to set expectations.
Pro tips to optimize your contact form
Adding a form is the first step. Optimizing it can increase the number of useful leads and reduce spam or confusion. Here are a few suggestions to consider:
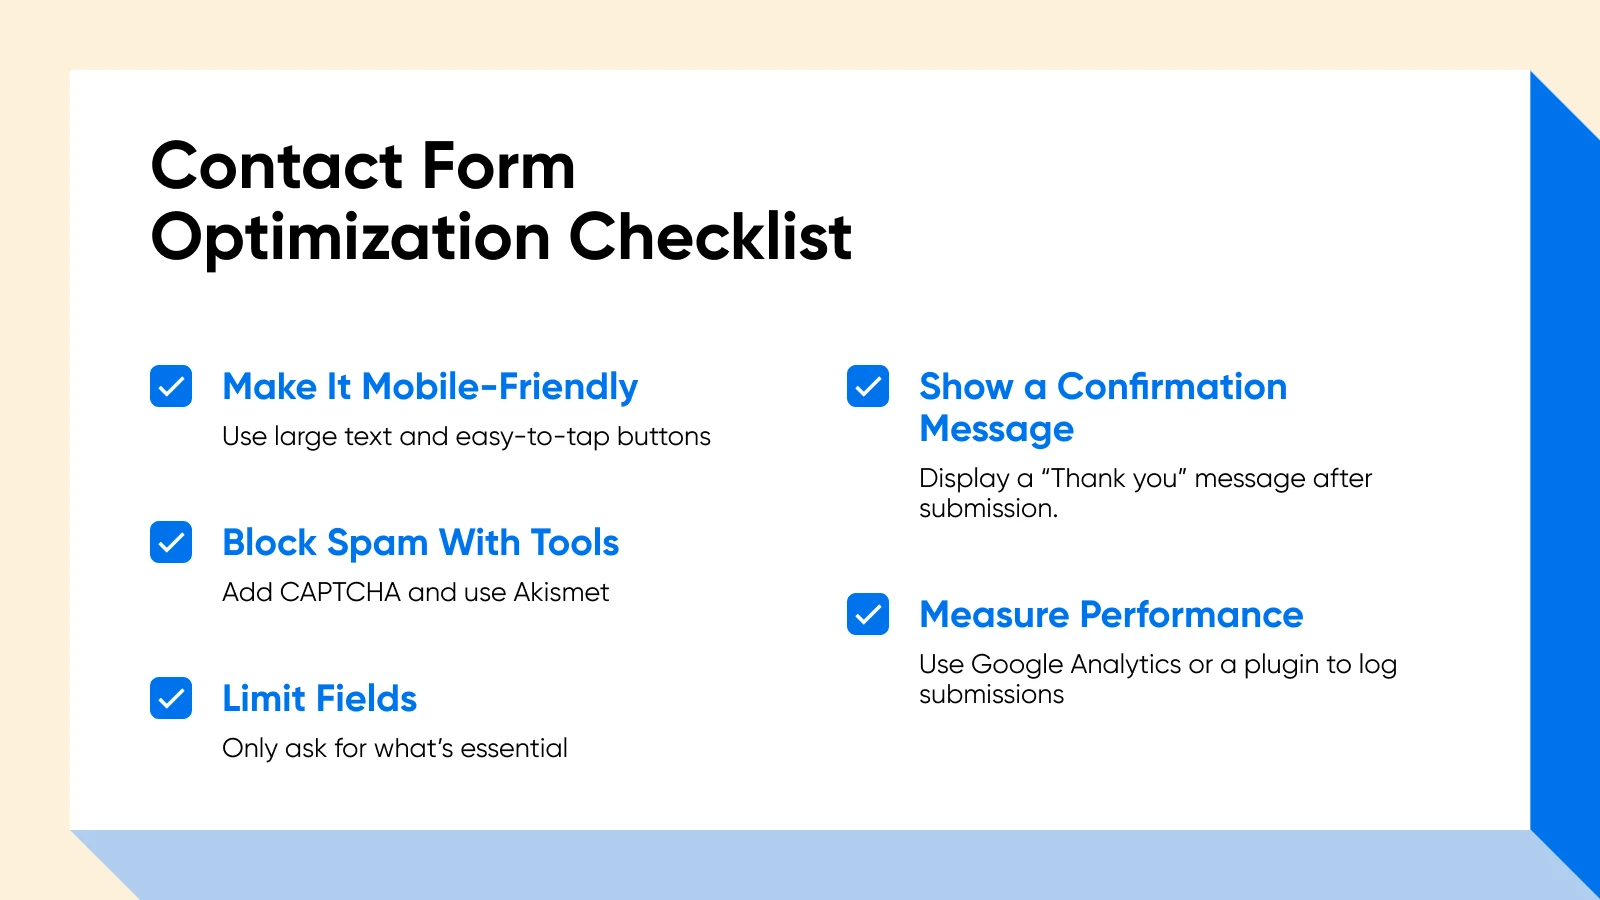
Focus on mobile users
Plenty of people browse on their phones these days. The form should look neat on smaller screens.
WPForms and other modern builders create forms that automatically adjust, but you can still preview them on a phone or tablet.
Make sure the text is large enough, and the buttons are easy to tap.
Filter spam with CAPTCHA and Akismet
Spam submissions are annoying. CAPTCHAs test whether a visitor is a real person, while tools like Akismet check submissions against a spam database.
Combine both if you notice a spike in unwanted submissions. This approach frees your inbox of nonsense.
Keep only what you need
Overly complicated forms scare people away. If you only need a name and email address, stick to those fields. If you must have a phone number or shipping address, add them.
Just remember that the more fields you include, the less likely people are to fill them out.
Offer a clear confirmation
When visitors click “Submit,” they want a sign that the message went through. That can be as simple as “Thanks for contacting us!”
You could also use the confirmation page to direct them to common questions or a link to your blog for more reading.
Let that be a smooth transition rather than a dead end.
Track form submissions
Form submissions might be a key part of your marketing or customer support workflow. Tracking them can show how well your site is doing. Google Analytics or a specialized plugin can log each submission, giving you a way to measure conversion rates. It’s also worth knowing where the submissions themselves live, because it varies by tool: Ninja Forms stores unlimited entries in your dashboard for free (searchable and exportable to CSV), the Jetpack Form block collects responses under Jetpack → Forms, Contact Form 7 doesn’t save submissions to the database by default, and in WPForms, dashboard entry storage is a Pro feature.
If you learn that only a few people submit the form per month, you might test changes to the form fields, your calls-to-action, or your page design.
WordPress contact form FAQs
How do I add a contact form to a WordPress page?
Install a form plugin like WPForms, build a form from a template, then open the page in the editor and insert the plugin’s block (or paste its shortcode). Publish, and the form is live.
Can I add a contact form to a post or a sidebar?
Yes. Contact forms embed anywhere blocks or shortcodes work: blog posts, pages, and theme widget areas like sidebars and footers. If a widget area doesn’t support blocks, paste the form’s shortcode instead.
Where do WordPress contact form submissions go?
To the notification email address you set in the form’s settings. Depending on the tool, entries may also be stored in your WordPress dashboard: free in Ninja Forms and the Jetpack Form block, a paid (Pro) feature in WPForms.
Can I add a contact form in WordPress without a plugin?
Yes, if you can code: build the HTML form, then write a PHP handler that sanitizes, validates, and sends via wp_mail(), with nonce and spam protection. For most site owners, a form plugin or the Jetpack Form block is the practical route.
Why is my WordPress contact form not sending emails?
Usually because WordPress’s default PHP mail is unconfigured or unauthenticated on your host, so notifications get junked or dropped. Install an SMTP plugin like WP Mail SMTP and set up SPF, DKIM, and DMARC on your domain.
Ready to get visitors to reach you?
Each time you make your site easier to use, you improve your connection with visitors. A WordPress contact form is an easy win because it creates a clear path for questions, leads, or support requests.
You can install a simple plugin, create fields that fit your business, and post it on your site without editing code.
Prefer not to manage all of this yourself?
If you’d rather hand off more WordPress maintenance, DreamPress, DreamHost’s managed WordPress hosting, includes security optimization, daily offsite backups, and failover protection. Compare the plans to see whether that support is worth the added cost for your site.

Unbeatable WordPress Hosting
Reliable, lightning-fast hosting solutions specifically optimized for WordPress.
See More