
You’ve been watching your Zapier bill climb for six months.
Every new workflow adds another line item, and every successful action step counts as a task. The monthly invoice now costs more than your project management tool.
You start Googling alternatives and land on n8n, an automation platform you can self-host on your own virtual private server (VPS) for the price of a small server.
No execution quota. No per-task pricing. No surprise bills when your automations take off.
And yep, we walk you through the whole thing, command by command, from a bare Ubuntu server to a running instance with HTTPS, backups, and a tested restore.
What Is n8n and Why Are People Self-Hosting It?
n8n is a workflow automation platform that lets you connect apps, move data between services, and build complex automations through a visual editor. Think of it as the engine behind “when X happens, do Y and Z,” except you’re dragging nodes and drawing connections instead of writing code.
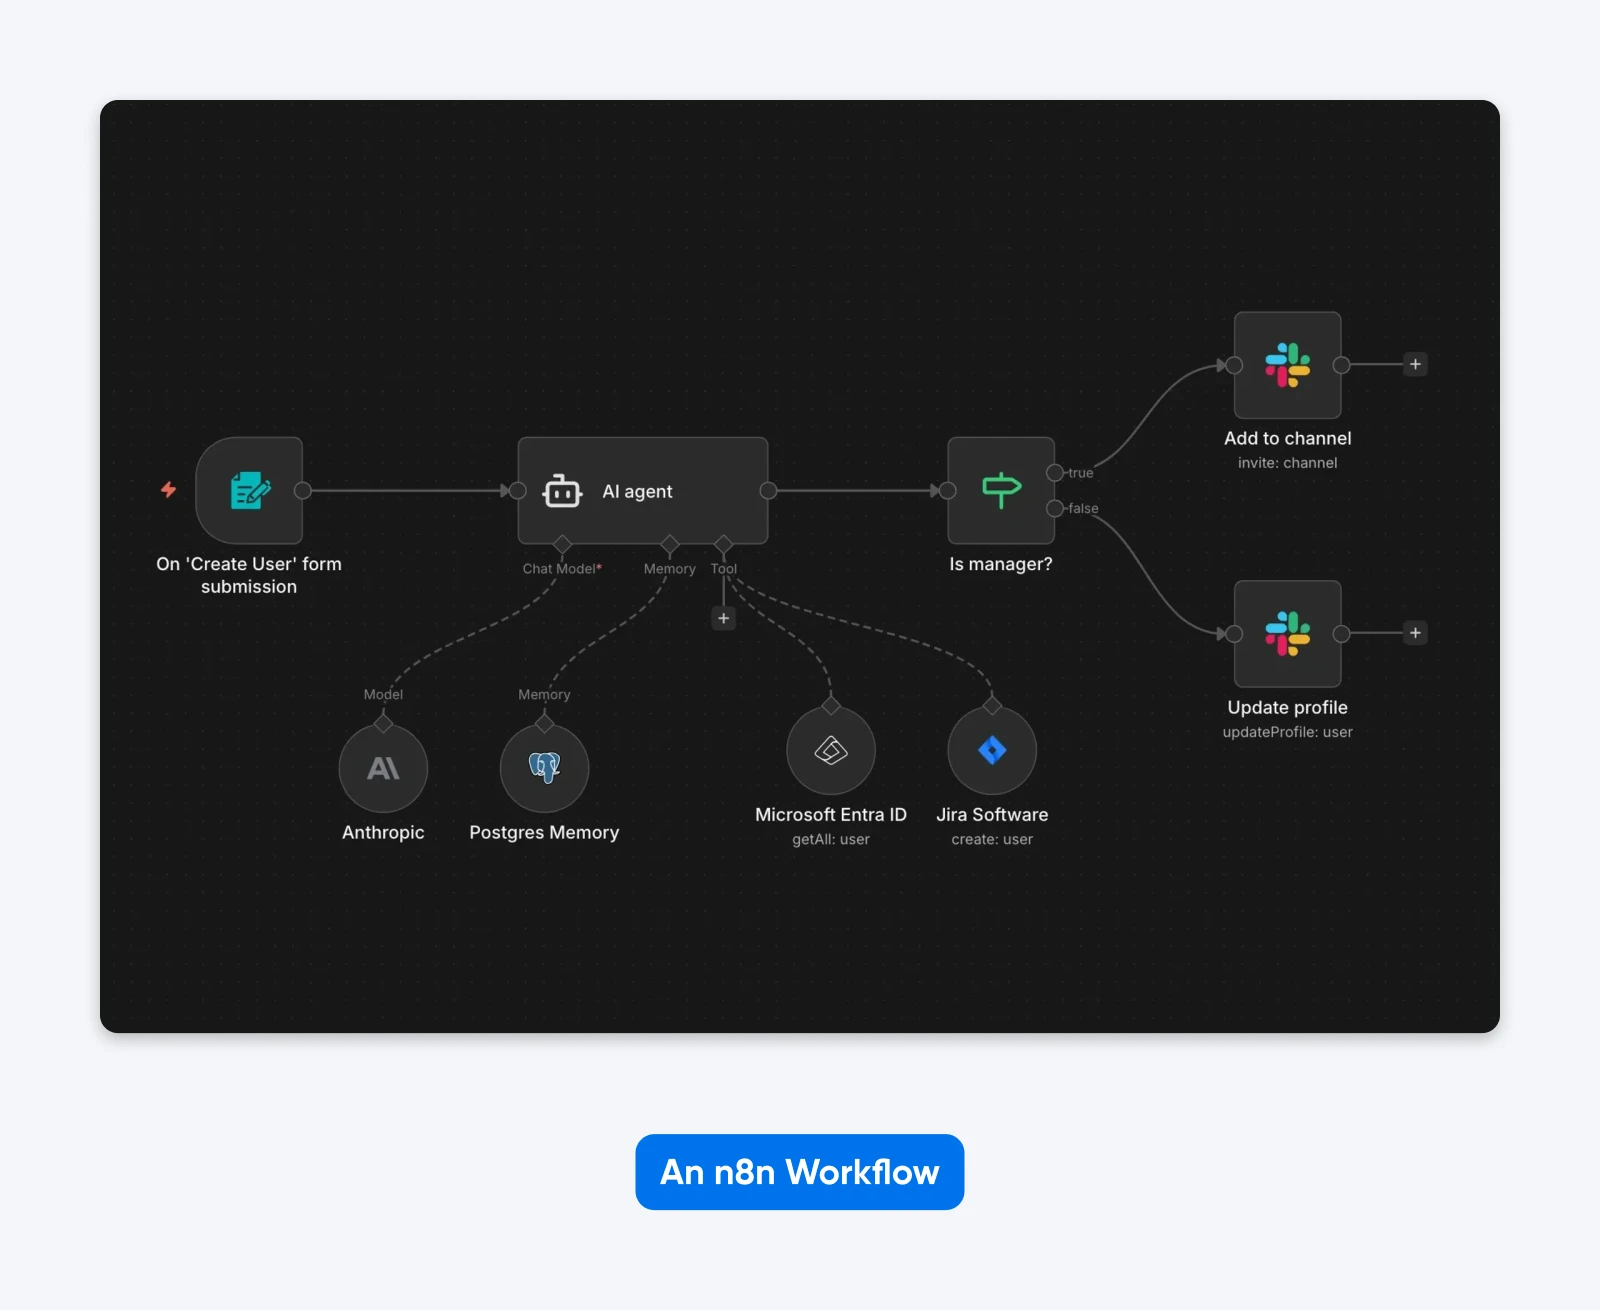
The project has passed 200,000 GitHub stars, and its official Docker image shows over 100 million pulls. A lot of servers out there are running n8n.
The platform runs under a Sustainable Use License, which is worth understanding before you commit. It’s not traditional open source (n8n itself says it doesn’t use the term, since OSI-approved licenses can’t restrict use), but it’s not locked down either. You can run it freely for your own internal business purposes. You can’t sell a product, service, or module whose value derives entirely or substantially from n8n functionality.
“In practice this means all use is allowed unless you are selling a product, service, or module in which the value derives entirely or substantially from n8n functionality.” — n8n’s license FAQ
People self-host n8n because the economics flip once you move past basic usage. n8n Cloud starts at €20/month (billed annually) for 2,500 executions on the Starter plan, and if you’re running any real volume, those limits show up fast.
On your own VPS? No execution quota, control over the data your n8n instance stores, and no n8n licensing or execution bill, though your server, domain, backup storage, and administration still carry costs. Executions themselves cost nothing extra; heavier volume does use more memory and storage, which is a sizing question (covered below), not a billing one.
What Can You Automate With n8n?
n8n’s 400+ integrations cover a wide range, and community-built nodes extend the list further. n8n is also one of many self-hosted alternatives to SaaS tools; the same logic applies to everything from CRM to project management.
Some common setups:
- CRM and lead routing. Sync contacts between your CRM, email platform, and Slack when new leads come in.
- Webhook-triggered workflows. Respond to events from payment processors, form submissions, or GitHub commits in real time.
- Data pipeline automation. Pull data from APIs, transform it, and push it into databases or spreadsheets on a schedule.
- AI agent chains. Connect LLMs with your internal tools to build custom AI assistants that can search, summarize, and act on your data.
(That last one is where your server resources start to matter. More on that in the specs section.)
How Much Does Self-Hosting n8n Cost?
The self-hosted Community edition has no n8n licensing or execution fees for permitted uses. Your total cost includes the server plus any domain, backup storage, and administration time. ExpressTech’s 2026 cost breakdown puts a raw VPS running Docker at $4–5 per month, a Coolify-managed VPS at $5–8, and managed one-click n8n platforms at $3–7.
Those are ExpressTech’s third-party hosting estimates. For a first-party number: the plan we recommend below, DreamHost VPS Hosting Stack 4, is $8.99/month for the first 3 months on monthly billing and auto-renews at $15.99/month after that, as of August 2026, with the full term plus taxes charged at checkout (current pricing is on the n8n VPS page).
Compare that to n8n’s own hosted and licensed plans, as listed on n8n’s pricing page. n8n prices in euros, and these are the annual-billing rates:
| Plan | Monthly Cost | Execution Limit |
| n8n Cloud Starter | €20/month | 2,500 executions |
| n8n Cloud Pro | €50/month | 10,000 executions |
| n8n Business (self-hosted license) | €667/month | 40,000 executions |
| Self-hosted Community edition on a VPS | No n8n licensing or execution fees for permitted uses; VPS, domain, backup storage, and administration costs may apply | No quota |
The gap widens when you factor in how each platform counts usage. n8n charges one execution per workflow run, “regardless of complexity,” and every plan includes unlimited steps. Zapier, by contrast, counts every successful action step as a task.
So a workflow with four action steps running 100 times per day is 3,000 n8n executions per month, but roughly 12,000 Zapier tasks.
Real numbers back this up. ExpressTech’s analysis works through an example of four workflows totaling about 7,000 executions per month: that workload outgrows n8n Cloud Starter and needs the Pro tier (listed there at $60/month on monthly billing), while a $3–7/month self-hosted setup runs it without limits, a difference they put at $636–684 per year.
The Hidden Costs of Self-Hosting
The dollar savings are real. But self-hosting isn’t free in every sense.
Here’s what it costs you:
Your time. Maintenance time varies with your workload and operating experience, but you’ll be responsible for updates, backups, monitoring, and restore tests. Heavier setups with AI-powered automations will demand more.
OAuth setup friction. Connecting services like Google Workspace or Microsoft 365 requires configuring OAuth credentials. Allow extra setup time for each provider and follow its console documentation. (If you’ve ever watched a loading spinner while a consent screen decides whether to trust your app, you know the feeling.)
TLS you have to trust but verify. The Caddy proxy in the setup below obtains and renews a publicly trusted certificate automatically, using an issuer such as Let’s Encrypt or ZeroSSL. Automatic is not the same as unbreakable: after DNS or proxy changes, confirm the certificate still renews.
Ramp-up if you’re new to servers. The walkthrough below assumes you can SSH into a server, edit a file, and run commands. If you’ve never done those things, budget learning time on top of the deployment itself.
What Server Specs Does n8n Need?
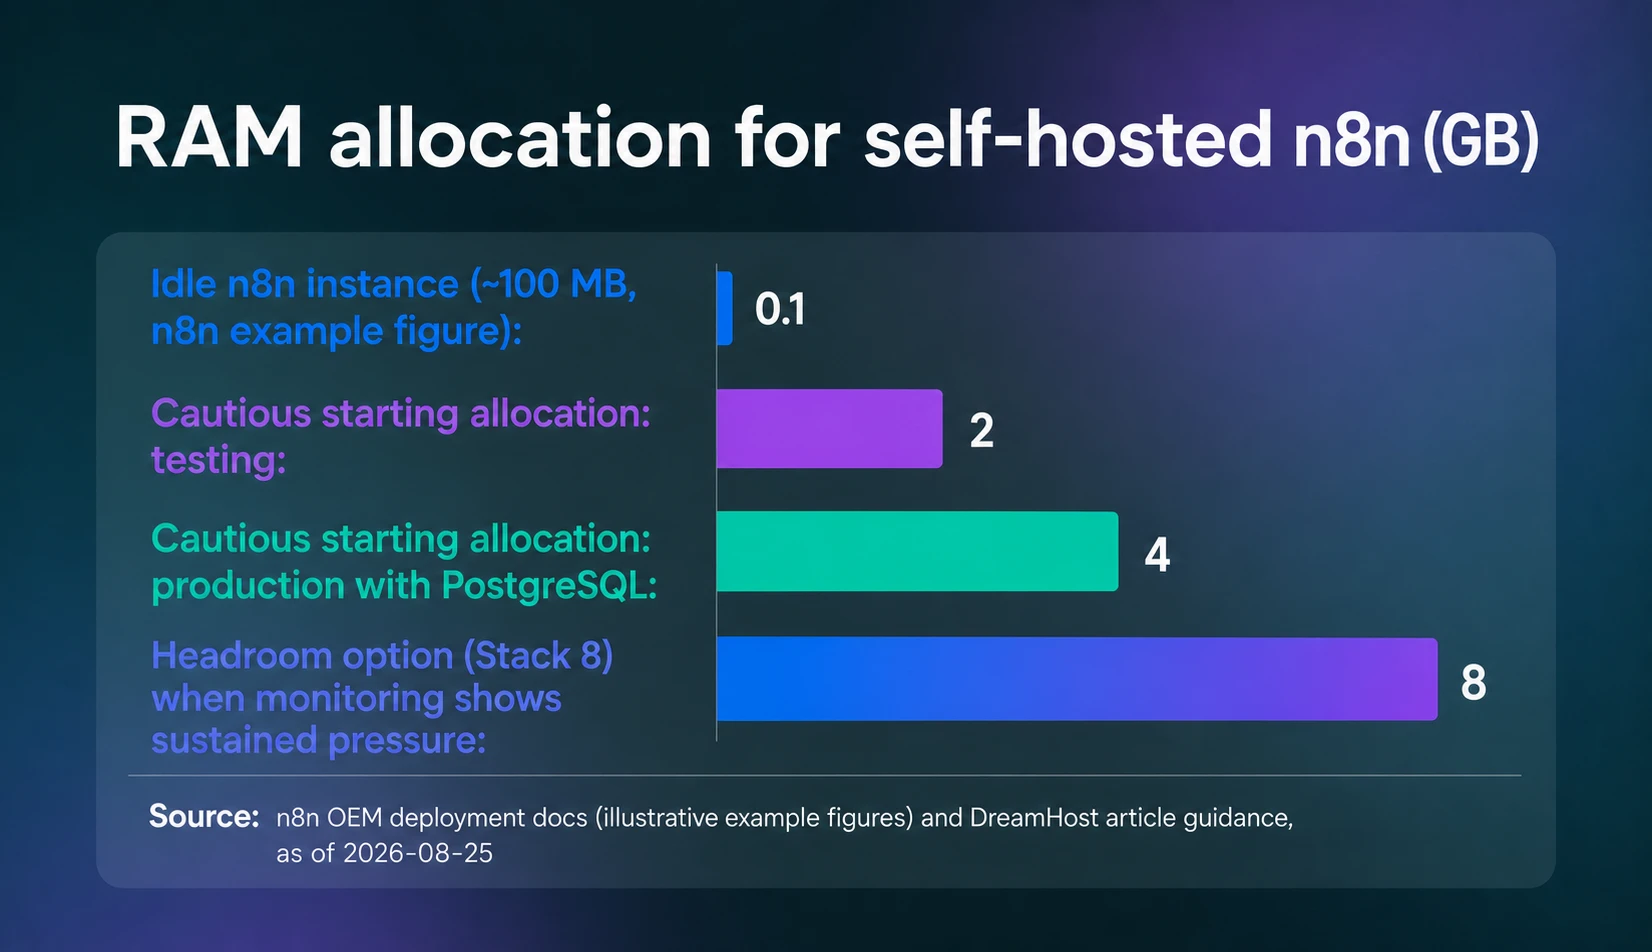
n8n itself is light. The closest thing to official sizing is the example figures in n8n’s OEM deployment docs, which n8n labels “for illustrative purposes only,” based on n8n Cloud: a memory range of 320 MB to 2 GB, a 512 MB to 4 GB SSD-backed database, and roughly 100 MB of memory for an idle instance. As a cautious starting allocation rather than an official n8n minimum, consider 2 GB for testing and 4 GB when adding PostgreSQL and production workflows. Monitor representative workflows and add memory when sustained pressure appears.
Also, remember that n8n is usually more constrained by memory than CPU. n8n’s own docs say it plainly: the platform “isn’t CPU intensive,” and “usually, memory requirements supersede CPU requirements.” What drives memory up is your workflows: data volume, Code nodes (which copy data before and after processing), and large binary files.
Here’s our quick napkin math for sizing headroom:
Size for execution concurrency and the volume of data each workflow processes, then monitor memory usage under a representative workload. Code nodes and large binary payloads can increase memory requirements, so leave headroom and scale the VPS when monitoring shows sustained pressure.
New to VPS hosting? Start with DreamHost’s beginner’s guide to VPS to understand the basics before sizing your server.
Which VPS Should You Choose for Self-Hosted n8n?
n8n doesn’t publish fixed RAM tiers by workload. Size for execution concurrency and data volume, leave headroom for Docker and PostgreSQL, then monitor representative workflows and scale when memory pressure is sustained.
So, here’s how we’d map that to DreamHost plans:
| Plan | Specs | When to Choose It |
| DreamHost VPS Hosting Stack 4 | 4 GB RAM, 2 vCPU, 75 GB NVMe SSD | An unbenchmarked but cautious 4 GB starting allocation for a first n8n server. |
| DreamHost VPS Hosting Stack 8 | 8 GB RAM, 2 vCPU, 150 GB NVMe SSD | The 8 GB option for additional memory headroom when monitoring shows sustained pressure, with double the RAM and storage. |
| DreamHost VPS Hosting Stack 16 | 16 GB RAM, 4 vCPU, 250 GB NVMe SSD | The 16 GB option for extra concurrency, larger data volumes, or adding Redis workers in queue mode. |
A few specs worth paying attention to beyond RAM: n8n lists SSD storage as a database best practice. Memory needs usually outweigh CPU needs, but the actual bottleneck depends on workflow concurrency, data volume, and the nodes you use. Unmetered bandwidth matters if you’re running webhook-heavy workloads with a constant stream of incoming HTTP requests.
Choose a hosting environment that lets you run Docker and configure the database, networking, persistent storage, and reverse proxy. Conventional shared hosting generally does not provide that level of control.
DreamHost’s VPS Hosting plans check the essential boxes (NVMe SSD storage, unmetered bandwidth, full root access, and Docker support), and n8n is in the one-click app library, pre-installed with PostgreSQL and automatic SSL if you’d rather skip the manual setup below.
Our pick for a first n8n server is Stack 4. As of August 2026, it costs $8.99/month for the first 3 months on monthly billing and auto-renews at $15.99/month, with the full term plus taxes charged at checkout; the n8n VPS page always shows the current rates. That renewal price is the honest number to compare against n8n Cloud Starter’s €20/month.
Oh, and one thing to file away in the back of your mind for later: as your usage grows, n8n supports queue mode, a scaling architecture that separates the main instance (UI, triggers, webhooks) from workflow execution, using Redis as a message broker and worker instances to run the jobs. n8n’s documentation calls it the mode that “provides the best scalability.”
How Do You Set Up n8n on a VPS?
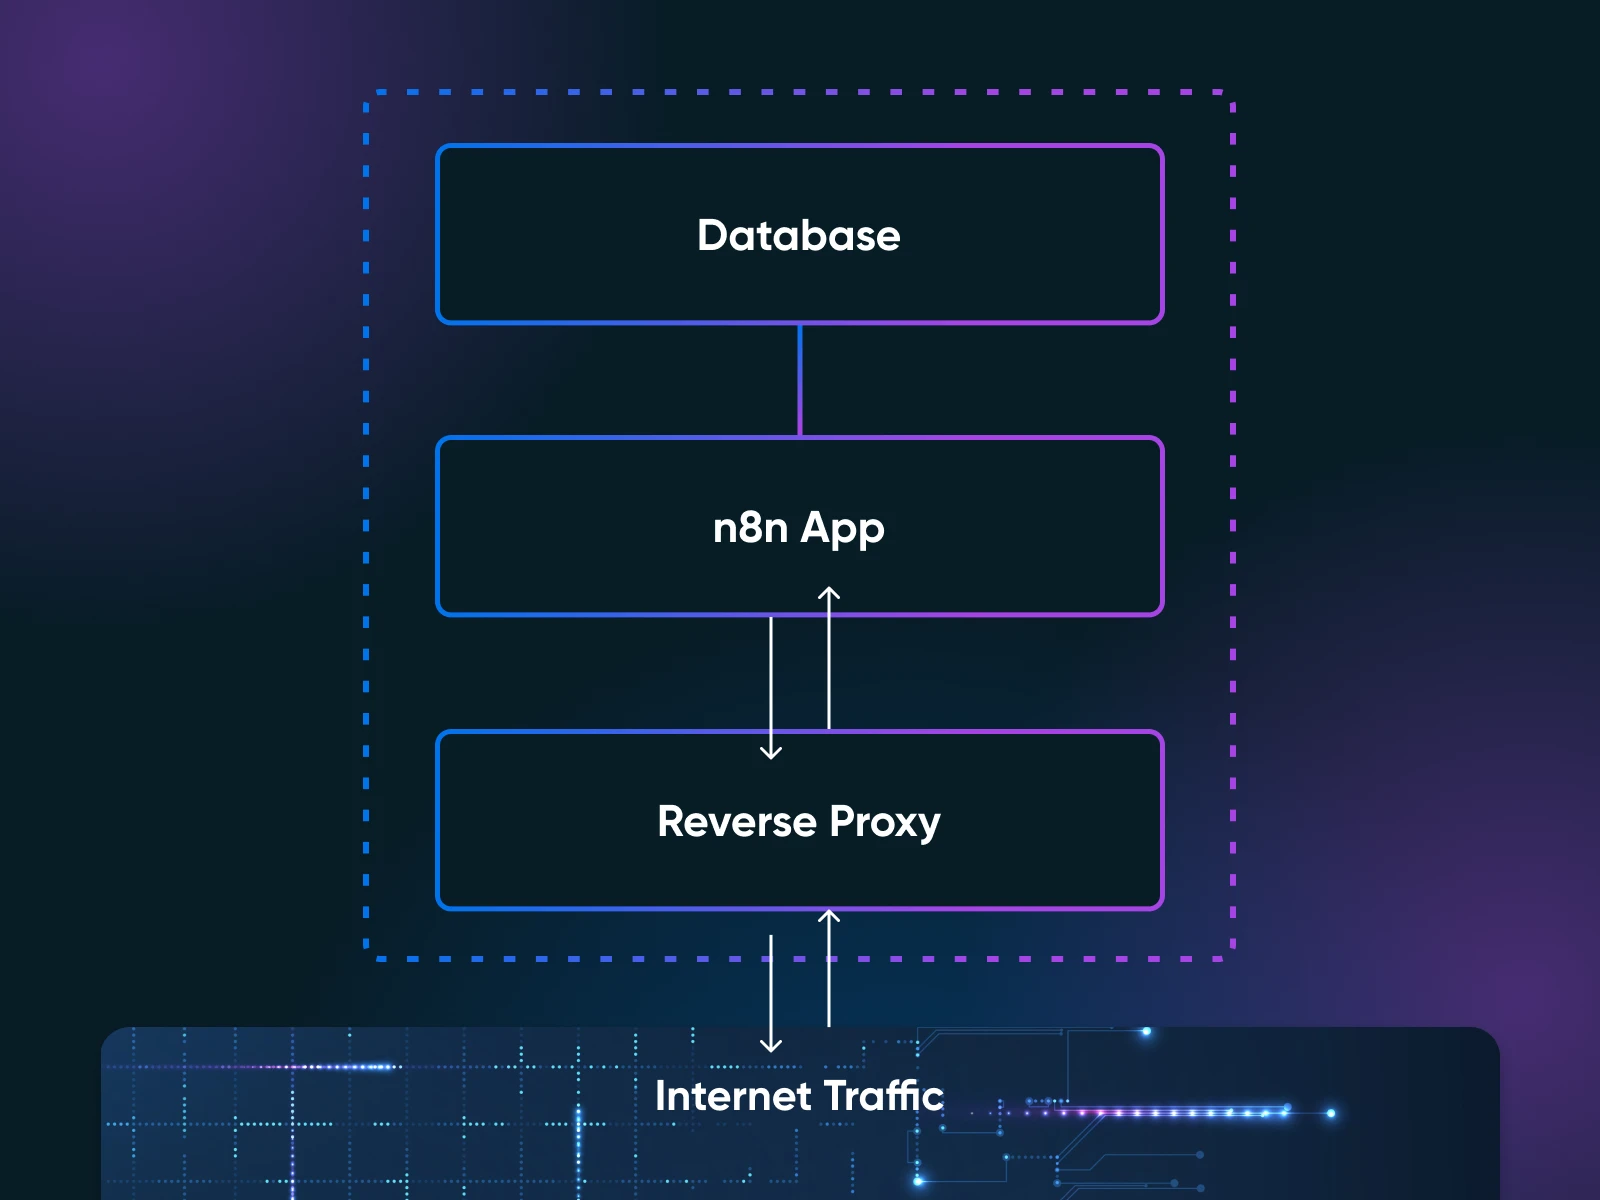
Deploying a self-hosted n8n instance takes 11 steps: DNS, SSH hardening, a firewall, Docker, secrets, a Compose file for the three-container stack (n8n, PostgreSQL, and Caddy), the Caddyfile, launch and verification, updates, backups, and a restore test. Caddy is our reverse proxy: the server that sits between the internet and your application, handling TLS and routing. We include the commands for the core deployment and a manual backup-and-restore test.
The commands target Ubuntu 22.04 or newer, but replace the example domain, secret values, volume name, and dated backup filenames where instructed. The n8n Docker Compose documentation covers the same ground with a Traefik proxy if you’d rather follow n8n’s own template.
What You Will Need Before You Start
- A VPS with root access running Ubuntu 22.04 or newer, with at least 2 GB of RAM (4 GB is our cautious recommendation for production)
- A domain name you can point at your server’s IP address (for TLS and accessing the n8n editor)
- Basic terminal comfort — you should know how to SSH into a server, edit a file, and run commands
One more prerequisite that isn’t on any official list: back up your N8N_ENCRYPTION_KEY the moment you generate it. That’s why step 5 has you create the key with openssl rand -hex 32 before first launch instead of letting n8n generate one silently. This key encrypts all your stored credentials, including every API key, OAuth token, and database password you’ve connected. n8n’s own Docker documentation warns that if the key can’t be found at startup, n8n creates a new one and existing credentials can no longer be decrypted — meaning you’re rebuilding every single integration from scratch (and regretting your life choices). Copy it somewhere safe, separate from your database backups.
If your provider only gave you a root login, create a deployment user first, from the provider console or a root SSH session, before the local SSH commands in step 2:
adduser deploy
usermod -aG sudo deploy
Everything below runs as that user, with sudo where needed.
Step 1: Point Your Domain at the Server
Create a DNS A record for a dedicated subdomain (n8n.example.com throughout this guide) pointing at your server’s IP address, exactly as n8n’s Docker Compose guide describes. Do this first: if DNS hasn’t propagated, Caddy can’t obtain a certificate, and your browser may show a security error instead of the n8n editor.
Step 2: Harden SSH Access
On your local machine, generate a key pair (Ubuntu’s OpenSSH documentation recommends ed25519) and copy it to the server:
ssh-keygen -t ed25519
ssh-copy-id deploy@your_server_ip
Confirm you can log in with the key. Then, on the server, turn off password and root logins, and check what sshd will actually enforce:
sudo tee /etc/ssh/sshd_config.d/00-hardening.conf > /dev/null <<'EOF'
PasswordAuthentication no
PermitRootLogin no
EOF
sudo sshd -t
sudo sshd -T | grep -E '^(passwordauthentication|permitrootlogin) '
The 00- prefix is deliberate. OpenSSH uses the first value it reads for each keyword, per the sshd_config manual, and cloud server images often ship earlier drop-ins in the same directory (cloud-init, for one, writes its SSH settings to 50-cloud-init.conf). Name your file 99-hardening.conf and one of those snippets can silently win. sshd -t checks the configuration for errors; sshd -T prints the effective settings after every file is merged. Confirm the last command prints passwordauthentication no and permitrootlogin no before you go any further. Then restart sshd:
sudo systemctl restart ssh.serviceUbuntu’s docs warn that a bad sshd config on a remote server can lock you out. Keep your current session open and test a fresh login in a second terminal before closing anything.
Step 3: Turn On the Firewall
Ubuntu ships UFW (Uncomplicated Firewall) disabled by default. Allow SSH before enabling it, so the firewall can’t cut off your own session:
sudo ufw allow 22/tcp
sudo ufw allow 80/tcp
sudo ufw allow 443/tcp
sudo ufw --force enable
sudo ufw status
Three ports, nothing else. One Docker-specific warning from Docker’s own install docs: ports that Docker publishes to the host bypass UFW rules entirely. That’s why the Compose file in step 6 publishes host ports only for Caddy: 80 and 443 are the only container ports published by Compose (SSH on 22 is also open), and n8n and PostgreSQL get no published host ports at all.
Step 4: Install Docker and Docker Compose
Install Docker Engine from Docker’s official apt repository, not the get.docker.com convenience script, which Docker’s docs recommend only for testing and development. First the prerequisites and Docker’s signing key:
sudo apt update
sudo apt install ca-certificates curl
sudo install -m 0755 -d /etc/apt/keyrings
sudo curl -fsSL https://download.docker.com/linux/ubuntu/gpg -o /etc/apt/keyrings/docker.asc
sudo chmod a+r /etc/apt/keyrings/docker.asc
Next, register the repository itself. This writes the repository file from Docker’s Ubuntu install guide, filling in your Ubuntu release automatically:
sudo tee /etc/apt/sources.list.d/docker.sources > /dev/null <<EOF
Types: deb
URIs: https://download.docker.com/linux/ubuntu
Suites: $(. /etc/os-release && echo "${UBUNTU_CODENAME:-$VERSION_CODENAME}")
Components: stable
Signed-By: /etc/apt/keyrings/docker.asc
EOF
Then install and verify:
sudo apt update
sudo apt install docker-ce docker-ce-cli containerd.io docker-buildx-plugin docker-compose-plugin
sudo docker run hello-world
If hello-world prints its confirmation message, Docker and the Compose plugin are ready.
Step 5: Create the Project Directory and Secrets
Create the project directory, then generate your encryption key — don’t let n8n invent one silently on first boot:
sudo mkdir -p /opt/n8n-compose
cd /opt/n8n-compose
openssl rand -hex 32
Copy the output somewhere safe right now — off the server. Then put it, along with a strong database password, in a protected .env file next to your compose file (Docker Compose reads it automatically). Replace both placeholder values with your own:
sudo tee /opt/n8n-compose/.env > /dev/null <<'EOF'
POSTGRES_PASSWORD=choose_a_strong_password
N8N_ENCRYPTION_KEY=paste_the_64_character_key_you_just_generated
EOF
sudo chmod 600 /opt/n8n-compose/.env
The chmod 600 matters: this file holds secrets, so only its owner (root) should be able to read it. In the compose file, N8N_ENFORCE_SETTINGS_FILE_PERMISSIONS=true applies the same idea inside the container: per n8n’s security variables reference, it has n8n try to set 0600 permissions on its own settings file.
Step 6: Write the Docker Compose File
Create /opt/n8n-compose/docker-compose.yml (for example with sudo nano /opt/n8n-compose/docker-compose.yml) and paste the following, swapping in your own domain for n8n.example.com in both URL lines and setting your timezone:
services:
  caddy:
    image: caddy:2
    restart: unless-stopped
    ports:
      - "80:80"
      - "443:443"
    volumes:
      - ./Caddyfile:/etc/caddy/Caddyfile
      - caddy_data:/data
      - caddy_config:/config

  n8n:
    image: docker.n8n.io/n8nio/n8n:2.36.7
    restart: unless-stopped
    expose:
      - "5678"
    environment:
      - DB_TYPE=postgresdb
      - DB_POSTGRESDB_HOST=postgres
      - DB_POSTGRESDB_DATABASE=n8n
      - DB_POSTGRESDB_USER=n8n
      - DB_POSTGRESDB_PASSWORD=${POSTGRES_PASSWORD}
      - N8N_ENCRYPTION_KEY=${N8N_ENCRYPTION_KEY}
      - N8N_HOST=n8n.example.com
      - N8N_PORT=5678
      - N8N_PROTOCOL=https
      - N8N_WEBHOOK_URL=https://n8n.example.com/
      - N8N_PROXY_HOPS=1
      - N8N_ENFORCE_SETTINGS_FILE_PERMISSIONS=true
      - GENERIC_TIMEZONE=America/New_York
      - TZ=America/New_York
      - EXECUTIONS_DATA_MAX_AGE=168
    depends_on:
      postgres:
        condition: service_healthy
    volumes:
      - n8n_data:/home/node/.n8n

  postgres:
    image: postgres:18
    restart: unless-stopped
    environment:
      - POSTGRES_USER=n8n
      - POSTGRES_PASSWORD=${POSTGRES_PASSWORD}
      - POSTGRES_DB=n8n
      - PGDATA=/var/lib/postgresql/data
    healthcheck:
      test: ["CMD-SHELL", "pg_isready -U n8n -d n8n"]
      interval: 5s
      timeout: 5s
      retries: 10
    volumes:
      - postgres_data:/var/lib/postgresql/data

volumes:
  caddy_data:
  caddy_config:
  n8n_data:
  postgres_data:
Five details in there earn their keep:
- The image is pinned to a specific version (2.36.7 is the current stable release as we write this, per n8n’s install docs), so upgrades only happen when you decide.
- n8n publishes no host port. It is reachable by containers on the Compose network, including Caddy, but not through a published host port, so the editor can only ever be reached through the reverse proxy, never directly from the internet.
- The healthcheck makes n8n wait for PostgreSQL. A bare
depends_ononly waits for the container to start, not for the database to accept connections. Thecondition: service_healthypattern comes straight from n8n’s own example Postgres compose file, which also deploys PostgreSQL 18. - The
N8N_WEBHOOK_URL/N8N_PROXY_HOPSpair matters behind a proxy. n8n normally builds webhook URLs from its protocol, host, and port, and n8n’s docs say that won’t work behind a reverse proxy, so you set the webhook URL manually so n8n can “register the correct webhook URLs with external services,” setN8N_PROXY_HOPSto 1, and make sure the proxy passes the X-Forwarded-For, X-Forwarded-Host, and X-Forwarded-Proto headers. (The same page notesN8N_WEBHOOK_URLreplaces the olderWEBHOOK_URL, which is deprecated from n8n 2.35.0.) TZandGENERIC_TIMEZONEdo different jobs. Per n8n’s Docker docs,GENERIC_TIMEZONEdrives scheduling nodes like Schedule, whileTZsets the container’s system timezone (what commands likedatereport). Set both to the same value.
(Start with PostgreSQL from day one. n8n defaults to SQLite, which works for testing, but n8n’s hosting templates recommend PostgreSQL for production, and migrating later is painful in the “I wish I’d done this right from the start” way.)
Step 7: Write the Caddyfile
Create /opt/n8n-compose/Caddyfile with your domain (again, replace n8n.example.com):
n8n.example.com {
    reverse_proxy n8n:5678
}
That’s the whole reverse proxy config. Per Caddy’s automatic HTTPS documentation, Caddy obtains and renews a publicly trusted certificate automatically, using an issuer such as Let’s Encrypt or ZeroSSL, and redirects HTTP to HTTPS, provided your DNS A record points at the server and ports 80 and 443 are open (steps 1 and 3). Caddy is also one of the reverse proxies in n8n’s official hosting examples.
Step 8: Launch and Verify
cd /opt/n8n-compose
sudo docker compose up -d
sudo docker compose ps
Wait until ps shows the postgres container healthy and n8n running, then check the front door from any machine:
curl -fsS -o /dev/null -w '%{http_code}' https://n8n.example.com/A 2xx code (or a 3xx redirect) means Caddy terminated TLS and n8n answered; curl exiting with an error instead means DNS, the certificate, or the containers need a look (sudo docker compose logs caddy and sudo docker compose logs n8n are the first places to check). Open https://n8n.example.com in a browser and create your owner account.
Step 9: Update n8n Deliberately
n8n releases a new minor version most weeks, and its update instructions tell you to check the breaking-changes changelog before upgrading. When you’re ready: edit the version tag in docker-compose.yml, then
cd /opt/n8n-compose
sudo docker compose pull
sudo docker compose up -d
With a pinned tag, pulling alone changes nothing: you choose each upgrade by changing the tag, which is the point of pinning. Run a backup (step 10) before major version updates.
Step 10: Schedule Backups
Three things are required for a usable restore: the PostgreSQL database, the n8n_data volume, and the .env file that supplies N8N_ENCRYPTION_KEY. n8n’s Docker docs are explicit that even when you use PostgreSQL, the /home/node/.n8n folder (our n8n_data volume) still holds essential data, including the encryption key material. Back up all three, and retain docker-compose.yml and Caddyfile so you can reconstruct the stack. The script below handles the database and the volume; copying the config files off-host comes right after. Create the script as a root-owned file:
sudo tee /opt/n8n-compose/backup.sh > /dev/null <<'EOF'
#!/bin/bash
set -euo pipefail
cd /opt/n8n-compose
STAMP=$(date +%Y-%m-%d)
mkdir -p /opt/n8n-backups
docker compose exec -T postgres pg_dump -U n8n -d n8n > "/opt/n8n-backups/n8n-db-${STAMP}.sql"
docker run --rm -v n8n-compose_n8n_data:/data -v /opt/n8n-backups:/backup alpine \
  tar czf "/backup/n8n-data-${STAMP}.tar.gz" -C /data .
find /opt/n8n-backups -name 'n8n-db-*.sql' -mtime +30 -delete
find /opt/n8n-backups -name 'n8n-data-*.tar.gz' -mtime +30 -delete
EOF
sudo chmod 700 /opt/n8n-compose/backup.sh
sudo /opt/n8n-compose/backup.sh
Notes on the script: n8n-compose_n8n_data is the volume name Compose creates for a project directory named n8n-compose; confirm yours with sudo docker volume ls and adjust if it differs. The two find lines keep 30 days of backups; set a different retention to match your storage and recovery needs.
Schedule it from root’s crontab. Root’s cron should only ever execute a root-owned script (chmod 700, with the .env at 600), never a file another user can edit. Run sudo crontab -e and add one line for a daily 3 a.m. run:
0 3 * * * /opt/n8n-compose/backup.shThe script backs up the PostgreSQL database and the n8n_data volume on a schedule. Copy the .env (which contains your encryption key), Compose, and Caddy files off-host now and whenever they change. On the server, create a temporary protected archive:
sudo tar -C /opt/n8n-compose -czf /home/deploy/n8n-config.tar.gz .env docker-compose.yml Caddyfile
sudo chown deploy:deploy /home/deploy/n8n-config.tar.gz
chmod 600 /home/deploy/n8n-config.tar.gz
Then, from your local machine, pull down the config archive along with the backups, and delete the temporary server copy:
scp deploy@your_server_ip:/home/deploy/n8n-config.tar.gz .
scp -r deploy@your_server_ip:/opt/n8n-backups .
ssh deploy@your_server_ip 'rm /home/deploy/n8n-config.tar.gz'
A backup that only exists on the server it protects disappears with the server.
Step 11: Test a Restore on a Scratch VPS
This is a backup-and-restore procedure so you can check that your backups are usable. Test this restore on a fresh scratch VPS — never on your production server. Provision a throwaway server, repeat step 4 (Docker) there, and copy over your project files (docker-compose.yml, Caddyfile, .env) and your latest dated backups into the same paths.
First, swap the hostname: put a test hostname (say, n8n-restore-test.example.com, with an A record pointing at the scratch VPS) into N8N_HOST, N8N_WEBHOOK_URL, and the Caddyfile. Then, replacing the dated filenames with your own:
cd /opt/n8n-compose
sudo docker compose create
sudo docker run --rm -v n8n-compose_n8n_data:/data -v /opt/n8n-backups:/backup alpine \
  sh -c "cd /data && tar xzf /backup/n8n-data-2026-08-25.tar.gz"
sudo docker compose up -d --wait postgres
sudo docker compose exec -T postgres psql -U n8n -d n8n < /opt/n8n-backups/n8n-db-2026-08-25.sql
sudo docker compose run --rm n8n unpublish:workflow --all
sudo docker compose up -d
The unpublish:workflow --all line uses n8n’s built-in Server CLI to unpublish every restored workflow before the instance starts, so restored schedules and triggers don’t fire against your production systems from the test box. Finish with the same curl check as step 8, against the test hostname.
Be honest with yourself about what a green check means: it confirms the database and volume restored and the stack starts cleanly. It doesn’t exercise your workflows through the editor, so log in on the test instance and spot-check the ones you can’t afford to lose.
How Do You Keep a Self-Hosted n8n Instance Secure?
A self-hosted n8n instance is as secure as the server it runs on, and you’re the one who controls that server.
Security comes down to six things. None of them is complicated individually, but skipping any one of them leaves a real gap. The setup above already implements the first three.
- HTTPS through a reverse proxy. Never access the n8n editor over plain HTTP. The Caddy config in step 7 obtains and renews a publicly trusted certificate automatically, using an issuer such as Let’s Encrypt or ZeroSSL, and redirects HTTP to HTTPS.
- Firewall lockdown. UFW allows only SSH (22), HTTP (80), and HTTPS (443). Never expose n8n’s default port 5678 directly to the internet. The compose file above enforces this by giving n8n no published host port, so only containers on the Compose network can reach it.
- Docker network isolation. PostgreSQL and n8n talk over the internal Compose network. Your database port is never published on the host, so it’s never reachable from outside.
- Strong authentication. Use a strong owner password, and turn on two-factor authentication; n8n’s security guide lists 2FA among its recommended protections for self-hosted instances.
- Regular updates. Update the version tag in your compose file, then pull and restart (step 9). Read the changelog first, because n8n updates can include breaking changes.
- Backups you’ve actually restored. Steps 10 and 11 give you the schedule and the test. A backup you’ve never tested is a hope, not a plan.
One more thing to watch that’s not strictly security-related but will make a big difference. n8n saves the input and output of every execution to its database by default. Pruning is on by default: n8n deletes executions older than 336 hours (14 days), or once you pass 10,000 stored executions. A busy instance can still bloat PostgreSQL in the meantime.
If your workflows are chatty, tighten it: set EXECUTIONS_DATA_MAX_AGE=168 to prune execution data older than seven days (the compose file above already does), or skip storing successful runs entirely with EXECUTIONS_DATA_SAVE_ON_SUCCESS=none.
What Are the Trade-Offs of Self-Hosting vs. n8n Cloud?
Self-hosting n8n gives you an instance with no execution quota and control over the data it stores, for the cost of a small VPS plus your own administration. n8n Cloud gives you zero server maintenance, with execution caps by tier. The choice comes down to whether you want to own your automation infrastructure or pay someone else to run it.
The n8n documentation puts it this way: “n8n recommends self-hosting for expert users. Mistakes can lead to data loss, security issues, and downtime. If you aren’t experienced at managing servers, n8n recommends n8n Cloud.”
Here’s how the two options compare:
| Factor | Self-Hosted | n8n Cloud |
| Monthly cost | Your VPS bill plus any domain, backup storage, and administration costs (DreamHost Stack 4: $8.99/mo for 3 months, then $15.99/mo, as of August 2026; ExpressTech’s 2026 third-party estimates: $4–8/mo) | €20–50 (billed annually), by tier |
| Executions | No quota; capacity depends on your server’s resources | 2,500 (Starter) or 10,000 (Pro) |
| Setup | The 11-step walkthrough above | Minutes |
| Maintenance | Updates, backups, and monitoring are yours | Handled by n8n |
| Data location | Your server | n8n’s infrastructure |
| Updates | Manual (update the tag, pull, restart) | Automatic |
| TLS | Caddy obtains and renews certificates automatically (issuer such as Let’s Encrypt or ZeroSSL) | Handled for you |
| Scaling | Add RAM, or use queue mode with Redis workers | Upgrade plan tier |
There’s also a middle ground worth knowing about. Managed platforms like PikaPods (around $3.80/month) and Elestio (around $17/month, per ExpressTech’s comparison) run self-hosted n8n without you managing the server yourself. These services can reduce server-administration work, although you should verify who handles n8n updates, backups, monitoring, and security.
But here’s the bigger picture. On any hosted plan, your execution capacity is a billing tier, and the platform sets the tiers. Prices, quotas, and features can change around workflows you’ve already built.
With self-hosting, the instance and the data it stores sit on infrastructure you control (connected services still receive whatever your workflows send them). Full control, full responsibility.
Making the Final Call
Self-hosting makes sense when three things line up:
- You’re running enough automations that cloud execution caps would pinch
- You want your workflow data on infrastructure you control
- You (or someone on your team) is willing to own updates, backups, and monitoring
Otherwise, n8n Cloud is a reasonable call. Paying for the Starter plan to avoid ever thinking about Docker logs is a fair trade, especially for a small team that just wants their automations to run.
But once you’re ready to cross the self-hosting threshold, the math gets decisive fast. A 4 GB VPS is a practical, if unbenchmarked, starting point; production capacity depends on concurrency, data volume, and the nodes you use, so monitor the instance and scale it as demand grows. Start small, upgrade as your workflows grow, and keep full control of your stack.
That last part matters more than it might seem. You can always move up to a bigger server. It’s a lot harder to untangle yourself from a SaaS platform after it changes its pricing around the workflows you’ve already built.

Own Your Entire Stack. Apps, AI, Databases, and More.
Keep every credential and conversation on a server you control, with NVMe speed and unmetered bandwidth built in.
Explore VPS Hosting PlansFrequently Asked Questions About Self-Hosting n8n
Is n8n really free to self-host?
The n8n software is free to run on your own server under the Sustainable Use License. The self-hosted Community edition (the standard version n8n publishes on GitHub) has no n8n licensing or execution fees for permitted uses such as internal business automation. The “free” part is the software; you’ll still pay for your server, plus any domain, backup storage, and administration time.
The license restricts selling a product, service, or module whose value derives entirely or substantially from n8n functionality. Review n8n’s license FAQ if your intended use involves offering n8n-powered functionality to customers.
What are the minimum system requirements for n8n?
n8n publishes example sizing rather than a hard minimum, and labels those figures illustrative (they come from its OEM deployment docs): roughly 100 MB of memory at idle, an example memory range of 320 MB–2 GB, and a 512 MB–4 GB SSD-backed database. As a cautious starting allocation rather than an official n8n minimum, consider 2 GB for testing and 4 GB when adding PostgreSQL and production workflows, then monitor and add memory when sustained pressure appears.
DreamHost’s VPS Hosting Stack 4 plan provides 4 GB of RAM with NVMe SSD storage and full root access for running self-hosted applications like n8n. See VPS Hosting plans for details.
Use PostgreSQL instead of SQLite for production, and prefer SSD storage because n8n lists it as a database best practice.
Can I run n8n locally instead of on a VPS?
Yes — a single Docker command runs n8n on your own machine, and it’s a great way to test workflows before committing to a server. The catch is webhooks: workflows triggered by external services need your instance to be reachable from the internet, which a laptop behind a home router isn’t by default. Port forwarding, VPNs, and tunnels can work around that, each with its own setup and security trade-offs.
n8n offers a tunnel service to relay webhooks to a local instance, but its Docker documentation is blunt that the tunnel is “only meant for local development and testing” and shouldn’t be used in production. For anything that runs around the clock, use a VPS.
Can I migrate from Zapier to n8n?
Don’t expect a one-click import. Plan to rebuild your workflows in n8n’s visual editor rather than importing them from Zapier.
The good news: n8n has 400+ integrations, but check every app, trigger, and action your current workflows use before planning the migration. Simple workflows rebuild quickly; complex multi-step sequences take longer.
How do I update a self-hosted n8n instance?
Edit the version tag in your docker-compose.yml to the release you want, then run docker compose pull followed by docker compose up -d. With a pinned tag like docker.n8n.io/n8nio/n8n:2.36.7, pulling alone changes nothing — you choose each upgrade by changing the tag, which is the point of pinning. (If you use the latest tag instead, a pull-and-restart is all it takes, but every restart becomes a surprise upgrade.)
Back up your PostgreSQL database before major version updates. The backup script from the walkthrough above handles it, or run pg_dump in the PostgreSQL container directly.
Careless updates break things, and n8n releases a new minor version most weeks. n8n’s own update instructions tell you to check the breaking-changes changelog before upgrading, so read it before you pull. The restart itself is quick; reading the changelog is the part that deserves your time.
Is self-hosted n8n secure enough for business data?
Self-hosting gives you control over where n8n stores workflow definitions, credentials, and execution data. However, connected services still receive any data your workflows send to them, and securing the server remains your responsibility.
Follow the six-point checklist from the security section above: HTTPS, firewall, Docker isolation, strong auth with 2FA, regular updates, and tested backups. The n8n team maintains a security guide covering additional production considerations, from security audits to two-factor authentication.
