How to Migrate Your WordPress Website to DreamHost (In 6 Steps)

Choosing a web host is typically one of the first decisions you’ll make when setting up your website. However, over time you may come to regret your choice of provider. If this happens, you’ll be faced with the prospect of migrating your website from one host to another.
Fortunately, that process is more straightforward than it might first appear. This is especially true if you’re moving your WordPress site to a host that will provide a better, safer home for it — like DreamHost! What’s more, this can be done in just a few steps, thanks to our new Automated Migration plugin.
In this article, we’ll show you how to easily migrate your site to DreamHost in six steps using our plugin. We can’t wait to show you how it works, so let’s dive right in!
Leave your current hosting hassles behind and get back to focusing on what matters most. Move to DreamHost today with our free, automated migration plugin.Easily Migrate Your WordPress Site

Why You Might Want to Migrate Your WordPress Website
When we talk about migrating your website, we mean moving it from one web host to another. Typically, one of the first things you’ll do when creating a new site is to sign up with your chosen hosting provider.
Typically, they’ll take care of getting your site online, so people are actually able to visit it.
However, if you decide you want to move your site to a different host after it’s been functioning for a while, you’ll need to migrate all your files and database information.
There are many reasons why you might want to migrate your WordPress site to a different host, including:
- Your website has grown over time, and you need more options, functionality, or space to keep up with it
- Your current host doesn’t provide the security features or support options you’re looking for
- Your site is experiencing poor performance or a lot of downtime
If you feel it’s time for a change, whether due to the above reasons or something else entirely, your first step will be to find a new host that’s a better fit. You should look for one providing excellent performance and uptime, plenty of flexibility and “scalable” options, and top-notch security and support.
Here at DreamHost, we offer hosting plans that meet all of these criteria and more. You can choose from affordable shared hosting packages, or opt for DreamPress — a fully-managed solution. Either way, you’ll benefit from great performance, lots of useful, WordPress-specific features, and expert support.
Best of all, migrating your site to DreamHost is a simple process when you use our Automated Migration plugin.
Related: 12 Reasons Why Your Website Is Slow (And How to Fix Them)
Introducing DreamHost Automated Migration

If you’ve decided to migrate your WordPress website, you have several options. As we mentioned above, you can often have your new host take care of the process for you. Advanced users may be interested in manual migration options, such as using WP-CLI. However, in many cases, the simplest option is to use a plugin.
That’s why we worked with the team over at BlogVault to create a tool specifically designed to help you migrate your site to DreamHost. With DreamHost Automated Migration, not only do you get the ease of using a plugin, but you also know that your migration will be tailored to our hosting services. This also means you won’t have to take the extra step of cloning your website before you move it.
Key Features:
- Enables you to move or migrate your WordPress site to DreamHost.
- Lets you copy your files and database over to your new hosting account without cloning your site separately.
- Only requires six simple steps, from installation to migration.
This really is the simplest way to migrate your website and know that it will fit right into your DreamHost account.
Pricing: The DreamHost Automated Migration plugin is available for free to DreamHost account holders. This means that if you’ve recently switched to DreamHost or are considering it, your migration process just got easier and a whole lot more budget-friendly!
How to Migrate Your WordPress Website to DreamHost (In 6 Steps)
Now that we’ve covered the basics, it’s time to discuss how to actually perform your site migration. The six steps below will help you move your site from your current hosting provider to your new DreamHost plan.
Step 1: Prepare for the Migration Process
Migrating your site to DreamHost (or any web host) is a fairly simple process. However, there are a few tasks you’ll want to take care of before proceeding:
- Make sure you’ve updated your WordPress installation to the most recent version.
- Check your themes and plugins to ensure that they’ve all been updated or deleted if no longer in use.
- Choose and purchase a DreamHost plan, or add hosting to your existing DreamHost domain.
After you have all of the above items in place, you’re ready to get started!
Step 2: Locate Your Migration Key in Your DreamHost Account
Once you’ve established your account, log into your user panel and navigate to the Free Migration tab directly from your Home page.
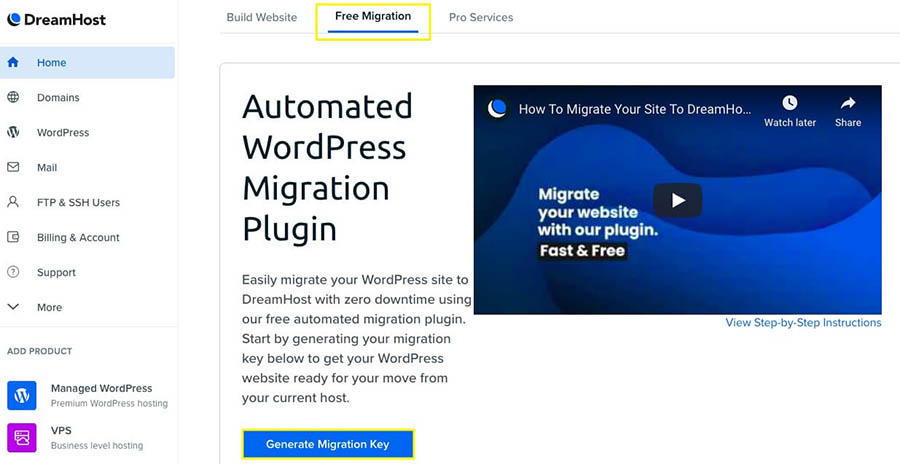
There, you’ll see where you can click on Generate Migration Key. You’ll need this to complete the migration process. Once you select it, your key will appear below the button.
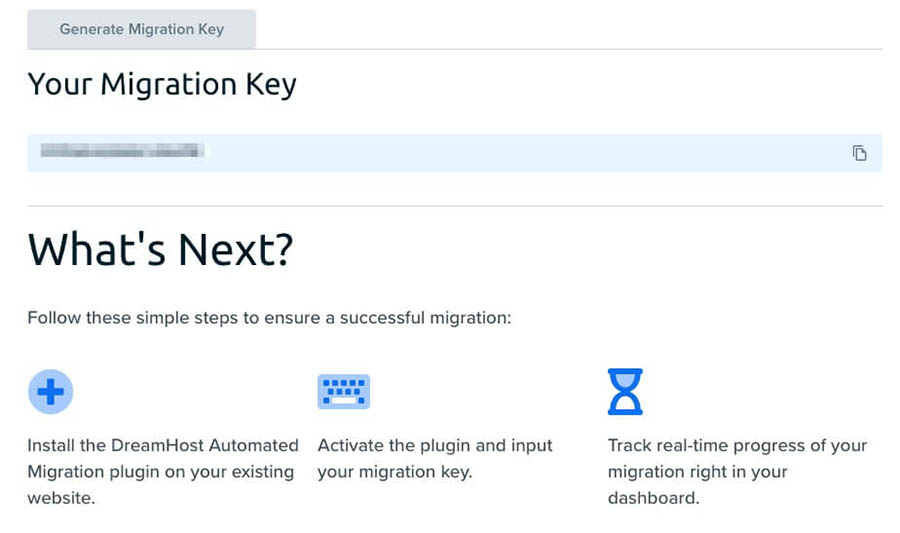
You’ll need this information for the next step, so it’s best to leave your browser tab open for easy access. It’s important to note that the migration key generator is not available on Virtual Private Servers (VPSs) or dedicated hosting plans. Keys can be requested by contacting our support team or you can manually enter your host details.
If you have a shared plan where you host more than one website, you may not see the generator in your account. If that’s the case, you’ll need to contact our support team to request your migration key or any additional keys you may need.
Locating Your Migration Key in DreamPress Accounts
It’s important to note that for DreamPress accounts, this process is the same, but your migration option will be located in a different place. In your user panel, you’ll go to WordPress > Managed WordPress in the left-hand menu. You’ll then find a Migration tab among your options.
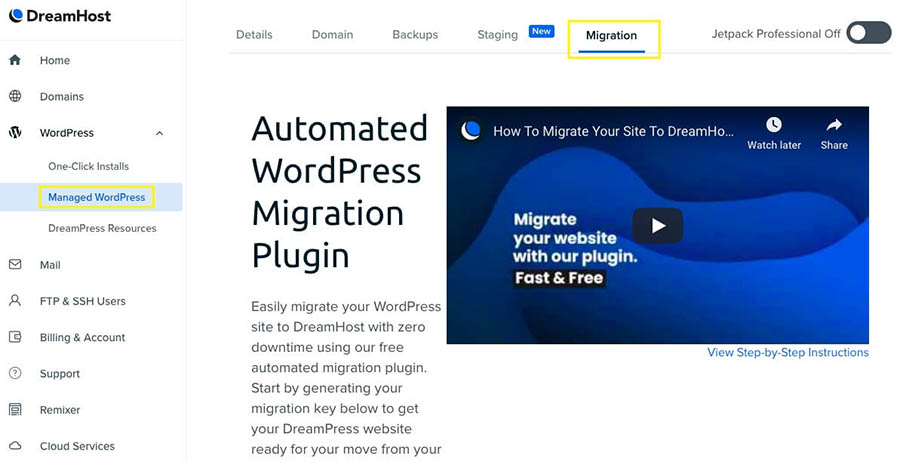
Next, you’ll see the Generate Migration Key button. Click on this, and you’ll receive your unique key to be used during the migration process. This is the key our plugin needs to access and move your site’s files and database.
It’s recommended that you leave this page of your user panel open, and head over to your WordPress website by opening another browser tab.
Step 3: Install the Free DreamHost Automated Migration Plugin
In your WordPress website dashboard, navigate to Plugins > Add New and use the Search field to find the DreamHost Automated Migration plugin.
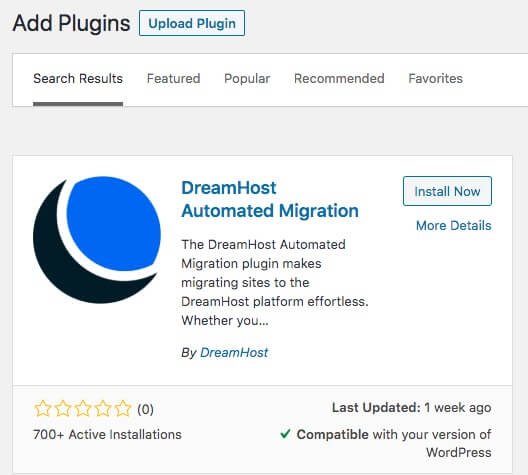
Click on Install Now, and then Activate the plugin once the installation is complete.
Step 4: Use Your Migration Key to Start Your Migration
You’ll recall that we recommended leaving your DreamHost user panel open in another tab. Now you’ll go back to that tab, copy your migration key, and head back to WordPress.
You’ll see a DreamHost option in your left-hand menu. Click on that, and you’ll be able to add your migration key.
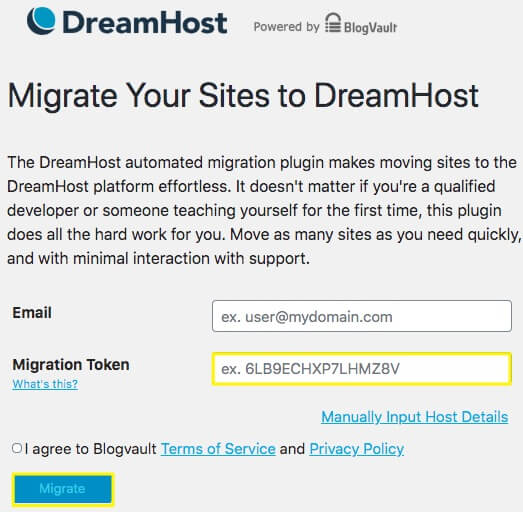
Paste the migration key from your DreamHost account into the Migration Token field. You’ll need to agree to our partner BlogVault’s Terms of Service as well. Once you check that box, click on Migrate.
Step 5: Track the Progress of Your Migration
Next, you can either wait for an email from the DreamHost team or watch the progress of the migration in your WordPress dashboard. This will let you know when your migration is complete.
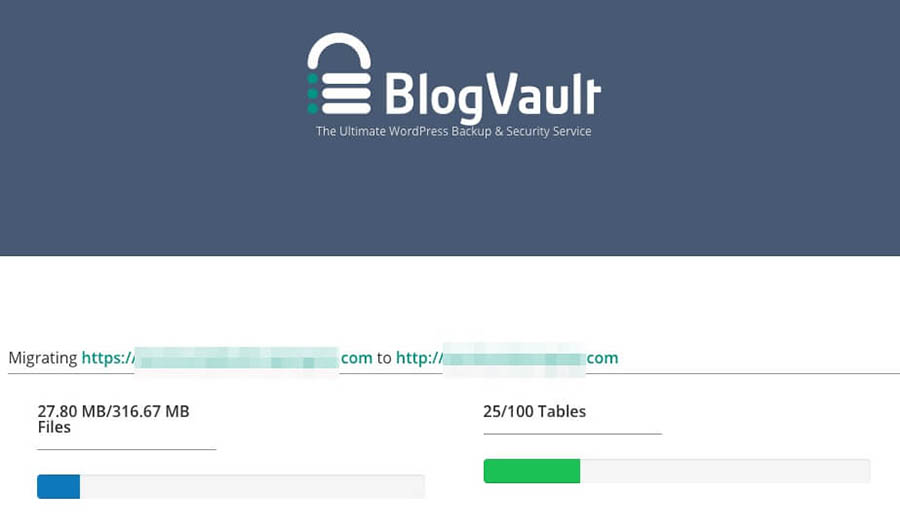
Additionally, if there are any issues with your migration, you’ll receive the relevant information on this screen.
Step 6: Update Your DNS Records
Once you receive notice that your site has been successfully migrated, you should review it within your DreamHost account. If your domain is the same at DreamHost and your old host, you can review this by adding “dream.website” to the end of your DreamHost domain. If you’ll be using a different domain name at DreamHost or are using a temporary subdomain, visit our knowledge base for additional steps.
You’ll also want to make sure that your domain is pointing to your newly-migrated website. This means updating your Domain Name System (DNS) information.
You can find DreamHost’s DNS address by going to Domains in your user panel and clicking on DNS underneath your domain.

Providing this DNS information to your existing domain registrar will ensure that your domain is pointed at the correct web content, now hosted with us at DreamHost.
That’s it! Your migrated site should now be up and running. It’s a smart idea to test your new site thoroughly and make sure everything has been transferred correctly. Then you can delete your old site, and enjoy your new quality hosting with DreamHost.
Migrating a website is complicated, but we’ve done it a million times. Our Website Transfer service will move your site seamlessly — without disrupting your business.Move to a Speedy New Hosting Server

It’s Simple to Switch Web Hosts
Migrating your website to a new host might be a bit of a hassle, but it can be well worth it in the long run. If your current host isn’t up to par, you’ll want to switch to a new host that provides the performance, stability, and security your site needs to thrive. Plus, WordPress users will find that the process can be handled easily using our own Automated Migration plugin.